Decadent Black Velvet Cake for Special Moments
Ready to impress? Bake Black Velvet Cake for Special Moments. This cake balances rich cocoa and a luscious cream cheese frosting—perfect for any celebration!

A Love Letter to Black Velvet Cake
Let me take you back to a cozy kitchen filled with laughter and the sweet smell of chocolate wafting through the air.
Picture me, a little kid, standing on a chair trying to help my grandma whip up her famous black velvet cake .
I can still feel the warm hugs she’d give me in between those baking sessions, and honestly, it made the cake taste even sweeter.
Now, every time i put on my apron to bake black velvet cake for special moments , i’m not just baking a cake; i’m creating memories, and i know you will too!
So, why should you care about this delightful, rich chocolate dessert? well, let me tell you—this black velvet cake recipe has roots that go deep, sprinkling a little joy into every celebration.
You’ve probably heard of red velvet, but this decadent twist draws on the same velvety texture, blending chocolate and cocoa powder for a depth that takes your taste buds straight to heaven.
Over the years, it’s become one of those go-to cakes for birthdays, anniversaries, and everything in between.
Let’s Break It Down
Alright, let’s chat about the nitty-gritty of this cake. the total time to whip up this beauty is about an hour and twenty-five minutes.
Sure, it’s not lightning-fast, but who said that good things come easy? it yields about 10-12 servings , which is perfect for any gathering—whether it’s a birthday bash, an intimate dinner party, or just a day that ends with a “why not?” it’s a medium difficulty recipe, so don’t sweat it! if you have a handful of basic baking skills and a splash of patience, you’re golden.
Cost-wise, you’re looking at a pretty decent budget. most ingredients are staples you might already have in your kitchen. flour, sugar, cocoa—you can grab these without breaking the bank.
And because this cake serves quite a few, you’ll definitely get your money's worth!
Why This Cake Rocks
Now that we’ve set the stage, why is black velvet cake such a stunner? let’s talk health benefits and nutrition highlights .
Sure, it’s a dessert and not a salad, but it does boast some perks! the use of buttermilk gives it that moist cake vibe, adding a little tang that pairs delightfully with the rich chocolate flavor profile.
Plus, with that velvety cream cheese frosting , you’re looking at something that not only tastes good but also keeps your palate dancing.
When it comes to special occasions, this cake is like the life of the party. it’s unique and eye-catching—who wouldn’t be drawn in by that deep, dark color? it definitely stands out next to similar recipes.
You’d rather show up to a gathering with this showstopper instead of another plain old vanilla cake, right?
You can even bring this beauty to a potluck or a family gathering and be the hero of desserts . because let’s be real, every gathering needs a decadent cake for special occasions .
It elevates not just the dessert table but also the whole vibe of the celebration.
Before You Start Mixing
As you're prepping to create this magic, you're going to need a few things on hand. expect to gather some baking essentials like flour, sugar, cocoa powder, and of course, those special baking tools that make everything easier, like an electric mixer and 9-inch cake pans.
Don't worry if you don't have them all; some basics can easily be borrowed from a friend or neighbor!
So, if you’re ready to dive into this luscious adventure and learn how to make black velvet cake , grab your ingredients.
With a little bit of love and a whole lot of chocolate, you’ll have the perfect cake to treat your family and friends.
Up next, we’ll unwrap the ingredient list so we can get baking! trust me, this cake will be worth every moment.
Your Essential Ingredients Guide for Baking Beautiful Cakes
Baking a decadent black velvet cake for special moments can seem daunting at first, but it all starts with having the right ingredients and knowledge on hand.
Let's break it down into bite-sized pieces, so you can whip up that cake like a pro!
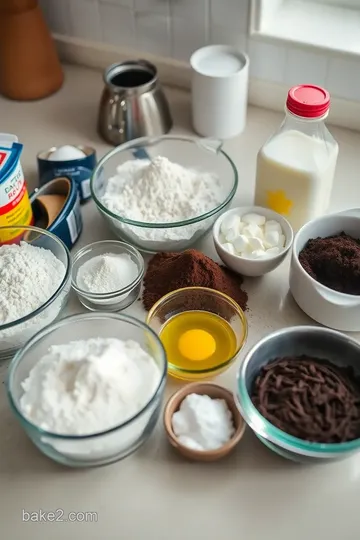
Premium Core Components
First things first, let's talk about your essential ingredients . A good cake relies on a solid foundation. Here’s a quick checklist to make sure you have everything down pat:
-
Detailed measurements: you’ll want 2 ½ cups (310g) of all-purpose flour and 1 ¾ cups (350g) of granulated sugar in your pantry.
For the chocolate lovers out there, don't forget ¾ cup (75g) of unsweetened cocoa powder . trust me, you don’t want to skip the chocolate in your black velvet cake recipe !
-
Quality Indicators: Freshness matters. Check your flour for any odd smells or pests—yikes! The cocoa should be rich and dark without any weird lumps.
-
Storage guidelines: keep your dry ingredients in a cool, dark place. you’ll want them to be at their best when you're ready to bake.
Most will last for about 6 months if stored properly.
-
Freshness Tips: Always buy your eggs, milk, and butter from a reliable source. You don’t want last week’s eggs bringing your cake down!
Signature Seasoning Blend
Next up is the all-important signature seasoning blend . This is where the magic happens!
-
Essential Spice Combinations: For our cake, just a pinch of salt makes all the difference. It enhances that chocolate flavor profile!
-
Herb Selections and Pairings: While herbs aren't typically in black velvet, a splash of vanilla extract can totally transform the vibe. It also works wonders in our velvety cream cheese frosting!
-
Flavor Enhancers: Ever tried a bit of espresso powder in your chocolate cake? It's like a secret handshake that elevates your flavor experience!
-
Regional Variations: Love a twist? Consider adding a zesty orange zest or a hint of espresso for that added oomph.
Smart Substitutions
We all have those moments when we realize we’re out of something. Don’t panic! Here are some smart substitutions :
-
Common Alternatives: Don’t have buttermilk? Mix a cup of milk with a tablespoon of vinegar or lemon juice. Voila!
-
Emergency Replacements: Out of eggs? For every egg, you can use 1/4 cup of unsweetened applesauce instead.
-
Dietary Modifications: Going vegan? You can make a vegan Black Velvet Cake easily with plant-based alternatives. Just swap eggs for flaxseeds or applesauce!
-
Seasonal Options: Fresh berries in season? Top your cake with some for a pop of color and fresh flavor.
Kitchen Equipment Essentials
Last on our list is your kitchen equipment essentials . You’re gonna need a few tools for that masterpiece:
-
Must-Have Tools: A good set of mixing bowls, 2 (9-inch) round cake pans , and an electric mixer are game-changers.
-
Alternative Equipment Options: Don’t have a stand mixer? No biggie! A whisk works fine, though it takes a bit more elbow grease.
-
Preparation Tips: Make sure to preheat your oven to 350° F ( 175° C) before starting. You want that perfect bake.
-
Storage Solutions: Store leftover cake in an airtight container in the fridge. It’ll keep for about 3 days but let's be real, it probably won’t last that long!
Baking is a personal experience, and trust me, your black velvet cake is destined to bring smiles to any celebration.
So roll up your sleeves, gather these essential ingredients, and let's dive into the sweet world of flavors! in the next steps, we’ll go through how to make that rich, moist cake and bring your dessert dreams to life.
Stay tuned for some drool-worthy instructions!
Elevating Your Baking Game: Professional Cooking Method
When it comes to whipping up something special, like a black velvet cake for special moments , there’s a lot more magic happening behind the scenes than you might think! i'm here to share the professional cooking methods that can turn your home baking into a culinary celebration.
Essential Preparation Steps
Let’s dive into the nitty-gritty! first up, we've got mise en place —fancy french for “everything in its place.” this means gathering and prepping all your ingredients before you even think about turning on that oven.
Think of it as setting the stage for the spectacular performance that is your cake.
Next, let’s talk time management . being organized is key. allocate about 25 minutes for prep and 30 minutes for chilling your frosting.
Keep an eye on the clock! it’s not just about baking; you want your cake to be perfect. set reminders if you have to, or use an old-school timer—whatever helps!
Safety first! always remember to wash your hands and your tools after handling raw ingredients. let’s face it: the last thing anyone wants is a side of germs with their moist cake recipe .
Step-by-Step Process
Here's how to nail it step by step.
- Preheat the oven to 350° F ( 175° C) . This is crucial so that your cake rises perfectly.
- Grease and line your cake pans. You want the cake to slide out without a fight.
- Mix your dry ingredients—flour, sugar, cocoa powder, and my secret weapon, baking soda.
- In another bowl, combine your wet ingredients like buttermilk, eggs, and a splash of vinegar. The vinegar reacts with the baking soda, giving it that perfect lift!
When it’s time to combine, don’t overmix. just stir until everything is combined. and for doneness? stick a toothpick in that cake after about 25- 30 minutes.
if it comes out clean, you're golden!
Expert Techniques
Now for the fun stuff—the expert techniques! keep an eye on temperature control : that oven needs to be at the right heat.
Too hot and your cake might burn; too cold and it becomes a floppy mess.
While baking, here are some quality checkpoints to keep in mind. look for that beautiful domed shape. if you see cracks, it’s a sign of overmixing.
Do a little troubleshooting and adjust your mixing technique!
Success Strategies
Listen up—here are the common mistakes to avoid : always check the expiration date on your baking powder. an expired ingredient can ruin the stars of your cake.
And whatever you do, don’t forget the chilling step before you frost!
When you get everything just right, all your efforts will yield perfect results . want to prep ahead? bake the layers a day before and wrap ’em tightly.
Just add frosting the next day for easy assembly.
Conclusion: Additional Information
Baking takes practice, but with these professional cooking methods under your belt, you’ll feel like a pro. the goal? to make and celebrate with a stunning black velvet cake ! each step you take—from cake preparation techniques to layer assembly —gets you closer to that dreamy slice of decadence.
So what are you waiting for? channel your inner chef and bring that chocolate flavor profile alive in your kitchen! trust me, once you’ve baked this cake, you won’t just get smiles—you’ll get requests to bake it again and again.
Happy baking!
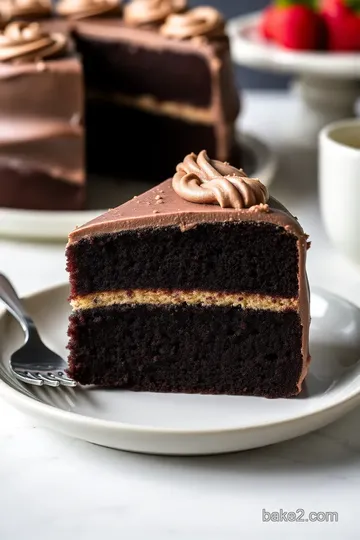
Bake Black Velvet Cake for Special Moments
When it comes to celebrating special moments , nothing says “let’s party” like a decadent dessert. and trust me—this black velvet cake recipe is the perfect centerpiece for any gathering.
It’s rich, chocolatey, and just the right amount of fancy. plus, it's so moist due to that buttermilk magic! let's dive into some pro tips to ensure your cake is not just good, but freaking amazing!
Pro Tips & Secrets
First things first— chill out before you start. sure, baking can be a bit of a whirl, but taking a breather helps.
For a super easy black velvet cake that impresses without stressing you out, remember these insider tips:
-
Room Temperature Ingredients: Always bring your ingredients to room temperature before mixing. This helps everything combine smoothly, making for a light, fluffy cake.
-
Time-saving techniques: if you want to save time on the day of baking, consider baking the layers a day ahead.
Wrap 'em tightly in plastic wrap and pop them in the fridge. the next day? easy cake assembly!
-
Flavor Enhancements: Wanna kick up those flavors? Add a teaspoon of espresso powder to your dry ingredients. It’s like a secret weapon that amplifies that chocolate flavor profile without tasting like coffee!
-
Presentation Tips: Don't skimp on frosting! A thick layer of that velvety cream cheese frosting makes everything better. Plus, consider using an offset spatula for nice, clean edges.
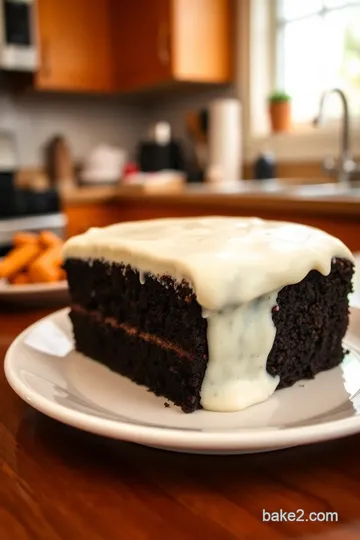
Perfect Presentation
Alright, once you’ve got your Black Velvet Cake baked and frosted, it’s time to make it look STUNNING.
-
Plating Techniques: Use a cake stand for a dramatic effect. Elevating your cake makes it feel special, don’t you think?
-
Garnish Ideas: Fresh raspberries or mint leaves on top not only add color but also a delightful fresh contrast.
-
Color Combinations: The deep black of the cake paired with a bright white frosting is visually pleasing. If you wanna get extra with it, add edible gold leaf for that wow factor!
-
Visual Appeal Tips: Consider a simple dusting of cocoa powder on top for a chic finish.
Storage & Make-Ahead
Got leftovers? No problem. This cake stays fab with just a few simple tips.
-
Storage Guidelines: Keep your frosted cake in an airtight container in the fridge for up to a week. I mean, you want to savor it, right?
-
Reheating Instructions: If you like it warm (and who wouldn't?), just pop a slice in the microwave for about 15-20 seconds. Boom; it’s like fresh out of the oven again!
-
Freshness Duration: While it’s best enjoyed fresh, the cake can hold its own for about 5-7 days. If the frosting sits longer, it might lose some fluffiness.
Creative Variations
Bored with the standard recipe? Let’s get creative!
-
Flavor Adaptations: Want a little twist? You can substitute a layer of chocolate ganache for the frosting if you’re feeling indulgent.
-
Dietary Modifications: Make it vegan by swapping eggs with flaxseed meal and using a plant-based cream cheese for frosting.
-
Seasonal Twists: Toss in some pumpkin spices for a fall variation.
-
Regional Variations: Experiment with adding some cowboy coffee if you want a Southern twist!
Complete Nutrition Guide
Let’s address the nitty-gritty, shall we?
-
Detailed Breakdown: This cake has about 450 calories per slice . Not too shabby for such a rich dessert!
-
Health Benefits: The cocoa powder offers some antioxidants, but let’s not kid ourselves—this is definitely more of a treat than a health food.
-
Dietary Considerations: For those watching sugar intake, be wary !
-
Portion Guidance: Usually serves around 10-12 people, so it's great for gatherings.
Expert FAQ Solutions
Oh, the questions I’ve had—and still have! Here’s a few common ones I've heard while whipping up this Black Velvet Cake.
-
What if my cake collapses? Make sure your oven is at the right temp. An oven thermometer can be a lifesaver.
-
How can I keep my layers from sticking? Don't forget the parchment paper; it's a total game-changer.
-
What if I need to make a larger cake? Just double the recipe and use a larger pan—simple as pie… or cake?
Encouraging Conclusion
In the end, this decadent cake for special occasions is not just about the taste; it’s about bringing people together.
Whether it’s a birthday, an anniversary, or just because you feel like it, this black velvet cake is sure to please.
So, grab your mixing bowls and bake this beauty to celebrate your special moments . trust me; you won’t regret it! happy baking!
Decadent Black Velvet Cake for Special Moments Card
⚖️ Ingredients:
- 2 ½ cups (310g) all-purpose flour
- 1 ¾ cups (350g) granulated sugar
- ¾ cup (75g) unsweetened cocoa powder
- 1 ½ teaspoons baking soda
- 1 teaspoon baking powder
- ½ teaspoon salt
- 1 ½ cups (360ml) buttermilk, at room temperature
- 1 cup (240ml) vegetable oil
- 2 large eggs, at room temperature
- 2 teaspoons vanilla extract
- 1 teaspoon white vinegar
- 1 teaspoon black food coloring (optional)
- 1 cup (230g) unsalted butter, softened
- 8 oz (225g) cream cheese, softened
- 4 cups (480g) powdered sugar
- 2 tablespoons (30ml) heavy cream (optional)
- 1 teaspoon vanilla extract
🥄 Instructions:
- Step 1: Preheat the oven to 350°F (175°C). Grease and flour the pans, lining the bottom with parchment paper.
- Step 2: In a large bowl, whisk together flour, sugar, cocoa powder, baking soda, baking powder, and salt.
- Step 3: In another bowl, mix buttermilk, vegetable oil, eggs, vanilla, vinegar, and food coloring.
- Step 4: Gradually add the wet mixture to the dry, stirring until just combined. Avoid overmixing.
- Step 5: Distribute batter evenly between prepared pans. Bake for 25-30 minutes, or until a toothpick inserted comes out clean.
- Step 6: Let the cakes cool in pans for 10 minutes, then transfer to a cooling rack to cool completely.
- Step 7: Beat together softened butter and cream cheese until smooth and creamy. Gradually add powdered sugar and mix until combined.
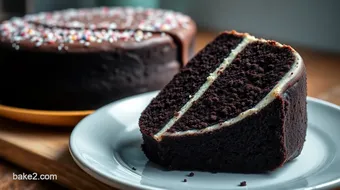
- Step 8: Level cooled cake layers, if necessary. Spread frosting between layers, and frost the top and sides of the cake.
- Step 9: Refrigerate for about 30 minutes to set the frosting before slicing.
Previous Recipe: How to Bake Vegan Chocolate Chip Cookies Quickly: My Family's Softest Recipe
Next Recipe: How to Mix Black Food Coloring in 15 Minutes: My Kitchen-Tested Secret