Deliciously Dairy-Free Coffee Layered Cake
Looking for an impressive dessert? This Bake Coffee Layered Cake - Deliciously Dairy Free is moist, rich, and perfect for any celebration. Trust me, your taste buds will thank you!

- Welcome to the World of Baking: A Personal Journey
- What’s the Story Behind This Delight?
- Why This Cake Rocks
- Ready to Get Baking?
- Essential Ingredients Guide
- Mastering the Art of Professional Cooking
- Pro Tips & Secrets
- Perfect Presentation
- Storage & Make-Ahead
- Creative Variations
- Complete Nutrition Guide
- Expert FAQ Solutions
- Recipe Card
Welcome to the World of Baking: A Personal Journey
Okay, friends, let me take you back to one of those rainy afternoons when i was stuck in the house, itching to bake something special.
With the smell of fresh coffee wafting through my kitchen, the idea popped into my head: why not revamp a classic? that's when i decided to whip up a bake coffee layered cake - deliciously dairy free .
Honestly, nothing beats the combination of coffee and cake, right? it's like two of my favorite things collided in the best way possible.
Now, i know we all have different dietary needs or preferences. maybe you're vegan, gluten-free, or just trying to avoid dairy for whatever reason.
Well, you’re in the right place! this cake ticks all those boxes, bringing together layers of moist, coffee-infused goodness and a dreamy dairy-free frosting.
Trust me; even your non-dairy friends will be fighting each other for a slice!
What’s the Story Behind This Delight?
Let’s dive into where this beauty came from. coffee cakes have been around for ages, but this one stands out thanks to its dairy-free twist.
While traditional coffee cakes are often buttery and rich, we’re taking a modern approach with ingredients like almond flour and plant-based milk.
They say necessity is the mother of invention, right? the rise of plant-based diets has made dairy-free baking popular, and this cake fits perfectly in today’s dessert scene.
If you’re wondering about the time commitment , let’s break it down. you’re looking at about 20 minutes for prep and 30 minutes for baking .
Throw in a little cooling time, and you’re about an hour and a half total before you taste this delish treat.
And don’t worry; it’s not rocket science! if you can mix, pour, and frost, you can handle this recipe.
Cost-wise, this is budget-friendly. the ingredients, most available at your usual grocery store, won’t break the bank. and with enough slices to serve around 8 people , it's perfect for gatherings with friends or a simple family dinner.
Why This Cake Rocks
Aside from the obvious deliciousness, let’s chat about the health benefits . with almond flour , you’re sneaking in some extra protein and healthy fats.
Plus, swapping out conventional dairy means you can enjoy the cake without feeling heavy afterward. you can call it a win for both your taste buds and your waistline.
Perfect for special occasions, this layered cake is definitely a show stopper. seriously, bring this to a gathering, and everyone will be asking for the recipe .
What’s even cooler is that it’s versatile. need something nut-free? just switch the almond flour for more all-purpose flour. baking magic , right?
So, if you’re keen to impress at your next birthday bash or family get-together, this moist layered coffee cake will take center stage.
Plus, with coffee-flavored desserts being all the rage these days, you'll be the trendsetter among your friends!
Ready to Get Baking?
Now that you’re all hyped up about baking this cake, let's move on to the fun part. gather your ingredients, roll up your sleeves, and let’s start creating this masterpiece! just imagine how impressive it’ll be to serve up slices topped with fluffy vegan frosting and a sprinkle of cocoa powder.
Your coffee-loving friends will be in heaven!
Stay tuned for the ingredients and instructions coming up next. Trust me, this is one recipe you won’t want to miss!
Essential Ingredients Guide
Alright, friends! if you're ready to dive into the world of baking — particularly baking a cake that’ll have everyone at your party saying, “wow, can i get the recipe?” — you’ve come to the right place! today, we're talking about the bakery coffee layered cake - deliciously dairy free.
Let’s break down everything you need to create this scrumptious dessert that'll impress even the pickiest of eaters.
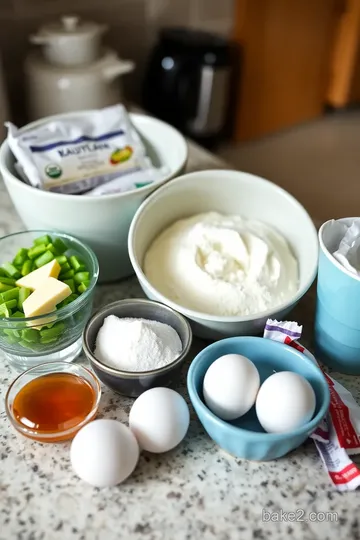
Premium Core Components
First things first, let’s talk about essential ingredients . having the right stuff on hand makes your baking journey way smoother.
Here’s your essential checklist with measurements in both us and metric, plus how to spot the good stuff and keep it fresh.
Flours: for our cake, we use 2 cups (240g) of all-purpose flour and 1 cup (100g) of almond flour . look for flour that feels soft and light.
Store it in an airtight container away from moisture — you want it fresh for those moist coffee cakes!
Dairy-free milk: whether you’re going with almond or oat, choose a milk that’s got a creaminess to it. you’ll need 1 cup (240ml) for the cake.
Keep it sealed in the fridge and check the expiry date to avoid a kitchen disaster.
Brewed coffee: yes, coffee is an essential too if you want that flavor punch. fresh brewed keeps it robust. you’ll need 1/2 cup (120ml) .
If you get distracted (it happens!), store leftover coffee in the fridge for a day. just don’t pull a “science experiment” on yourself; toss it if it smells off.
Dairy-free frosting: we’re whipping up 1 cup (240ml) of dairy-free whipping cream. again, fresh is best! make sure your cream is nice and chilled before whipping.
This way, you get those perfect stiff peaks that keep your frosting from being a melty mess!
Signature Seasoning Blend
Now let’s put some jazz into our cake with a signature seasoning blend . while our cake is heavenly as is, a little extra makes it shine.
Add a teaspoon of vanilla extract for sweetness and warmth. if you’re feeling adventurous, toss in a pinch of cinnamon! it pairs beautifully with coffee.
Smart Substitutions
Not everyone has a fully stocked pantry, and that’s totally cool! Here are some smart substitutions :
-
Egg substitute: out of eggs? no problemo! you can make a flax egg — just mix 1 tablespoon of ground flaxseed with 2.
5 tablespoons of water . let it sit until it thickens. boom, simple!
-
Nut-free cake options: if you or someone at your gathering has nut allergies, no need to fret. just replace almond flour with extra all-purpose flour.
The cake will still be moist and delicious!
Kitchen Equipment Essentials
Before we dive into baking nirvana, let’s cover those must-have tools . You’ll need:
- 2 x 8-inch round cake pans : Grab these for that fabulous layered presentation.
- Mixing bowls : You can never have too many!
And let’s talk preparation tips : Always, always grease your pans. No one wants their masterpiece stuck! And if you’re in a hurry, flouring them helps too.
Storage-wise? Get yourself some good plastic wrap or an airtight cake container. Trust me, you’ll want leftovers. And yes, reheating that slice in the microwave? Game changer.
Transitioning to Instructions
So, are you jazzed about making this moist layered coffee cake yet?! perfect! our next step will be heading into the baking instructions.
Stick around for a step-by-step process that'll guide you through creating the bake coffee layered cake - deliciously dairy free .
You'll amaze your taste buds (and everyone else’s) with this delightful treat!
Mastering the Art of Professional Cooking
When it comes to cooking, especially if you’re looking to nail that bake coffee layered cake - deliciously dairy free (trust me, it’s a game-changer), understanding professional cooking methods can take you to another level.
I’ve had my fair share of cooking experiences, and let me tell ya, a little preparation can transform a chaotically stressful kitchen adventure into something smooth and enjoyable.
So, let’s dive in!
Essential Preparation Steps
First things first, let’s chat about mise en place . this french term is a fancy way of saying “everything in its place.
” before you even think about turning on that oven, gather all your ingredients. trust me; you’ll feel like a rock star when you can just grab what you need without scrambling around.
It’s like checking your gear before a big game—super essential.
Now, let’s talk about time management. if you’re anything like me, timing can sometimes feel like a wild card. having a plan is key! i usually break down tasks.
For instance, while my cake is baking (aim for 25- 30 minutes at 350° f ) i’m whipping up the frosting.
That’s multitasking at its finest!
Organization strategies like using the right tools can make life easier too. an electric mixer for the frosting? yes, please! and if your workspace is tidy, you avoid those “oops, i forgot to add the sugar!” moments.
Lastly, safety is no joke! Keep oven mitts handy and watch out for hot surfaces. You want to avoid any mishaps when you’re assembling your moist coffee cake, especially when you’ve worked so hard on it!
Step-by-Step Process
Okay, let’s get to the meat of it: the baking! I swear by clear, numbered instructions . They keep me on track and feeling confident. Imagine this:
- Preheat your oven to 350° F (if you haven’t already).
- Grease and flour your cake pans . Seriously, don’t skip this step, or your cake will stage a dramatic escape!
- Move on to mixing dry ingredients. Sift that all-purpose flour and almond flour together with your baking powder and salt. Whisk it like you mean it!
- Combine wet ingredients in another bowl. My tip? Use freshly brewed coffee if you want that rich, earthy flavor to shine through in your cake.
- Now, mix until just combined —overmixing can be the enemy here!
Once everything's in the oven, you’ll set those timers like a pro! keep an eye on the cakes for doneness; a toothpick test will become your best friend.
When it comes out clean, it’s a winner!
Expert Techniques
Now, here’s where you can really channel your inner chef. for cool finishes, i add a layer of frosting between those cake layers.
Use a dairy-free whipped cream , which is a total game changer. if your frosting isn’t holding its shape, chill it a bit! a little cooling can do wonders.
For quality checkpoints , remember that letting your cakes cool completely before frosting saves you from getting a melty mess. I’ve learned this the hard way—don’t follow in my shaky frosting footsteps!
If you’re ever unsure, troubleshooting tips can often save the day. if your cake is too dry, next time, you might reduce the cook time or add an egg substitute for added moisture.
Success Strategies
Let’s chat about the elephant in the room—mistakes. We’ve all been there! The most common blunder? Forgetting key ingredients. Double-check your list! That alone can sort out a lot of baking grief.
For quality assurance tips , always taste your frosting before slathering it on. a little tweak here and there can elevate a decent layer to phenomenal.
So don’t shy away from adjusting to your own flavor preferences.
Looking to perfect your results? Make-ahead options work wonders! Bake your cakes a day or two prior and store them tightly wrapped. They’ll actually taste better after setting a bit!
In conclusion, diving into professional cooking methods not only makes baking a beautiful bake coffee layered cake - deliciously dairy free less daunting but also more enjoyable.
Embracing these techniques can elevate your culinary game. next up, we’ll explore some additional tips and tricks to keep your kitchen adventures fun and successful! stay tuned!
Pro Tips & Secrets
If you want your Deliciously Dairy-Free Coffee Layered Cake to taste like a bakery masterpiece, listen up! I’ve got some pro tips that’ll have you swerving through the kitchen like a pro.
First off, fresh coffee is a game changer. go for brewed coffee instead of instant. it really enhances the flavor.
You’d be surprised how much a simple switch can spice things up! and, while we’re at it, make sure you whip your dairy-free cream to stiff peaks for that perfect frosting.
It holds shape like a champ, trust me!
Thinking of time? rotate those cake pans halfway through baking. it ensures even baking and browning. oh! and let those layers cool completely.
I know the patience game can be tough, but it’ll totally pay off when you dig into a nice, clean slice.
Perfect Presentation
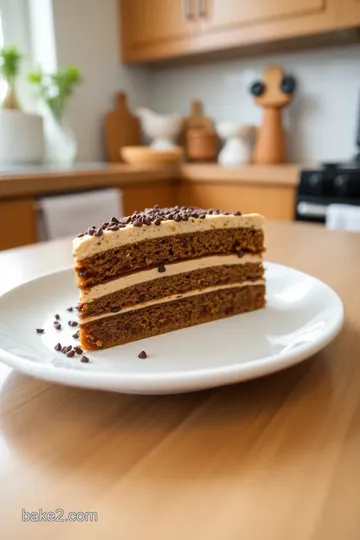
Alright, let’s chat about making this cake look as amazing as it tastes. plating techniques can take your cake from “meh” to “wow!” start with a simple layer of frosting between those tall, moist layers.
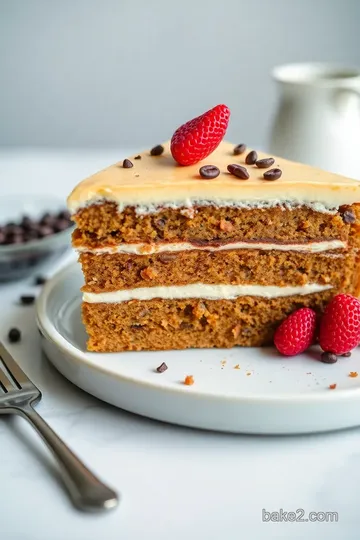
Think of it like giving your cake a nice little coat. a sprinkle of cocoa powder or some coffee beans on top? chef’s kiss ! it adds sophistication and a pop of flavor.
And don’t forget color! pair this rich, dark cake with fresh berries for a burst of color. it’s like having your cake and eating it too—visually and flavor-wise! just make sure to cut those slices with a sharp knife for a clean finish.
Remember, we eat with our eyes first!
Storage & Make-Ahead
Need to prepare ahead for a special occasion? no problem! your moist layered coffee cake can be stored in the fridge for about 3-4 days.
Just wrap it tightly with plastic wrap or store it in an airtight container. if you want to freeze it, do so before frosting—just wrap those layers separately.
They’ll be good for up to three months.
When it’s time to reheat, coat your slice in a little parchment paper and toss it in the microwave for about 15-20 seconds.
You’ll have a soft slice again, just like it was freshly made!
Creative Variations
Feeling adventurous? let’s switch things up a bit! why not try out some seasonal twists ? toss in a hint of cinnamon or nutmeg for a cozy, festive vibe.
Or even trade the coffee for some espresso shots to bring that energy level up for guests.
If you're playing the dairy-free baking game, you can turn this into a vegan masterpiece by swapping out the eggs with some flax eggs or applesauce.
And if you’re living that gluten-free life, almond flour is your bff here. party on!
Complete Nutrition Guide
You probably care about what you’re munching on, right? here’s the scoop! this cake packs in around 320 calories per slice.
It’s not just a treat; it has some healthy bits too. the almonds give you a boost of protein, and that dairy-free whipping cream? low in calories but oh-so-satisfying!
If you’re eyeing for something healthier, serve it with a fruit side. Adds vitamins along with that deliciousness!
Expert FAQ Solutions
Let’s wrap this up—here’s where I tackle those burning questions you might have. A common one: “Why isn’t my cake rising?” Well, it might be your baking powder. Make sure it’s fresh.
Another biggie: “can i substitute the coffee for something else?” absolutely! use a mocha or even hot chocolate mix for a fun twist.
Just remember, your baking game might need tweaks here and there.
So there you go, friend! with these tips and tricks, your bake coffee layered cake - deliciously dairy free will not only taste amazing but also be an eye-catcher at any party.
Whether it’s birthdays or just a tuesday evening, this cake is a winner.
Get in that kitchen, don your apron, and let’s bake some magic! You got this!
Deliciously Dairy-Free Coffee Layered Cake Card
⚖️ Ingredients:
- 2 cups (240g) all-purpose flour
- 1 cup (100g) almond flour
- 1 cup (200g) granulated sugar
- 1 tablespoon baking powder
- 1/2 teaspoon salt
- 1 cup (240ml) dairy-free milk (such as almond or oat milk)
- 1/2 cup (120ml) brewed coffee (cooled to room temperature)
- 1/2 cup (120ml) vegetable oil
- 2 large eggs (or flax eggs for vegan option)
- 1 teaspoon vanilla extract
- 1 cup (240ml) dairy-free whipping cream (coconut or almond-based)
- 3 tablespoons powdered sugar
- 1 teaspoon vanilla extract
- 1 tablespoon cocoa powder (for dusting, optional)
🥄 Instructions:
- Step 1: Preheat the oven to 350°F (175°C).
- Step 2: Prepare the cake pans: Grease and flour the cake pans.
- Step 3: In a large bowl, combine all-purpose flour, almond flour, sugar, baking powder, and salt. Whisk to combine.
- Step 4: In another bowl, whisk together dairy-free milk, brewed coffee, vegetable oil, eggs, and vanilla extract until smooth.
- Step 5: Pour the wet ingredients into the dry ingredients, stirring gently until just combined.
- Step 6: Pour the batter evenly into the prepared cake pans.
- Step 7: Bake for 25-30 minutes, until a toothpick inserted in the center comes out clean.
- Step 8: Remove from the oven and let the cakes cool in the pans for 10 minutes then transfer to a wire rack to cool completely.
- Step 9: In a mixing bowl, whip the dairy-free cream until soft peaks form. Gradually add powdered sugar and vanilla extract, and continue whipping until stiff peaks form.
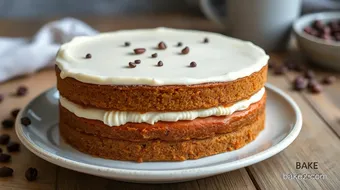
- Step 10: Place one layer on a serving plate, spread a layer of frosting, then top with the second cake layer. Frost the top and sides of the cake uniformly.
- Step 11: Dust with cocoa powder, or add coffee beans for garnish if desired.
- Step 12: Serve and enjoy!
Previous Recipe: How to Whip Vegan Coffee Buttercream in 5 Minutes: Easy Deliciousness!
Next Recipe: My Grandmother's Easy Onion Salad with Lime & Cilantro: 5 Zesty Secrets!