Delightful Dairy-Free Cupcakes - Light & Fluffy
Looking for the perfect treat? These light and fluffy dairy-free cupcakes are my go-to for celebrations. Bake Dairy-Free Cupcakes - Light & Fluffy with my easy tips!

- Let's look into into Dairy-Free Delights
- A Little Bit of Cupcake History
- Why You’ll Love These Cupcakes
- Transitioning to Ingredients
- Your Essential Ingredients Guide for Baking Success
- A Guide to Professional Cooking: Unlocking Your Kitchen Potential
- Bake Dairy-Free Cupcakes - Light & Fluffy
- Recipe Card
Let's look into into Dairy-Free Delights
Oh my gosh, i still remember the first time i tried to bake dairy-free cupcakes - light & fluffy . i was hosting a friend’s birthday bash, and the dietary restrictions came flying in hot! at first, i panicked.
But, being the not-so-perfect baker i am, i decided to plunge headfirst into the world of dairy-free baking . i was amazed at how easy it turned out to be, and honestly, it was a total game changer!
Now, if you’ve ever found yourself curious about how to whip up some sweet, moist dairy-free cupcakes , then you’re in for a treat! these little wonders are light, fluffy, and pack a flavor punch without any dairy or eggs.
It’s a win-win for anyone wanting to enjoy a slice of sweetness without a side of guilt. and trust me, they’re not just for those with allergies; these beauties can stand tall next to any classic cupcake!
A Little Bit of Cupcake History
Cupcakes have been around since the 19th century, known back then as "number cakes" because the ingredients were measured by the cup.
Fast forward to today, and they are a staple at parties and family get-togethers. cupcake variations are endless! from classic vanilla to extravagant red velvet—with these eggless cupcakes , we’re turning a traditional favorite into something that caters to dairy-free diets.
These days, dairy-free dessert options are sought after more than ever. whether you're vegan, lactose intolerant, or just looking to switch things up, holy moly, this recipe resonates with so many folks! plus, it’s super easy—like, you’ll be done in about 35 minutes (not counting the cooldown, of course!).
Just about anyone can tackle this easy cupcake recipe .
Why You’ll Love These Cupcakes
Let’s talk benefits. first off, these cupcakes are a fantastic option for those chasing healthier lifestyle choices. made with non-dairy ingredients , they’re not just light and fluffy but also lower in calories than traditional counterparts.
Think of them as a light cupcake without dairy that won’t leave you in a sugar coma, perfect for parties or even as a sweet pick-me-up during the week.
Celebrations come in all shapes and sizes! need birthday cupcake ideas ? gotcha covered! want to whip up something fun for a gathering? these will steal the show.
Plus, they appeal to pretty much everyone. you can have your icing (or not) and eat it too!
Don’t worry if you’re new to this style of baking; you can easily impress with these healthy cupcake recipes . Plus, if you want a topping to put the cherry on top (pun intended), just go for a whipped vegan frosting —oh-so-delicious and allergy-friendly!
Transitioning to Ingredients
You might be thinking, “alright, i’m in! how do i make these delightful treats?” well, grab your aprons because we’re about to dive deep into the ingredients.
Gather up your almond milk , sugar, and some nifty baking substitutes for milk you might already have at home.
Get ready, my friend, because these dairy-free cupcakes are about to become your new go-to recipe!
Stick around, because next, we’re breaking down the specific ingredients you’ll need to bring these light and fluffy dreamboats to life. Time to get baking!

Your Essential Ingredients Guide for Baking Success
Let’s talk about the essentials that’ll take your baking from average to out-of-this-world good . Today, we’re diving into everything you need to know to turn out those light, fluffy, dairy-free cupcakes and feel like a pro while doing it!
Premium Core Components
Ingredients matter, folks. When it comes to cooking and baking , quality can totally change the game.
When you're grabbing your essentials, here’s a breakdown for you:
-
Measurements: for your cupcakes , you’ll need 1 ½ cups (190g) of all-purpose flour and 1 cup (200g) of granulated sugar.
In metric, that’s the same as 190 grams of flour and 200 grams of sugar. easy peasy!
-
Quality indicators: Look for sugar that’s white and free of clumps; flour should be finely milled without a grainy texture. Always check those expiration dates; fresh ingredients are a baker's best friend!
-
Storage guidelines and shelf life: store your flour in a cool, dry place, and your sugar can hang out in the pantry.
Flour is typically good for about a year if sealed tight, while sugar can last indefinitely! but if it’s got lumps, toss it.
-
Freshness tips: Check your almond milk before using it. If it smells funky, it’s time to let it go.
Got those basics down? Awesome!
Signature Seasoning Blend
Now let’s spice things up!
-
Essential spice combinations: With cupcakes, we’re talking the magic of vanilla. A dash of cinnamon can also elevate your dessert game. It’s a classic combo that never disappoints!
-
Herb selections: Okay, this ain’t exactly a savory dish, but you can experiment with a hint of rosemary or even lavender for a unique twist—just a tiny bit goes a long way.
-
Flavor enhancers: Don't forget a splash of apple cider vinegar ; it’s what makes your cupcakes rise and adds to that fluffy texture.
-
Regional variations: Want some Texas-gone-healthy vibes? Try adding some spicy jalapeños into a batch. For a slice of the south, how about a pecan pie flavor? You're only limited by your imagination!
Smart Substitutions
Baking is all about having fun, and often, you need to improvise.
-
Common alternatives: Can't find almond milk? Oat milk works like a charm!
-
Dietary modifications: For those of us adjusting to dairy-free lifestyles, there's coconut milk or even cashew cream if you want to fluff that frosting—just as delicious!
-
Emergency replacements: Running low on flour? Try using almond flour . It brings a nutty vibe your friends will totally dig.
-
Seasonal options: Got some summer berries? Toss them in to create a lighter, fresher flavor. These cupcakes can be dressed up for any season or celebration!
Kitchen Equipment Essentials
Before you start whipping those cupcakes, you need your tools!
-
Must-have tools: A standard muffin tin and cupcake liners are a must for any home baker. You don’t want to risk a messy stick situation in your cupcake-making shenanigans!
-
Alternative equipment options: Find yourself without a mixer? No problem! A good ol' whisk and some elbow grease will do just fine—just be prepared to sweat a little!
-
Preparation tips: Always preheat your oven to 350° F ( 175° C) before you start mixing. No one likes a flat cupcake; magic happens in the oven!
-
Storage solutions: After you’ve baked up a storm, keep those yummy cupcakes in an airtight container. They’ll stay fresh for about three days—if they last that long!
With all these essentials handy, you’re well on your way to bake dairy-free cupcakes - light & fluffy like a pro!
Next up, we'll get into the step-by-step instructions on how to whip these delights up, so grab those ingredients and let’s make some magic happen!
A Guide to Professional Cooking: Unlocking Your Kitchen Potential
So, you wanna dive into the world of professional cooking? awesome choice! it’s not just about what you whip up; it's how you prep, manage your time, and nail those cooking techniques.
Let’s break down the essentials before we get you to bake some delicious dairy-free cupcakes - light & fluffy ! trust me, this will be fun and incredibly rewarding.
Essential Preparation Steps
First off, mise en place is your best buddy. it’s french for "everything in its place," and it's a game changer.
Gather all your ingredients before you start cooking. this way, you won’t be scrambling to find the baking powder while your almond milk is about to boil over.
Now, let’s chat time management. set a timer; it works wonders for staying on track. precision is everything in cooking.
So while those cupcakes are baking at 350° f ( 175° c) , focus on making your frosting or cleaning up.
Multi-tasking is key!
Organization? totally important. keep your workspace tidy. use bowls for dry and wet ingredients, and don’t forget about safety! keep those knives away from your fingers and remember that it's a clean kitchen that keeps sickness at bay.
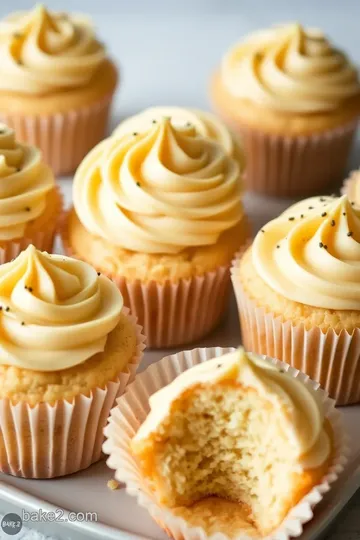
Step-by-Step Process
Now, onto the fun part—baking! Here’s your step-by-step to conquer those cupcakes:
- Preheat Oven: Set that oven to 350° F ( 175° C) and ready your muffin tray with cupcake liners.
- Mix Dry Goods: In a large bowl, combine 1 ½ cups of flour, 1 cup of sugar, ½ teaspoon baking powder, ½ teaspoon baking soda, and ¼ teaspoon salt. Whisk that bad boy until it’s all blended.
- Combine Wet Ingredients: Grab a separate bowl and mix ½ cup almond milk, ⅓ cup vegetable oil, 2 tablespoons apple cider vinegar, and 1 teaspoon vanilla extract.
- Combine Mixtures: Now, pour your wet mix into the dry. Mix until just combined. We want fluffy cupcakes, not dense bricks.
- Fill Cupcake Liners: Scoop your batter into the liners about two-thirds full.
- Bake: Pop those cupcakes in the oven for 18- 20 minutes . A toothpick should come out clean when they’re done.
- Cool Down: Let them hang out in the tin for 5 minutes before moving them to a cooling rack. Patience brings perfection!
- Frost: Make your frosting (if you want to) while the cupcakes cool. Whip dairy-free butter, add powdered sugar, almond milk, and vanilla. Frost those cupcakes once they're completely cool.
Expert Techniques
Alright, let's talk like pros do.
-
Start with room temperature ingredients . Makes a huge difference in texture. Seriously, don’t skip this.
-
Be gentle when mixing. A little lump is okay.
-
You're aiming for a light, fluffy texture—like clouds on a cupcake!
-
Here’s a cool tip: If they puff up too much, tap your baking tray gently on the counter halfway through baking to let out some air.
Success Strategies
Now, let’s avoid rookie mistakes.
-
Don’t overmix! Keep those cupcakes light and airy.
-
Make sure to frost only after they’ve cooled. A melted mess isn't cute.
-
If you want to prep ahead, these cupcakes freeze wonderfully. Just thaw and frost later!
Got a sweet tooth but want to keep it healthy? these cupcakes are eggless and dairy-free, perfect for all sorts of dietary preferences.
Think about mixing and matching flavors—add cocoa powder for a chocolate twist or fold in some berries for a fruity surprise.
Just remember: Baking’s all about having fun and experimenting. Before you know it, you'll be sending out invitations for a cupcake party!
I hope my little guide helps you whip up those oh-so-delicious dairy-free cupcakes - light & fluffy . next up, i want to share some extra info and tips that'll take your baking game to the next level.
Stay tuned!
Bake Dairy-Free Cupcakes - Light & Fluffy
Alright, y'all! so you've decided to dive into the world of dairy-free baking . these delightful dairy-free cupcakes - light & fluffy are here to sweeten your day! seriously, whether you're avoiding dairy for health reasons or just want to try something new, these babies are a total game changer.
Pro Tips & Secrets
Let’s kick it off with some pro tips . I’ve learned a few tricks in my kitchen adventures that have taken my cupcakes from “meh” to mind-blowing .
-
Room temperature ingredients : always start with room temperature almond milk and oil. this simple step helps everything mesh together better, giving you that fluffy cupcake texture we all crave.
No one likes a dense cupcake, am i right?
-
Don’t go overboard : when you’re mixing those wet and dry ingredients, be gentle! just combine until you don’t see any dry bits— lumpy is okay! overmixing is the enemy of light, airy cupcakes.
-
Test doneness like a pro : stick a toothpick in the center. if it comes out clean, you’re golden! if it’s a bit gooey, throw it back in for a couple more minutes.
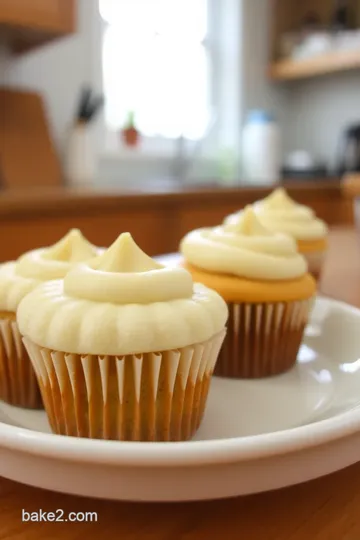
Perfect Presentation
Now let's talk about presentation . You might be thinking, "They're just cupcakes!" But a little flair can turn them into showstoppers.
-
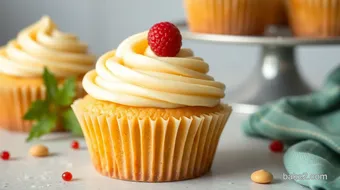
Plating Magic : Place your cupcakes on a lovely white plate for that classic contrast. It makes those colors pop!
-
Top It Off : A sprinkle of edible glitter or fresh berries can elevate the visual appeal . Trust me, people will be snapping pics before you even serve ‘em!
-
Color combos : you can use vibrant frosting—think pastel colors or bold reds and blues. on that note, a whipped vegan frosting can work wonders.
It’s light as air, just like the cupcakes!
Storage & Make-Ahead
Planning ahead is key to staying ahead! After whipping up your moist dairy-free cupcakes , here's how you can keep ‘em fresh:
-
Storage : these bad boys can chill in an airtight container for about 3 days at room temperature. if you want to stretch that out, you can pop them in the fridge for about a week.
-
Reheating : If you like them warm, just microwave for about 10-15 seconds. Providing just a smidge of heat can bring out those yummy flavors, making them taste freshly baked again.
Creative Variations
When I say cupcake variations , I mean get creative . Life's too short for boring treats!
-
Flavor Adaptations : Try adding 1 tablespoon of cocoa powder for a rich chocolatey twist. Feeling fruity? Toss in some berries or lemon zest to keep things fresh and zesty!
-
Seasonal Twists : Pumpkin spice in the fall? Yes, please! A little cinnamon in your batter can make your kitchen smell like autumn perfection.
-
Dietary Mods : Looking to make these eggless cupcakes ? They already are! But if you need gluten-free dessert options, swap in a gluten-free flour mix. Easy peasy!
Complete Nutrition Guide
If you’re keeping tabs on nutrition, you’ll be happy to know these cupcakes can fit into a healthier lifestyle. Here’s the scoop:
-
About 150 calories each, these low-fat cupcake recipes won’t break the bank when it comes to health.
-
With a decent dollop of almond milk and minimal sugar, you’re rocking flavorful, healthy cupcake recipes that don’t skimp on fun!
-
Portion guide? Easy as pie (um, cupcakes)! Two to enjoy, and you’re still within a moderate treat limit!
Expert FAQ Solutions
You know what’s even better than cupcakes? Answering your burning questions about them!
-
What if my cupcakes came out dense? No worries! Next time, be gentle with the mixing and ensure your ingredients are fresh. Old baking soda can totally kill the fluff factor.
-
Swapping ingredients? Remember, apple cider vinegar and baking soda create the perfect chemical reaction to give those cupcakes lift.
Wrap It Up Sweetly
So there you have it! your ultimate guide to bake dairy-free cupcakes - light & fluffy. these cupcakes are about fun, creativity, and making lovely desserts without dairy.
So get in that kitchen and whip up something special!
Whether it’s a birthday bash or just a saturday evening treat, these non-dairy cupcakes will leave everyone asking for your recipe.
Share the love, and maybe even try a batch of vegan frosting on these joys. you've got this! happy baking!
Delightful Dairy-Free Cupcakes - Light & Fluffy Card
⚖️ Ingredients:
- 1 ½ cups (190g) all-purpose flour
- 1 cup (200g) granulated sugar
- ½ teaspoon baking powder
- ½ teaspoon baking soda
- ¼ teaspoon salt
- ½ cup (120ml) almond milk (or any dairy-free milk)
- ⅓ cup (80ml) vegetable oil
- 2 tablespoons apple cider vinegar
- 1 teaspoon pure vanilla extract
- ½ cup (115g) dairy-free butter (such as margarine)
- 2 cups (250g) powdered sugar
- 2 tablespoons almond milk (or dairy-free milk)
- 1 teaspoon vanilla extract
🥄 Instructions:
- Step 1: Preheat your oven to 350°F (175°C) and prepare the muffin tin with cupcake liners.
- Step 2: In a large bowl, combine flour, sugar, baking powder, baking soda, and salt. Whisk until blended.
- Step 3: In another bowl, mix almond milk, vegetable oil, apple cider vinegar, and vanilla extract.
- Step 4: Pour the wet ingredients into the dry ingredients and mix until just combined. Do not overmix; a few lumps are okay.
- Step 5: Evenly distribute the batter into the cupcake liners, filling each about two-thirds full.
- Step 6: Bake in the preheated oven for 18-20 minutes, or until a toothpick inserted in the center comes out clean.
- Step 7: Remove from the oven and allow cupcakes to cool in the tin for 5 minutes, then transfer to a wire rack to cool completely.
- Step 8: While cooling, prepare the frosting by beating dairy-free butter until creamy. Gradually add powdered sugar, almond milk, and vanilla, mixing until fluffy. Frost cooled cupcakes as desired.
Previous Recipe: How to Make Delicious Stir-Fry Wai Wai Noodles with Colorful Veggies
Next Recipe: How to Cook Guava Bocadillo Colombian Delight: My Grandmother's Secret!