Irresistible Bake Maple Butter Tart Squares
Want a sweet, chewy treat? These Bake Maple Butter Tart Squares are a delightful dairy-free option. Perfect for cozy afternoons or your next bake sale!

- Satisfying Your Sweet Tooth with Maple Butter Tart Squares
- Sweet Tradition with a Modern Twist
- Health Benefits and Unique Selling Points
- What You’ll Need
- Your Go-To Essential Ingredients Guide
- Mastering the Art of Baking: Professional Cooking Methods
- Nailing It with Your Maple Butter Tart Squares
- Recipe Card
Satisfying Your Sweet Tooth with Maple Butter Tart Squares
Oh my gosh! the moment i took my first bite of bake maple butter tart squares | easy dairy-free treat , i felt like i’d traveled straight to canada, standing in front of a quaint bakery, the air filled with the sweet scent of maple and warmth.
It was one of those days when nothing seemed to go right. i was knee-deep in work and hungry, so i turned to baking to ease my frustrations.
Honestly, those squares were just the comfort i needed.
Have you ever been so in need of a treat that the thought of baking something made you feel instantly better? that’s the magic of maple desserts .
They pull you in with their gooey goodness and make everything feel alright again, like a warm hug for your taste buds.
So, if you’re after a sweet escape, let’s dive into these chewy, caramel-sweet squares!
Sweet Tradition with a Modern Twist
Let’s take a stroll down memory lane. the maple butter tart is a classic canadian dessert, loved for its rich, creamy filling and buttery crust.
But we’re all about making life easier here, and that’s where these squares come in. this recipe blends that traditional flavor into a simpler, easier-to-bake form.
Its modern twist means it’s not just for special occasions anymore—these squares can be your go-to for a quick afternoon snack idea or a delightful bake sale treat .
Time-wise, these lovelies take about an hour and fifteen minutes , give or take. seriously, not bad for a dessert that tastes like it took hours to perfect! plus, they’re rated easy.
Yep, just a few straightforward steps, no ph.d. in baking required. and for all you budget-watchers out there, the cost is pretty friendly.
You probably have most of these ingredients in your pantry already, especially if you’re into easy baking recipes .
Health Benefits and Unique Selling Points
Okay, let’s chat about some benefits. though they’re delicious, these dairy-free desserts still deliver! using coconut oil and maple syrup , you get a natural sweetness with a bonus of nutrients.
Maple syrup is rich in antioxidants and offers some vitamins and minerals. who knew indulging could feel a little healthier?
And let’s face it, there’s something about serving maple butter tart squares at gatherings that says, “i got you.” whether it’s a casual family get-together, a potluck, or even a holiday party, these squares will be the star of the dessert table.
They stand out against other easy sweet treats , and trust me, everyone is going to be asking for your recipe!
Plus, if you’re looking to cater to various dietary needs, you can easily adapt these squares. they can go completely nut-free, gluten-free, or even turned into vegan treats .
Use your favorite gluten-free alternatives or maple sugar substitution , and there’s no need to leave anyone out.
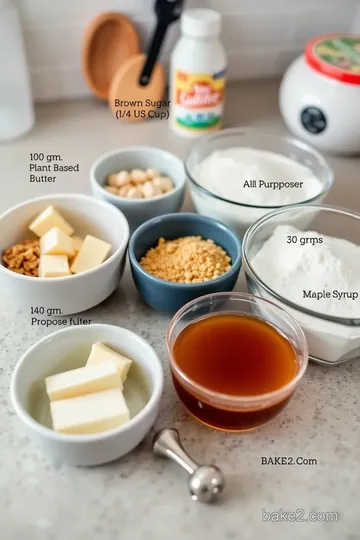
What You’ll Need
Alright, are you ready to gather your ingredients? you’ll be amazed how simple it is to whip this up. think of it as a treasure map leading you straight to sweet deliciousness.
Grab: white or whole wheat flour, coconut oil, pure maple syrup, and more! with ingredients you can find at any grocery store—or maybe even in your pantry—you’re on your way to making a delightful batch of these maple syrup recipes !
Stay tuned as we get to the nitty-gritty of how to Bake Maple Butter Tart Squares | Easy Dairy-Free Treat ! You won't want to miss it, trust me!
Your Go-To Essential Ingredients Guide
Hey there, friends! if you’re ready to dive deep into baking, you’ve come to the right place. whether you're in the kitchen just for fun or whipping up something special like bake maple butter tart squares | easy dairy-free treat , knowing your ingredients inside and out can make a seriously big difference.
Let’s chat about what you need to gather.
Premium Core Components
First things first—let’s hit those premium core components. detailed measurements are key! for this recipe, you’ll want 1 cup (120 g) of all-purpose flour and 1/4 cup (50 g) of coconut oil.
Remember, if you’re sticking to metric, it’s 240 ml for the oil and 55 g for the sugar.
Now, how do you know if you’re getting quality ingredients? look for those telltale signs. your maple syrup should smell warm and caramel-like.
And if the coconut oil is solid and whitish, you’re golden! for storage guidelines , keep your flour in a cool, dry spot, and your maple syrup in the fridge once opened.
And trust me, when you pick up your ingredients, go for the freshest! the flavor matters more than you might think.
Signature Seasoning Blend
Let’s spice things up! the right seasonings can take your dairy-free desserts to the next level. for our maple butter tart rate, consider adding vanilla extract —it’s a flavor enhancer worth its weight in gold.
Got thyme? you might not think about it, but some herbs can be surprisingly nice, maybe even in a savory twist.
A little tip—regional variations are your friends! if you’re feeling adventurous, throw in different spices based on where you live.
Some folks love a pinch of cinnamon, while others go for maple sugar substitution—both fab choices!
Smart Substitutions
Now, let’s talk about those smart substitutions . keeping a stash of common alternatives is a lifesaver. don't have maple sugar? no biggie—use brown sugar .
If you're into gluten-free alternatives , you can totally switch to oat flour for an equally delightful base. and if you run out of almond milk , just grab whatever milk you have on hand.
If the baking bug hits during the holidays and you forgot that one ingredient, don’t freak out. emergency replacements like applesauce can help bind your ingredients if you’re short on oils.
Seriously, don’t stress; cooking is all about adapting.
Kitchen Equipment Essentials
Alright, folks, let’s not forget about kitchen equipment essentials . You’ll want an 8-inch (20 cm) square baking pan —it’s a must. Oh, and a mixing bowl too, of course!
If you're in a pinch, guess what? a round pan totally works! just adjust your baking time slightly. and prep like a pro—measure everything out ahead of time, because trust me, a chaotic kitchen isn’t a fun kitchen.
Closing Thoughts
Phew, we’ve covered some serious ground here. knowing your core ingredients, smart substitutions, and must-have tools makes everything easier. and before we dive into the instructions for bake maple butter tart squares | easy dairy-free treat , remember that cooking is about having fun and embracing those little mishaps along the way.
So, grab those maple syrup recipes, channel that sweet tooth craving, and let’s turn those ingredients into something magical. Stay tuned, because we are about to jump into the step-by-step greatness that will have you enjoying these chewy dessert squares in no time!
Mastering the Art of Baking: Professional Cooking Methods
Cooking like a pro isn’t just for the chefs on tv. with a few simple methods and approaches, you can totally step up your game.
So, let’s break it down, starting from how to get your apron strings ready to the final taste test of bake maple butter tart squares | easy dairy-free treat.
Trust me, your sweet tooth will thank you!
Essential Preparation Steps
Mise en place: first things first, let’s talk about mise en place. it’s a fancy french term that means “everything in its place.
” before you dive into those chewy dessert squares, gather all your ingredients. this makes life so much easier, especially when you’re working with maple syrup recipes and other sticky stuff.
Time management tips: next up, timing! did you know that prepping can take about 15 minutes , but chilling your squares will require 30 minutes ? plan your tasks.
Prep while the oven heats—multitasking is key!
Organization Strategies: Keep your workspace tidy. Use bowls for each ingredient. Nothing is worse than losing track of what you’ve added, especially when making glorious Canadian desserts like these maple squares.
Safety Considerations: Don’t forget safety! Make sure your kitchen tools are in good shape. Keep your fingers away from those sharp knives, and always use oven mitts when dealing with hot pans.
Step-by-Step Process
Now for the juicy stuff! Here’s a step-by-step breakdown for our Maple Butter Tart Squares.
- Preheat your oven to 350° F ( 175° C).
- Prepare your pan—grease it or line it with parchment paper.
- For the Dough:
- Mix 1 cup of flour , 1/4 cup melted coconut oil , 1/4 cup maple sugar , and a pinch of salt until crumbly.
- Press that mixture firmly into the pan like you mean it!
- Bake that crust for 10- 12 minutes , until it’s lightly golden.
- For the Filling:
- Whisk together 1/2 cup pure maple syrup , 1/2 cup coconut sugar , 2 tablespoons cornstarch , and some almond milk. This is where the magic happens!
- Pour the filling boldly over the crust.
- Bake those beauties for another 15- 18 minutes , or until you see the filling set and puffed.
- Let them cool completely before slicing into squares.
Remember, timing and temperatures are pivotal: 10- 12 minutes for the crust and 15- 18 minutes for the filling !
Expert Techniques
Here’s where you can really impress. A few expert tips can elevate your baking game.
-
Quality Checkpoints: When you pour in your filling, look for that shiny surface. If it jiggles a little and doesn’t look too sloshy, you’re right on track.
-
Critical Steps Explained: A good rule of thumb? Use dark maple syrup for a robust flavor. For those making nachos over maple butter tart recipes, keep your ingredients fresh!
-
Troubleshooting Tips: If your filling cracks, don’t sweat it! It’s still going to taste incredible. Just serve it with whipped coconut cream, and no one will even notice!
Success Strategies
No one wants a baking fail, am I right? Here are some common mistakes and how to dodge them.
-
Common Mistakes to Avoid: Overbaking is a killer. Always set your timer! Breaks between baking resemble those awkward conversations at a family dinner—don’t let them happen!
-
Quality Assurance Tips: Always taste your filling before baking. If you’re not in love with the flavor, adjust your sugar or syrup.
-
Perfect Results Guide: Let those squares cool for at least 30 minutes after baking! This helps set the texture genuinely right.
-
Make-Ahead Options: These squares are perfect for make-ahead desserts. Whip them up a day in advance for parties—talk about easy baking recipes!
So, whether you’re whipping up simple baking recipes for a cozy afternoon or bringing dessert bars to a bake sale, don’t forget those maple butter tart squares! they’re not just tasty but also a fun and exciting way to embrace your inner chef! before we move on to more recipes, let’s take a moment to appreciate that comforting feeling of homemade goodness.
Stay tuned for more additional information and tips to keep your baking game strong. After all, mastering the art of cooking is a journey!

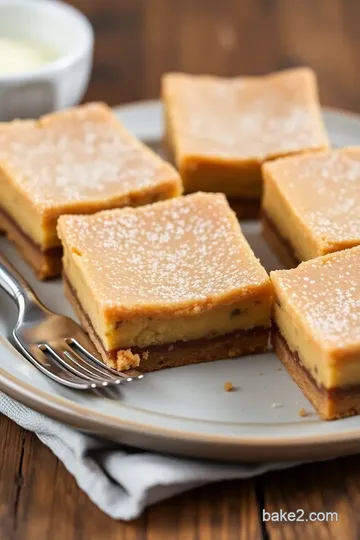
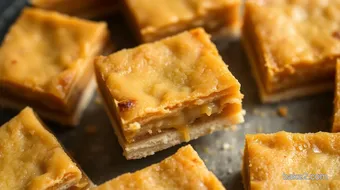
Nailing It with Your Maple Butter Tart Squares
Oh my gosh, if you haven't tried baking maple butter tart squares | easy dairy-free treat , you are totally missing out! these delicious squares are a game changer, packed with that warm, sticky goodness of maple syrup.
Trust me; they’re perfect for those sweet tooth cravings, a cozy afternoon pick-me-up, or any casual gathering. let’s dive into some tips and secrets to make your baking experience even better!
Pro Tips & Secrets
First up, if you want to elevate your dessert, i’ve got some seriously cool pro tips. when making your crust, make sure you press it down evenly in the pan.
This ensures it bakes perfectly without any soggy corners. it’s such a bummer when that happens!
For a time-saving tip , you can whip up the dough while your oven preheats. that way, you maximize that precious baking time.
Here's another flavor enhancement secret: use dark maple syrup. it brings a richer flavor that's absolutely out of this world!
And family gatherings? Presentation is key! Serve these squares sliced neatly in a cake stand or on a pretty platter—trust me; it’ll turn heads.
Perfect Presentation
Speaking of presentation, let’s talk plating. i’m all about making it look as good as it tastes! slice the squares into even pieces, and while serving, add a touch of fresh fruit on the side.
Apples or strawberries really pop against the golden squares.
And don’t forget the garnishes! a sprinkle of powdered sugar or a drizzle of coconut whipped cream really takes it over the top.
When you’ve got those vibrant colors on the plate, your dessert becomes an instagram-worthy piece of art!
Storage & Make-Ahead
Now, you may be wondering, “can i make these ahead?” absolutely! these dairy-free desserts store beautifully. keep them in an airtight container at room temperature for up to five days.
Trust me; they will disappear before you know it!
If you want to freeze them, just slice them up and pop them in the freezer. they can last for about a month.
Reheat them in the microwave for about 10-15 seconds, and they’ll taste like they just came out of the oven.
Win-win!
Creative Variations
Feeling adventurous? There are so many ways to get creative with this recipe! You can easily adapt the flavors. How about adding in some chocolate chips or drizzling a bit of dairy-free chocolate on top?
Got dietary modifications? Go for it! These squares can easily go gluten-free if you swap in your favorite gluten-free flour. We've got options, people!
And listen, don’t forget about seasonal twists! In the fall, toss in some chopped apples or pumpkin spice for a twist on these classic sweets. The possibilities are endless!
Complete Nutrition Guide
Just to keep things balanced, let’s do a quick nutrition check . each square has about 180 calories—now that's what i call a guilt-free treat! these are great for afternoon snacks or, honestly, a sweet tortilla of comfort after a long day.
Plus, if you’re looking to keep your portions in check, stick to one square as a serving. trust me; they’re chewy and satisfying enough to curb your cravings without completely derailing your healthy eating plans.
Expert FAQ Solutions
Got questions? i’ve got answers! maybe your filling didn't set up right; it happens to the best of us! if that’s the case, you likely just need to bake them a little longer.
And let’s talk nut-free options. If there's nut allergies in your squad, simply skip them, or swap them with pumpkin seeds for a little crunch. Easy peasy, right?
Wrap Up: Go Get Baking!
You guys, baking these maple butter tart squares | easy dairy-free treat is such a rewarding experience. not only do you get to savor a delicious piece of maple dessert , but you also get to show off your skills at any gathering.
Home-baked goodies speak volumes about love and creativity, don't ya think?
So, grab your apron, put on your favorite tunes, and dive into some simple baking recipes. You and your friends are going to fall head over heels for these! Let's make some sweet memories!
Irresistible Bake Maple Butter Tart Squares Card
⚖️ Ingredients:
- 1 cup (120 g) all-purpose flour
- 1/4 cup (50 g) coconut oil, melted
- 1/4 cup (50 g) maple sugar
- 1/4 teaspoon salt
- 1/2 cup (120 ml) pure maple syrup
- 1/2 cup (100 g) coconut sugar
- 2 tablespoons cornstarch
- 1/4 teaspoon salt
- 1 teaspoon vanilla extract
- 1/4 cup (60 ml) unsweetened almond milk
- 1/2 cup (75 g) chopped pecans or walnuts (optional)
🥄 Instructions:
- Step 1: Preheat the oven to 350°F (175°C).
- Step 2: Prepare the baking pan by greasing it or lining it with parchment paper.
- Step 3: In a mixing bowl, combine flour, melted coconut oil, maple sugar, and salt.
- Step 4: Mix until it forms a crumbly dough.
- Step 5: Press the mixture evenly into the bottom of the prepared baking pan.
- Step 6: Bake the crust for 10-12 minutes until lightly golden.
- Step 7: In a separate bowl, whisk together maple syrup, coconut sugar, cornstarch, salt, vanilla extract, and almond milk until smooth.
- Step 8: (Optional) Stir in chopped nuts for added texture.
- Step 9: Pour the filling over the pre-baked crust.
- Step 10: Bake for an additional 15-18 minutes, or until the filling is set and slightly puffed.
- Step 11: Let cool completely in the pan before slicing into squares.
Previous Recipe: Ultimate Vegan Maple Butter Tarts | A Delicious Sunday Morning Treat
Next Recipe: Quick & Easy: Mix Small Batch Royal Icing Quickly & Easily