Bake Milk-Free Cupcakes: Joyful Treats
Looking for a delightful treat? My milk-free cupcakes are easy to make and bursting with flavor! Perfect for any occasion—give them a try today!

- A Sweet Kick-off: Milk-Free Cupcake Happiness
- The Lowdown on Milk-Free Cupcakes
- The Health and Happiness Factor
- Sweet Summation
- Essential Ingredients Guide: Get Ready to Bake!
- Unlock the Secrets of Professional Baking
- Pro Tips & Secrets
- Perfect Presentation
- Storage & Make-Ahead
- Creative Variations
- Complete Nutrition Guide
- Expert FAQ Solutions
- Recipe Card
A Sweet Kick-off: Milk-Free Cupcake Happiness
Let me tell you about the time i decided to bake milk-free cupcakes: joyful treats for my best friend’s birthday.
I had just learned that she was going dairy-free, and i panicked. what was i going to do? no milk? no butter? seriously? i mean, who can resist a perfectly fluffy cupcake? but then i thought, “why not?”
So, i dove head-first into the world of dairy-free desserts . honestly, i was a little terrified, but boy, was i excited to prove that you can whip up delicious treats without milk that taste just as amazing.
And let me tell ya, these cupcakes weren't just edible; they were downright joyful .
The Lowdown on Milk-Free Cupcakes
These milk-free cupcakes have a fascinating backstory! cupcakes are believed to have been born in the united states around the 19th century, making them a true american icon.
They’ve evolved over the years and today, they hold a special place in our hearts, especially for birthdays, weddings, or any celebration really.
The best part? you don’t need to be a master chef to make these beauties. this is an easy cupcake recipe that's perfect for everyone—from the kitchen newbie to the baking pro.
With just about 35 minutes from start to finish, you’ll have 12 fluffy cupcakes cooling on your counter. and about your wallet? you can whip up a batch for less than what you’d spend on a fancy coffee!
The Health and Happiness Factor
Now, let’s chat about the key benefits . first off, these cupcakes are totally dairy-free . if you’re eating clean or have allergies, they’re your new best friends.
Packed with simple, wholesome ingredients, they’re a great alternative to traditional cupcakes.
Plus, they’re vegan-friendly , and we know how much people love their plant-based cupcakes these days. the unique selling point ? you can mix and match flavors to create endless cupcake variations , like lemon zest or cocoa powder for a chocolate twist.
And guess what? you can even make them gluten-free!
Imagine serving these at parties—people won’t even notice they’re missing the dairy! They’re perfect for family gatherings, birthday bash ideas, or just a cheer-yourself-up treat after a long day.
Sweet Summation
So there you have it! baking milk-free cupcakes not only satisfies those cravings for sweet treats without milk , but they also fit into all kinds of diets— no dairy desserts, egg-free options, you name it.
As i learned while whipping up my batch, everyone gets to enjoy a slice of the joy.
Ready to roll up your sleeves? Next, we’ll dive into the ingredients needed to make these fluffy cupcakes . Trust me; you won't want to skip this part!
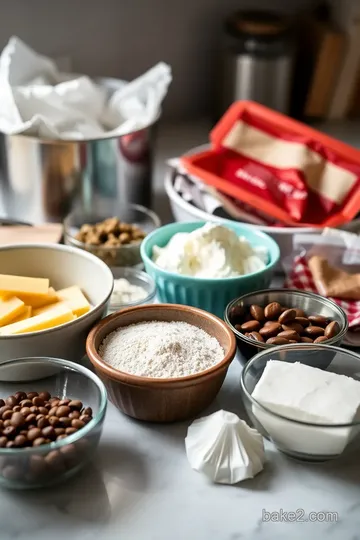
Essential Ingredients Guide: Get Ready to Bake!
So, you want to bake milk-free cupcakes: joyful treats ? awesome choice! these fluffy little delights are perfect for any occasion.
Whether it's a birthday bash or just a tuesday treat, you won’t even realize they’re dairy-free. let's dive into what makes these cupcakes so amazing, starting with the essential ingredients you'll need.
Premium Core Components
First off, let’s talk measurements . For this recipe, you'll need:
- 1 ½ cups (190g) all-purpose flour
- 1 cup (200g) granulated sugar
- 1 tsp (5g) baking powder
- ½ tsp (2g) baking soda
- ½ tsp (2g) salt
- ⅓ cup (80ml) vegetable oil or melted coconut oil
- 1 cup (240ml) unsweetened almond milk (or any non-dairy milk you dig)
- 1 tsp (5ml) vanilla extract
Keep these in mind! Freshness is key for these dairy-free desserts . Use flour and sugar that aren’t clumping up and check the expiration on those baking powders.
Storage tip: keep your flour in an airtight container—about six months is the sweet spot for freshness. and remember, once you open your almond milk, it usually lasts about a week in the fridge.
Signature Seasoning Blend
Now, onto the spices . you're gonna need the flavors to pop! if you’re feelin' adventurous, ask yourself: “what do i want to taste?” vanilla boosts anything sweet.
If you want a twist, toss in some lemon zest or almond extract. for a more intense flavor, think about cocoa powder for chocolate milk-free cupcakes .
When it comes to herbs and aromatics , this recipe is pretty straightforward. you really won’t need anything beyond vanilla for the cupcakes.
But if you're choosing frosting, think chocolate or a fruity hit with something like coconut for those delicious dairy-free treats .
Smart Substitutions
What if you're missing an ingredient? Don’t sweat it! Here are some common alternatives :
- No almond milk? Use soy, oat, or even good ol' cow's milk if you’re not strictly dairy-free.
- Outta oil? Unsweetened applesauce can bring moisture to the party and is perfect for healthy dessert recipes .
- Gluten-free? Swap all-purpose flour for a gluten-free blend. Your cupcakes will be just as blissful!
Kitchen Equipment Essentials
Rest assured, you don’t need fancy equipment. Here's what you’ll need to whip these babies up:
- Mixing bowls
- Measuring cups and spoons
- A whisk
- A muffin tin
- Cupcake liners
- A cooling rack
Got a mixer ? Awesome! It'll make your frosting process a breeze. But if you don’t, your trusty whisk works just fine!
Storage Solution: Once the cupcakes are baked and cooled, store them in an airtight container. They’ll stay good for about three days at room temperature, but trust me, they won’t last that long!
Wrapping It Up
Now that you're set on the essentials, you're ready to create your masterpiece! these bake milk-free cupcakes aren’t just easy; they’re a hit with everyone.
Every time i make them, i can’t help but feel a little joy. seeing family and friends devour them is the best feeling!
Next, let’s jump into the step-by-step instructions so you can start baking and enjoying these little bites of happiness. Remember, whether you're looking for easy cupcake recipes , non-dairy baking hacks, or just fun in the kitchen, you got this! Let's make those moist cupcakes ! Happy baking!
Unlock the Secrets of Professional Baking
When you're ready to bake milk-free cupcakes: joyful treats , it’s not just about tossing ingredients together. oh no, my friend! the magic happens when you dive into some professional cooking methods .
Let’s break it down step-by-step, so you can whip up those fluffy cupcakes that’ll make everyone cheer—without a hint of dairy!
Essential Preparation Steps
Get Your Mise en Place On
First things first, let's talk mise en place —a fancy french term that just means “everything in its place.” before you start whipping that batter, gather your ingredients.
It's like setting the stage before a show! you’ll want all your dry ingredients ready, alongside the wet ones. it may seem trivial, but trust me, it keeps your cooking seamless.
Mastering Time Management
Time can slip away faster than a kid in a candy store. grab a timer, and make a plan. getting everything prepped—like measuring out 1 cup (240ml) of almond milk and 1 ½ cups (190g) of flour—before you start baking helps you stay on track.
Use 15 minutes of active prep time wisely and have your oven preheated to 350° f ( 175° c) while you mix.
Keep It Organized
You ever look at a messy kitchen and feel overwhelmed? yeah, me too. start with a clean workspace! it’ll keep you focused.
Arrange your ingredients in the order you’ll use them; it’s like a roadmap for success. clean as you go—no one wants to deal with a hurricane of mess after baking, right?
Safety First
Finally, let’s not forget safety. always handle that hot oven with care! there’s no need to rush when you can grab oven mitts and avoid any drama.
Keep an eye on the countertops—flour can get slippery, and nobody wants an unplanned split while they’re baking.
Step-by-Step Process
Clear, Numbered Instructions
- Preheat your oven to 350° F ( 175° C) .
- Line a muffin tin with cupcake liners.
- Whisk dry ingredients : flour, sugar, baking powder, baking soda, and salt in a big bowl.
- Mix wet ingredients in another bowl: almond milk, oil, and vanilla.
- Stir both mixtures together—just don’t overdo it!
- Fill those liners 2/3 full.
- Bake for 18- 20 minutes . A toothpick should come out clean when you poke it in.
- Cool for 5 minutes in the tin before moving to a wire rack.
Keep an Eye on the Details
Temperature control is key. while baking, you want that oven nice and cozy at 350° f . if it’s too hot, your cakes might burn.
Not cool! and timing? you’ve only got about 20 minutes for that golden finish. use a timer and check for those visual cues—have they risen nicely? look good? let ‘em sit.
They'll be perfect!
Expert Techniques
Professional Methods You Can Use
Want your cupcakes to have the perfect texture? Here’s a tip from the pros: don’t overmix the batter! A few lumps are A-OK! Plus, adding a splash of apple cider vinegar can give your cupcakes that extra fluffiness, like magic!
Quality Checkpoints
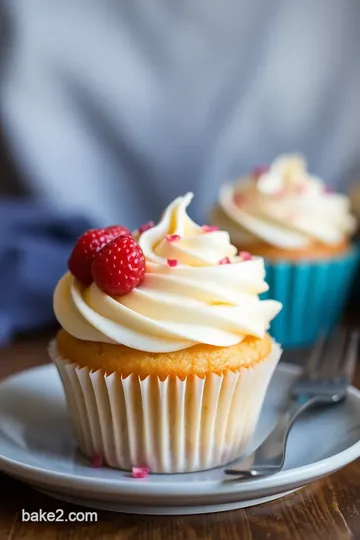
Always taste your batter before baking (just a little!). Is it sweet enough? Adjust as needed. Also, when they’re cooling, these little cupcakes are prime for any kind of decoration or frosting you desire!
Success Strategies
Avoiding Common Mistakes
The worst? when those cupcakes come out heavy and sad. avoid this by not overpacking your cupcake liners. also, give them room to breathe in the oven.
Trust me, those babies need space!
Quality Assurance Tips
Make sure you’re using fresh ingredients! Old baking powder can be a downer, and stale flour won't do your cupcakes justice.
Make-Ahead Options
These cupcakes freeze like champs! If you’re prepping for a party, bake ‘em ahead and freeze. When you're ready to serve, simply thaw and frost them!
Time to Bake Milk-Free Cupcakes
There you have it! with these professional cooking methods under your belt, you’re ready to bake milk-free cupcakes: joyful treats that anyone can enjoy—dairy-free and utterly delicious! your family and friends will be singing your praises and begging for the recipe.
Next up, let's dive into some additional information to make your baking journey easier and even more delicious!

Pro Tips & Secrets
Baking is just as much about technique as it is about the ingredients, ya know? When you're diving into these Bake Milk-Free Cupcakes: Joyful Treats , here are some insider tips to help you out:
First off, don’t overmix the batter ! seriously, a few lumps are totally okay. overmixing can lead to dense cupcakes instead of the fluffy goodness we’re going for.
Try mixing just until the wet ingredients are combined with the dry ones. this little trick works wonders in achieving those delightfully fluffy cupcakes everyone raves about!
If you're looking to save some time during prep, consider using store-bought dairy-free frosting . There are tons of delicious dairy-free treats on the market now! It’ll simplify things, so you can focus more on the fun part—eating!
And for an extra flavor pop, toss in a splash of almond extract or even a dash of cinnamon. these add a unique touch without requiring much effort.
Presenting your baked goods in a pretty way is just as important as how they taste. so, here's a presentation secret : use a piping bag to swirl on that frosting like you’re a pro.
It’ll make those birthday cupcake ideas shine!
Perfect Presentation
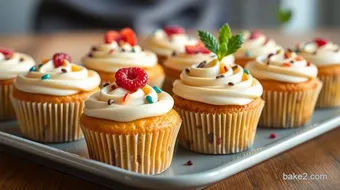
Let’s be real: we eat with our eyes first, right? a well-plated dessert is a happy dessert! when it comes to presenting your milk-free cupcakes, try placing them on a colorful platter.
This is where you can get creative!
Garnish ideas ? fresh fruit on top, a sprinkle of toasted coconut, or even a few edible flowers can bring a cup of joy to your cupcakes! adding contrasting colors not only looks great but also enhances the overall visual appeal.
It’s all about balance—think about colors that pop against the light cupcake base.
Storage & Make-Ahead
Now, life can get busy, so how do we manage these heavenly cupcakes? good news: storing them is super easy.
Keep your cupcakes in an airtight container at room temperature for up to three days. if they last that long!
If you want to whip up a batch ahead of time, you can bake them, cool completely, and then freeze them in a single layer.
When you're ready to party or treat yourself, just thaw and frost them. super simple, right? just remember, frosting them when they’re cooled completely is key; otherwise, you might just end up with a melty mess!
Creative Variations
One of the best parts about this recipe is how flexible it is! play around a bit. for a seasonal twist, consider adding pumpkin spice in the fall or crushed peppermint for winter festivities.
If you’re sticking to a gluten-free diet, swap out regular flour with gluten-free all-purpose flour , and boom! – you’ve got your gluten-free cupcakes.
And let's not forget about those egg-free options . using flax seeds or chia seeds mixed with water works great as a replacement if you need it.
It's all about experimenting until you find the combination you love!
Complete Nutrition Guide
When indulging in sweet treats, we sometimes wonder about our choices, right? Just for fun, let's break down the quick nutrition info for these cupcakes:
Each cupcake packs about 170 calories , 2g of protein, and 11g of sugar. remember, if you're using toppings or different frosting alternatives , it might alter the numbers a bit.
But hey, it’s all about balance!
These milk-free cupcakes can fit into many dietary considerations, making them great for family-friendly dessert recipes. They’re not just for those who can’t have dairy—everyone will enjoy them!
Expert FAQ Solutions
Whether you're a pro or new to baking, questions will always pop up. common ones include, "why are my cupcakes flat?" which usually points to not having enough leavening agent.
Make sure you’re using fresh baking powder and soda! if you think they might be too sweet, you can always reduce the sugar next time.
Need more tips? Keep it simple. Stick to the recipe, use room temperature ingredients, and check the doneness with a toothpick. Baking should be joyful, not stressful!
So, as we wrap this up, remember the joy that baking brings. whether you’re celebrating a birthday or simply treating yourself, you can totally make delicious, dairy-free treats.
Keep experimenting, keep smiling, and enjoy the rewards of your efforts with every single bite! happy baking, y’all!
Bake Milk-Free Cupcakes: Joyful Treats Card
⚖️ Ingredients:
- 1 ½ cups all-purpose flour
- 1 cup granulated sugar
- 1 tsp baking powder
- ½ tsp baking soda
- ½ tsp salt
- ⅓ cup vegetable oil or melted coconut oil
- 1 cup unsweetened almond milk or any other non-dairy milk
- 1 tsp vanilla extract
- Optional: 1 tbsp apple cider vinegar for added fluffiness
- ½ cup dairy-free butter (e.g., Earth Balance)
- 2 cups powdered sugar
- 1 tsp vanilla extract
- 2-3 tbsp non-dairy milk (adjust for consistency)
🥄 Instructions:
- Step 1: Preheat your oven to 350°F (175°C).
- Step 2: Line a muffin tin with cupcake liners.
- Step 3: In a large bowl, whisk together flour, sugar, baking powder, baking soda, and salt.
- Step 4: In another bowl, mix vegetable oil, non-dairy milk, vanilla extract, and apple cider vinegar (if using).
- Step 5: Pour wet ingredients into dry ingredients and stir until just combined (do not overmix).
- Step 6: Divide the batter evenly among the prepared cupcake liners.
- Step 7: Bake for 18-20 minutes, until a toothpick inserted into the center comes out clean.
- Step 8: Allow cupcakes to cool in the pan for 5 minutes before transferring to a wire rack to cool completely.
- Step 9: In a bowl, beat the dairy-free butter with a mixer until fluffy, gradually adding powdered sugar and vanilla, then mixing in non-dairy milk to achieve desired consistency.
- Step 10: Once cooled, frost the cupcakes and enjoy!
Previous Recipe: How to Bake Lactose-Free Cupcakes: Sweet & Fluffy Family Favorites
Next Recipe: Fluffy Whipped Cream: Your Sweet Shortcut to Delicious Desserts