Delightfully Soft Chocolate Chip Cookies
Wondering how to bake soft chocolate chip cookies delightfully? Join me in my kitchen as I share tips and tricks for perfect, melt-in-your-mouth cookies!

- Essential Ingredients Guide for Baking Delightful Cookies
- The Art of Professional Cooking: Bake Soft Chocolate Chip Cookies Delightfully
- Pro Tips & Secrets for the Ultimate Choco-Cookies
- Baking Presentation: Making Cookies Look as Good as They Taste
- Storage & Make-Ahead: Keeping Those Cookies Fresh!
- Creative Variations: Thinking Outside the Chip!
- Complete Nutrition Guide: Getting Down to the Nitty-Gritty
- Expert FAQ Solutions: Troubleshooting Like a Pro
- Wrapping Up
- Recipe Card
Oh my gosh, let me take you back to a rainy saturday afternoon. i was parked in my kitchen, one eye on my favorite old-school movie and the other on the bustling rain outside.
All i craved was something warm, gooey, and ultimately comforting. so, guess what i decided to whip up? you got it— bake soft chocolate chip cookies delightfully ! the smell of butter and vanilla filled my home, wrapping around me like a cozy blanket.
Honestly, nothing beats the anticipation of waiting for those cookies to come out of the oven.
So, let’s dive into why this classic american recipe is the stuff of legends. with a mix of nostalgia and modern love, these cookies not only offer a taste of childhood but also bring people together.
Whether you're a seasoned baker or a total newbie, you’ll find this soft chocolate chip cookies recipe super easy and downright fun!
Recipe Overview
Did you know that chocolate chip cookies were invented all the way back in the 1930s? ruth wakefield, a clever lady, was behind this delicious creation at her toll house inn.
Fast forward to today, and these classic chocolate chip cookies are a staple in homes across america. they’ve entered birthday parties, family picnics, and even quiet nights in while binge-watching your favorite series!
Now, let's talk about timing. prep time is around 15 minutes (because who doesn’t love quick baking?), with a little chill time of about 30 minutes to let those flavors deepen.
The magic happens in just 10- 12 minutes of baking, and soon, you’ll have about 24 cookies to share—if you can bring yourself to actually share, that is!
In terms of cost, we're looking at a simple grocery list that won’t break the bank. grab some flour, sugar, and those chocolate chips, and you're ready to go.
You can easily whip up this treat for less than a couple bucks, making it perfect for those tight budgets.
Key Benefits
Now, let’s get into the yumminess of this recipe. first off, these cookies are a guilty pleasure but also offer some joy to your body.
You’ve got the carbohydrates from the flour, healthy fats from the butter, and a little bit of protein from the eggs.
Sure, they shouldn’t replace your daily meals, but hey, they do offer a quick boost during your afternoon slump!
The unique selling point here is the soft and chewy texture . you bite into them, and they practically melt in your mouth.
Unlike some cookies that bite back, these guys are tender and forgiving, making them oh-so-enjoyable. they’re also great for a variety of occasions, whether you're celebrating a birthday or just wanting to impress someone with your baking skills.
What really sets this recipe apart? the persistence of flavor ! you can use different types of chocolate chips, throw in nuts, or even sprinkle some sea salt on top.
Each option gives your cookies a slight twist, keeping things exciting. maybe you want to try some alternative chocolate chip options ? the choices are endless!
Plus, don’t overlook the chilling cookie dough benefits ! a little chill time means these cookies won’t spread too much while baking, resulting in that perfect doughy center.
And trust me, the wait is so worth it when you demolish those warm cookies straight from the oven!
So, are you ready to grab your apron and get started? Let’s talk about the ingredients you’ll need to bake these delightful cookies!
Essential Ingredients Guide for Baking Delightful Cookies
Ah, the smell of freshly baked cookies wafting through the house—there's nothing quite like it, right? if you’re in the mood to bake soft chocolate chip cookies delightfully , you’ll want to stock up on some essential ingredients and have a few tricks up your sleeve.
Let’s take a closer look at what you'll need to whip up a batch of those classic soft chocolate chip cookies that everyone loves!
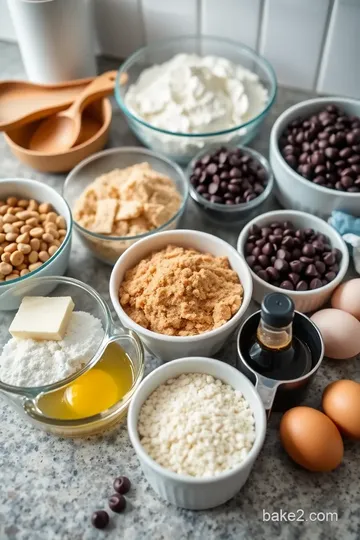
Premium Core Components
First up, let’s talk premium ingredients . Here’s what you need to make those chewy chocolate chip cookies that melt in your mouth.
- All-Purpose Flour: Measure out 2 ½ cups (315 g) . Don't skimp on this—it's the backbone of your cookie!
- Baking Soda: A teaspoon is all you need. It's crucial for that perfect rise.
- Salt: Just ½ teaspoon will do. It enhances all the sweetness.
Quality matters! when choosing your ingredients, look for fresh flour and pay attention to the expiration dates on your baking soda.
If your flour has a rancid smell, it’s time to toss it.
Storage Guidelines
Most ingredients can be stored in a cool, dry place. flour lasts about 1 year in your pantry, but it can extend up to two years in the freezer.
Always keep your butter in the fridge, wrapped tight. use it within a month for the freshest taste!
Signature Seasoning Blend
Now for the signature blend that takes your cookies from good to outstanding .
- Vanilla Extract: You’ll need about 1 tsp (5 ml) of pure vanilla. It adds depth and warmth.
- Brown Sugar: Use ¾ cup (150 g) , packed. This’ll give you that chewy texture.
- Granulated Sugar: The other ½ cup (100 g) adds sweetness and crispness to those edges.
Don’t forget to mix it up! You can throw in some ground cinnamon or even a pinch of espresso powder for added flavor.
Smart Substitutions
Sometimes life happens, and you might not have everything on hand. No worries—there are common alternatives you can use:
- Flour: If you’re gluten-free, swap it with a 1:1 gluten-free blend .
- Butter: Replace it with coconut oil or even applesauce for a lighter cookie.
- Chocolate Chips: If you’re out of semi-sweet, use milk chocolate or dark chocolate instead.
Always keep these in mind for those cookie emergencies!
Kitchen Equipment Essentials
Alright, let’s get organized with the must-have kitchen tools to make your cookie baking smooth sailing.
- Mixing Bowls: A couple of sturdy ones will do.
- Electric Mixer or Whisk: Trust me, creaming that butter and sugar is much easier with a mixer!
- Baking Sheet: A good non-stick or parchment-lined sheet is essential.
- Cooling Rack: This is crucial for letting those cookies set without getting soggy.
For those out there just starting out, grab the basics, and if you can, invest in a good set of measuring cups. Measuring flour properly is key for those dreamy cookies!
Transition to Instructions
Now that you’re armed with the best ingredients, flavor combos, and tools you need, you're ready to dive into the baking! grab your mixing bowl, preheat that oven to 350° f ( 175° c) , and prepare to bake soft chocolate chip cookies delightfully .
It's going to be a fun ride, and before you know it, you'll have warm, gooey cookies ready to impress your family or even yourself!
Stay tuned for the upcoming step-by-step cookie instructions!
The Art of Professional Cooking: Bake Soft Chocolate Chip Cookies Delightfully
Let’s dive into the professional cooking method that will have you whipping up the most scrumptious, soft chocolate chip cookies you've ever tried.
Seriously, these cookies will make you the star of any bake sale or family gathering. the key here is in the prep, timing, and a sprinkle of that classic baking love.
Essential Preparation Steps
Mise en place sounds fancy, but it just means "everything in its place." so, gather all your ingredients before you start.
This way, you won’t be scrambling to find the baking soda while your butter's melting away.
Now, about time management : you don’t want to be that person who realizes they forgot to preheat the oven after mixing everything.
Get that oven to 350° f ( 175° c) right from the start!
Organization is also key. set up your baking area so every tool and ingredient is at arm’s reach. this not only speeds things up but helps keep your kitchen from looking like a tornado hit it.
And let's talk safety. keep a dish towel handy to avoid burns and don't forget to keep those pesky kids (or pets) away from the hot oven.
Step-by-Step Process
Alright, let's get to the fun stuff. Here’s your step-by-step cookie instructions :
- Preheat the Oven : You already know this. Your oven should be at 350° F ( 175° C) .
- Prepare the Baking Sheet : Line it with parchment paper to ensure your cookies don’t stick.
- Mix Dry Ingredients : Whisk together 2 ½ cups of flour , 1 tsp of baking soda , and ½ tsp of salt in a bowl.
- Cream the Butter/Sugars : In a separate bowl, cream ¾ cup of softened butter with ¾ cup of brown sugar and ½ cup of granulated sugar until it's all fluffy, about 2- 3 minutes .
- Add Eggs and Vanilla : Mix in 2 large eggs and 1 tsp of vanilla . Keep it going until everything’s well blended.
- Combine : Gradually add the dry mix to the wet ingredients. You want to mix until just combined—don't overdo it!
- Fold in the Chocolate Chips : Add your 2 cups of chocolate chips . Use a spatula for this; it’s more about love than speed.
- Chill the Dough : Wrap it up and toss it in the fridge for at least 30 minutes . Trust me, this makes for better texture!
- Scoop and Bake : Drop generous spoonfuls onto your prepared sheet and pop ‘em in the oven for 10- 12 minutes or until the edges are lightly golden.
- Cooling Time : Let them cool for 5 minutes on the baking sheet before transferring to a cooling rack.
Make sure to trust your instincts. If they look a bit soft in the center, that’s okay! They’ll firm up as they cool.
Expert Techniques
Mastering chewy chocolate chip cookies involves understanding a few expert tips. for instance, remember to measure flour correctly. spoon it in, then level it off with a knife.
This prevents those dense little bricks we sometimes end up with.
You can also mix chocolate varieties to add depth. Replace some semi-sweet chips with dark chocolate or maybe throw in some nuts if you’re feelin’ adventurous.
A classic pro tip: if you want extra soft cookies, bake them just a minute or two less. they’ll finish cooking once they’re out of the oven.
And don’t try to move them too soon; they need that time on the sheet to properly set.
Success Strategies
Let’s avoid the common mistakes, shall we? don’t skip the chill time; it’s crucial for shaping those cookies just right.
And for goodness sake, don’t forget the cooling rack, or you'll end up with sad, soggy bottoms.
For best results, always inspect your cookies for doneness. You want a lightly golden edge but a soft, gooey center—that perfect balance.
Feeling ahead of the game? Make that dough in advance and freeze it. Just scoop it out when you need a cookie fix, let it thaw a bit, and bake away.
And there you have it! You’re primed to Bake Soft Chocolate Chip Cookies Delightfully . Stay tuned for our next section where I’ll dive into some additional information on variations to keep your cookie game fresh and exciting! Happy baking!
Pro Tips & Secrets for the Ultimate Choco-Cookies
Let’s dive into what makes these soft chocolate chip cookies truly shine! first up, a little insider tip: use room temperature butter .
This bad boy mixes up with your sugars perfectly, giving your cookies that airy texture. you know those fluffy, chewy edges we all crave? yep, that’s what we’re going for!
Time-saving techniques ? oh, i’ve got you! while the dough chills, you can gather your favorite cookie-munchin' buddies and set up a movie marathon.
Seriously, multitasking is key. and if you’re feeling fancy, throw in a dash of sea salt right before baking to take those flavors to the next level.
Trust me, it’s like a magic trick!
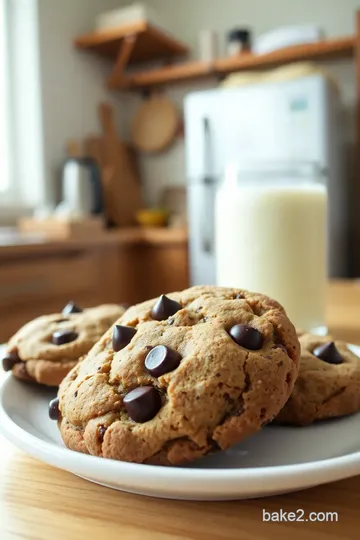
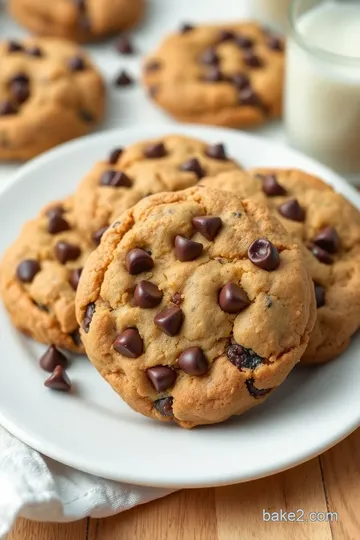
Baking Presentation: Making Cookies Look as Good as They Taste
Okay, now let’s talk presentation . it’s way more exciting than it sounds! time to ditch the ordinary. when you bake your cookies, try spacing them out so they don’t look all cramped on that tray.
Give each cookie a little room to breathe. the end result? a spread that looks as delicious as it tastes!
For garnish , a sprinkle of colorful sprinkles on top of the fresh cookies can appeal to the kid in all of us! or consider pairing them with fresh berries on the side.
And let’s be real, who doesn’t love a pop of color? it’s all about that visual appeal and making folks want to grab a cookie before they even taste them!
Storage & Make-Ahead: Keeping Those Cookies Fresh!
When it comes to storage, here’s the deal: after they cool on the cooling rack , pop those beauties in an airtight container.
They can last up to a week if you’re lucky! want to make them ahead of time? totally a smart move.
You can prepare the dough, chill it, and then freeze it. just roll them into balls, freeze, and store. bake them straight from the freezer when you need a fresh batch! it's like emergency cookies waiting in the wings!
Creative Variations: Thinking Outside the Chip!
Time to get a bit wild! sure, you can stick with the classic combination, but how about throwing in some nuts and chocolate together? a chopped pecan or walnut will add that perfect crunch next to your gooey chocolate.
Feeling seasonal? toss in some pumpkin spice during the fall or some peppermint chips during the holidays.
And for those who are all about health, or just trying to cut back, consider making gluten-free chocolate chip cookies .
It’s easier than you think! just grab a good gluten-free flour blend and you won’t even notice the difference—promise!
Complete Nutrition Guide: Getting Down to the Nitty-Gritty
Now, don’t roll your eyes! i get it, you’re here for cookies, not spreadsheets. but knowing what’s in those soft, delightful bites is smart! each cookie packs about 150 calories with a dash of sweetened goodness.
They’re not too heavy on sugar, so treat yourself.
If you’re keen on calories or carbs, just make sure to keep those portion sizes in check. two cookies with a tall glass of milk? sounds good to me! it’s all about balance, and we all deserve a little treat now and then.
Expert FAQ Solutions: Troubleshooting Like a Pro
Now, let’s tackle some of those nagging questions. “my cookies came out flat!” it happens, don’t worry! typically, that’s because the dough wasn’t chilled long enough or too much butter got added.
About that cookie cooling tip —give them a few minutes on the sheet before transferring them. this helps them hold shape!
If you got any wild ideas you're thinking about trying with your chocolate chip cookie variations , jot them down! Experimenting can lead to some hosting magic.
Wrapping Up
So there you have it! baking soft chocolate chip cookies delightfully isn’t just about the ingredients, it’s all about love and fun in the kitchen.
Take a note from my experiences—don’t sweat the small stuff. enjoy the process, get creative, and most importantly, don’t forget to share (after you snag a few for yourself, of course!).
Happy baking, my cookie-loving friends!
Delightfully Soft Chocolate Chip Cookies Card

⚖️ Ingredients:
- 2 ½ cups all-purpose flour
- 1 tsp baking soda
- ½ tsp salt
- ¾ cup unsalted butter, softened
- ¾ cup brown sugar, packed
- ½ cup granulated sugar
- 1 tsp pure vanilla extract
- 2 large eggs
- 2 cups semi-sweet chocolate chips
🥄 Instructions:
- Step 1: Preheat your oven to 350°F (175°C).
- Step 2: Line the baking sheet with parchment paper.
- Step 3: In a bowl, whisk together flour, baking soda, and salt; set aside.
- Step 4: In a large bowl, cream together softened butter, brown sugar, and granulated sugar until smooth and fluffy (about 2-3 minutes).
- Step 5: Beat in eggs one at a time, then add the vanilla, mixing until fully incorporated.
- Step 6: Gradually add dry ingredients to wet mixture, mixing until just combined.
- Step 7: Gently fold in chocolate chips using a spatula.
- Step 8: Cover the dough with plastic wrap and chill in the refrigerator for at least 30 minutes.
- Step 9: Use a cookie scoop to place dough on the prepared baking sheet, leaving space between each dough ball.
- Step 10: Bake in the preheated oven for 10-12 minutes, or until edges are lightly golden.
- Step 11: Remove from oven and let cool on the baking sheet for 5 minutes before transferring to a cooling rack.
Previous Recipe: How to Cook Corbina Eggs: Delicious Seafood Delight for Brunch
Next Recipe: How to Make My Grandmother's Zesty Onion Salad with Fresh Ingredients