Bake Swedish Limpa Bread - A Cozy Delight
Ever wondered how to Bake Swedish Limpa Bread - A Cozy Delight? Join me as I share my grandmother's favorite recipe, perfect for cozying up with tea!

- look into into Swedish Comfort: Bake Swedish Limpa Bread - A Cozy Delight
- Your Essential Ingredients Guide for Cozy Baking
- Professional Cooking Method for Baking Swedish Limpa Bread
- Pro Tips & Secrets for Baking Success
- Perfect Presentation: Make It Beautiful
- Storage & Make-Ahead: Keep It Fresh
- Creative Variations: Make It Your Own
- Complete Nutrition Guide: Know Your Bread
- Expert FAQ Solutions: Your Questions Answered
- Recipe Card
look into into Swedish Comfort: Bake Swedish Limpa Bread - A Cozy Delight
Oh my gosh, you guys! let me tell you about a time i was trying to impress my friends with a fancy new recipe.
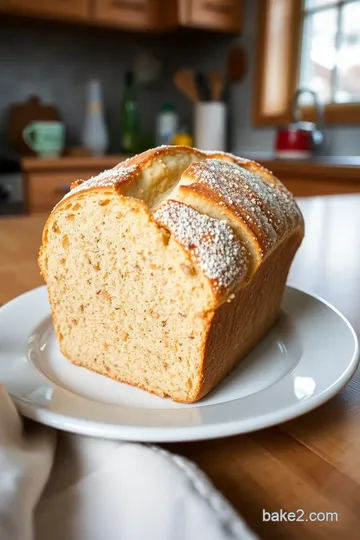
I thought, “what’s better than homemade bread?” i wanted something cozy, something that smelled like a hug. enter bake swedish limpa bread - a cozy delight .
Ever since i whipped up that fluffy loaf, it’s become a staple in my kitchen—and a hit at every gathering! you know when you can just smell the warmth and spices in the air? yup, that’s this bread for you.
A Dash of History with Every Bite
Now, let’s chat about where this charming bread comes from. swedish limpa bread has roots deep in swedish culture, lovingly made for special occasions like holidays and gatherings.
This loaf brings together the cozy vibes of scandinavian baking traditions, combining unique flavors like caraway, anise, and a zesty splash of orange.
Can you picture it? warm bread fresh out of the oven, around a table filled with laughter. it’s no wonder it’s so popular today!
You’re probably wondering—how much time and effort do i need to carve out? well, let’s break it down. it takes around two hours total , with about 30- 35 minutes of baking time .
Honestly, it’s not rocket science. if you’ve got some basic bread-making skills, you’re good to go. just a bit of mixing, kneading, and waiting, and you’re on your way to a golden-brown masterpiece.
And don’t worry about the wallet—this recipe won’t break the bank!
Savoring the Benefits
You know what’s awesome about this bread? it’s not just delicious; it’s loaded with benefits! first off, it’s nutritious. with wholesome ingredients like whole grains and aromatic spices, it keeps things interesting while providing some health perks.
Plus, it’s super versatile! whether you're chilling at home, hosting a tea time, or prepping for a dinner party, homemade limpa bread fits right in.
And don’t even get me started on those unique flavors! imagine a sweet yet savory treat that pairs perfectly with cheese or a nice jam spread.
It’s a party in your mouth with every bite! you can serve it on a cozy winter afternoon or as part of your special occasion spreads.
Trust me, your friends will be asking, “what’s your secret?”
A Transition to Deliciousness
Now that we’ve warmed our hearts with a bit of bread history and exciting benefits, it's time to roll up those sleeves and dive into what we need to bake this thing.
Let’s take a look at the limpa bread ingredients because trust me, you’re going to want to have these on hand!
Stay tuned because next, i’ll guide you through the simple steps of how to bake this cozy masterpiece in your own kitchen.
You're just a few ingredients away from creating a loaf that not only smells like bliss but also tastes like a warm embrace.
So, grab your apron, and let’s get ready to make some bread magic happen!
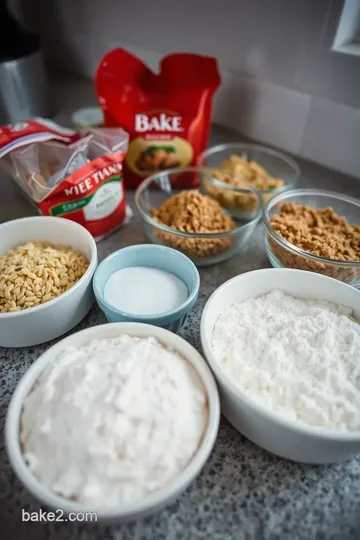
Your Essential Ingredients Guide for Cozy Baking
Oh my gosh, if you’re diving into baking, especially traditional swedish bread like limpa bread , you’re in for such a treat! before we get our hands floured up, let’s talk about those essential ingredients that’ll make your baking journey a delightful breeze.
It’s all about knowing what goes in your oven and how to use it, am i right?
Premium Core Components
To kick things off, let’s chat about those premium core components you just can’t skip. measurements are super important! for our limpa bread ingredients , you’ll need 2 tablespoons of melted butter and 1½ cups of warm milk —that’s about 360 milliliters if you’re working in metric.
When it comes to quality, always look for unsalted butter that’s fresh. you want that rich flavor to shine through.
Storage is key too! keep your spices in a cool, dark place. they lose their punch if they sit in the light too long.
Honestly, that goes for all your baking goods! most spices have a shelf life of about 1 to 3 years unopened.
If you can smell them, they’re good to go.
Signature Seasoning Blend
Now, for the fun part: creating your signature seasoning blend ! you’ll be using things like caraway seeds , ground anise , and don’t forget the zing from orange zest .
These spices not only give limpa bread its signature flavor but embody the cozy vibes of scandinavian baking recipes . are you a spice lover? don’t be afraid to play around with combinations.
A dash more here, a sprinkle less there—baking can be intuitive once you know your core flavors!
And if you’re feeling adventurous, have fun with regional variations . in different parts of sweden, you might see variations of sweet and savory bread that incorporate different herbs or spices based on local tastes.
Smart Substitutions
Here’s the deal: sometimes, you’re all set to make a loaf, and then you discover you’re out of an ingredient.
Don’t sweat it! embrace the smart substitutions ! didn’t grab any caraway seeds? no worries! you can swap in fennel seeds for a similar flavor kick.
Need a dairy-free option for the milk? go for almond milk or oat milk —both work beautifully in your dough.
The same goes for the sugar; throw in honey instead if you’re feeling sweet! it can be easier than you think to keep up your easy homemade bread game, even on a busy day.
Kitchen Equipment Essentials
Alright, let’s talk gear—your kitchen equipment essentials ! you don’t need a fancy set up; just grab a large mixing bowl , some measuring cups, and a wooden spoon .
But listen, having a good dough whisk can change your life! it makes mixing ingredients so much easier, trust me.
When it comes to prep, keep a clean kitchen towel or some plastic wrap handy for covering your dough while it rises.
And don’t forget a reliable loaf pan —a must for baking that fluffy limpa bread. but hey, if you don't have one, grab any oven-safe dish you’ve got; bread gets creative!
Closing Thoughts
So there you have it—your essential guide to nailing those cozy baking ideas for limpa bread ! prepare to unleash the warm, comforting fragrance of freshly baked bread into your home.
It doesn’t get better than this.
Next up, we’ll dive right into the instructions so you can bake swedish limpa bread - a cozy delight ! trust me; once you smell this baking, you won't want to go back.
Plus, you’ll impress everyone around with your artisan bread recipes ! ready to roll? let’s do this!
Professional Cooking Method for Baking Swedish Limpa Bread
Are you ready to dive into a cozy baking adventure? let’s talk about baking swedish limpa bread - a delightfully aromatic loaf that brings warmth and comfort.
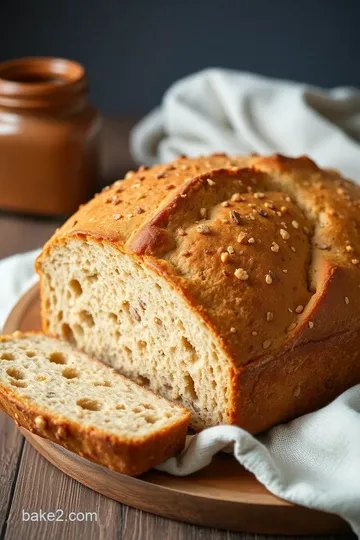
This traditional bread is spiced with caraway seeds, anise, and a hint of orange zest, giving it that unique sweet and savory flair.
Perfect for sipping tea or slathering on some butter, it’s a must-try for your next baking session!
Essential Preparation Steps
Mise en place: this fancy french term just means getting everything organized before you start. sort your limpa bread ingredients : milk, yeast, spices, flour, and whatnot.
This will save you from running around looking for stuff. trust me, nothing's worse than realizing you're out of butter halfway through!
Time management: baking takes time, but it’s all about balance. make sure you allow for prep time ( 20 minutes), resting (1 hour), and cook time (30- 35 minutes).
Keep a timer in your kitchen to stay on track, and you won’t miss a beat.
Organization Strategies: Keep your workspace tidy. You’ll need a large mixing bowl, measuring cups, and a loaf pan. If your area looks like a tornado hit, you won’t find anything when you need it!
Safety considerations: always keep your hot items at a safe distance from the edges of the counter. and be careful with that oven! the last thing you want is to burn yourself while trying to bake bread for tea time .
Step-by-Step Process
-
Activate the yeast: mix 1 ½ cups (360ml) of warm milk (about 110° f ) with granulated sugar and 1 tablespoon of active dry yeast .
Let it bubble for 5- 10 minutes . if it doesn’t bubble, your yeast might be old—better luck next time!
-
Mix the dough: in a bowl, combine melted butter , salt , 2 tablespoons ground caraway seeds , 1 teaspoon ground anise , and 1 tablespoon grated orange zest .
Stir in that frothy yeast mixture.
-
Add Flour Gradually: Toss in 4 cups of all-purpose flour , one cup at a time, until you’ve got a sticky dough.
-
Knead the Dough: Dust your surface and knead the dough for about 5- 7 minutes until it’s smooth. This exercise is good for your arms, trust me!
-
First Rise: Pop the dough in a greased bowl, cover it, and let it rise in a warm spot for about 1 hour , until it doubles in size.
-
Shape the Loaf: Punch that dough down and shape it into a loaf, then place it in your greased loaf pan.
-
Second Rise: Cover it again and let it rise until it peaks above the pan—this usually takes about 30- 45 minutes .
-
Preheat Oven: Get that baby preheating to 375° F ( 190° C) while you’re waiting!
-
Apply the Glaze: Brush the top with an egg wash (just whisk together that beaten egg with a tablespoon of water). It'll give your loaf that beautiful golden sheen.
-
Bake: Slide it into the oven and let it bake for 30- 35 minutes . It should be a golden brown and sound hollow when you tap the bottom.
-
Cool and Serve: Allow it to sit in the pan for 10 minutes , then transfer it to a cooling rack.
Expert Techniques
Okay, let’s get a bit deeper here. To take your homemade Limpa bread to the next level, here are a few tricks:
-
Yeast Activation: Don’t let your milk be too hot; otherwise, it’ll kill your yeast. Aim for that sweet spot around 110° F .
-
Check for Doneness: Tap on the bottom. It should sound hollow. A general rule? If it doesn’t, throw it back in the oven for a few minutes.
-
Storage Tips: If you have leftovers (which is rare because it’s delicious), wrap it in plastic and store it in a bread bag to keep it fresh.
Success Strategies
Now, let’s avoid some common pitfalls, shall we?
-
Common Mistakes: Over-kneading will tire out your arms and lead to a dense loaf. And remember, don’t rush the rising times!
-
Quality Assurance: Always use fresh spices for the best taste. They make a HUGE difference in flavor.
-
Perfect Results: If you want a sweeter loaf, consider adding a bit of extra sugar. Not too much, though—balance is key!
-
Make-Ahead Options: You can prepare the dough the night before and let it rise in the fridge. When you’re ready, just shape and bake! Easy peasy.
So there you have it—a delicious way to bake swedish limpa bread - a cozy delight that’ll impress friends and warm your heart.
Don’t be surprised if your kitchen ends up being the next neighborhood hub for cozy baking ideas!
Now, let’s roll into our last section, which will cover Additional Information on how this bread fits into the Nordic tradition and beyond!
Pro Tips & Secrets for Baking Success
Alright, my fellow baking ensoiasts! let's chat about how to bake swedish limpa bread - a cozy delight like a pro.
First off, this isn’t just any swedish bread recipe ; it’s a flavor bomb full of cozy vibes. trust me!
Chef's Personal Insights
When i first tackled making homemade limpa bread , i learned it's the little touches that make all the difference.
Using fresh spices, like caraway and anise , can elevate the bread’s flavor profile greatly. honestly, don’t skimp here! and a dash of freshly grated orange zest ? game changer!
Time-Saving Techniques
Now, let’s cut to the chase. need to get this spiced bread recipe done quickly? prepare the dough the night before.
Just cover it well and pop it in the fridge. when you’re ready to bake, take it out, let it warm up, and proceed with the second rise.
Less rush, more coziness!
Flavor Enhancement Tips
Take your flavor game to the next level by experimenting with the spices. have a favorite spice? throw a pinch in! this is all about making it yours.
Plus, bread baking tips suggest using a steam pan in the oven for that perfect crust. oh yeah!
Presentation Advice
You know what they say: you eat with your eyes first! when it comes to perfect presentation , this is where loaf creativity shines.
Dust a little flour on top before baking for that rustic artisanal look. it's like a fancy restaurant right in your kitchen, and it's super simple.
Perfect Presentation: Make It Beautiful
Let’s talk about plating, folks. Because who doesn't want their homemade bread to look as good as it tastes?
Plating Techniques
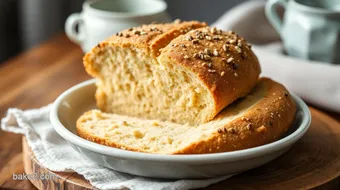
Once your Caraway seed bread has cooled, you should consider slicing it diagonally. It gives that artisanal feel, you know? Arrange those slices on a wooden cutting board for that ‘wow’ factor!
Garnish Ideas
For a fun touch, sprinkle some orange zest or a few seeds on top after the egg wash for extra flair. It’s like the cherry on top but, you know, bread-y!
Color Combinations
Try pairing your bread with lush colors. Picture pale cream with deep purple jams or bright green herbs. It’s all about creating a feast for the eyes!
Visual Appeal Tips
Use your favorite cheese and some sliced apples to bring color to the plate. honestly, it makes a world of difference.
The contrast will make your homemade limpa bread look like it came from a fancy magazine!
Storage & Make-Ahead: Keep It Fresh
So, you’ve baked this glorious bread, but what now?
Storage Guidelines
Keep the loaf tightly wrapped in plastic or in a bread box at room temperature for up to 3 days .
If you want it to last longer, slice it and store in the freezer. just thaw as needed!
Preservation Methods
Make sure to wrap it well to avoid freezer burn. Nobody wants that! If you’re feeling artsy, you can make little labels for thawed slices—cute, right?
Reheating Instructions
When it comes to reheating, you can pop it in a toaster oven or wrap it in foil and warm it in the oven.
Just don’t forget to check it so it doesn’t dry out.
Freshness Duration
This bread is best enjoyed fresh, but you can also have a slice toasted with butter as a next-day treat. Who can resist that?
Creative Variations: Make It Your Own
This is where the fun happens! Let’s talk about how you can switch things up!
Flavor Adaptations
Not feeling the traditional spices? Swap them for something seasonal! Think pumpkin spice in the fall or fresh herbs in the summer. The world is your oyster!
Dietary Modifications
Want a gluten-free Limpa bread ? You can find gluten-free flour blends that work just as well. Just remember that the texture might differ a bit.
Seasonal Twists
Think about adding dried fruits or nutty flavors during the holiday season. It transforms this artisan bread recipe into something festive!
Regional Variations
Why not try Canadian maple syrup instead of sugar? Different regions can inspire wholly different flavors and textures while respecting that Nordic bread tradition .
Complete Nutrition Guide: Know Your Bread
Alright, so what’s in this cozy loaf? Let’s break it down:
Detailed Breakdown
A slice of this bread usually has around 160 calories , which is pretty decent! you’re looking at about 4g of protein and 29g carbs .
Not bad for a satisfying snack, right?
Health Benefits
The spices like anise and caraway have digestive benefits. So, this bread is not just tasty but can be a nice addition to your meals for that little health boost.
Dietary Considerations
Keep in mind to check for any allergies, especially with the Limpa bread ingredients like milk and possible substitute suggestions.
Portion Guidance
Stick to one or two slices, especially if you’re pairing it with cheese or jam. Remember folks, we want cozy, not overstuffed!
Expert FAQ Solutions: Your Questions Answered
-
Why did my bread not rise? Maybe your yeast was old or the milk was too hot. Always make sure it's warm, not scalding.
-
Can I skip the second rise? Technically you can, but don’t. That extra fluffiness is worth it!
-
Can I add other flavors? Absolutely! Just experiment with caution—start small.
-
How do I store it? Wrap it up and ta-da! In a couple of days, you’ll have the best tea time companion.
In conclusion, bake swedish limpa bread - a cozy delight is more than a recipe. it’s a chance to bond with flavors, traditions, and even your kitchen.
I genuinely hope this inspires you to get those hands doughy and experience the magic of baking this delightful swedish loaf.
Happy baking, my friend!
Bake Swedish Limpa Bread - A Cozy Delight Card
⚖️ Ingredients:
- 2 tablespoons (30g) unsalted butter, melted
- 1 ½ cups (360ml) warm milk (about 110°F or 43°C)
- 1 tablespoon (15g) active dry yeast
- 1/4 cup (50g) granulated sugar
- 1 teaspoon salt
- 1 tablespoon (8g) ground caraway seeds
- 1 teaspoon (2g) ground anise seeds
- 1 tablespoon grated orange zest
- 4 cups (480g) all-purpose flour (plus extra for dusting)
- 1 egg, beaten (for egg wash)
- 1 tablespoon (15ml) water
🥄 Instructions:
- Step 1: Combine warm milk, sugar, and yeast in a bowl. Let sit for 5-10 minutes until frothy.
- Step 2: In a large bowl, mix melted butter, salt, caraway seeds, anise seeds, and orange zest.
- Step 3: Stir in the activated yeast mixture.
- Step 4: Gradually incorporate the flour, one cup at a time, until a sticky dough forms.
- Step 5: Transfer to a floured surface and knead until smooth, about 5-7 minutes.
- Step 6: Place dough in a greased bowl, cover, and let it rise in a warm spot until doubled, about 1 hour.
- Step 7: Punch down the dough and shape it into a loaf. Place in the prepared loaf pan.
- Step 8: Cover and let rise again until the dough rises above the rim of the pan, about 30-45 minutes.
- Step 9: Preheat oven to 375°F (190°C).
- Step 10: Brush the top of the loaf with the egg wash mixture.
- Step 11: Bake for 30-35 minutes, or until golden brown and sounds hollow when tapped.
- Step 12: Let cool in the pan for 10 minutes, then transfer to a cooling rack.
Previous Recipe: How to Whisk Lemon Beurre Blanc Sauce in 25 Min: A Zesty Delight!
Next Recipe: How to Make Chill Iced Pumpkin Creamy Delight in 15 Min: A Cozy Treat!