Vegan Maple Butter Tarts
Craving a sweet treat? Try my Vegan Maple Butter Tarts! Rich and gooey, they're a delightful twist on a classic, perfect for cozy evenings. Bake Vegan Maple Butter Tarts | Delicious Treats!

Opening Hook
You know that feeling when the leaves start turning golden, and there’s a chill in the air? it’s like the universe is nudging you to bake some treats! for me, that means it’s time to whip up a batch of vegan maple butter tarts | delicious treats .
Honestly, i still remember the first time i tried these tarts. i was at a canadian friend’s house, and they just floored me with their gooey goodness and flaky tart crust.
Maple syrup desserts have always been a weakness of mine, and these were no exception. i just had to recreate that magic at home!
Recipe Overview
Let’s take a quick stroll down memory lane. maple butter tarts are a traditional canadian dessert that dates back to the early 1900s.
They've become synonymous with canadian comfort , kind of like baseball and apple pie in the states. today, you find variations in almost every bakery up north, and with the rise of vegan baking, they’ve hopped across the border to join our kitchen adventures!
Now, you might be thinking, “are these difficult to make?” not at all! this recipe has a medium difficulty level .
Sure, you’ll need to know your way around basic pastry making, but for the most part, it’s a straightforward affair.
In about an hour and fifteen minutes, you’ll have a dozen adorable tarts ready to be devoured. plus, they won’t break the bank! with common ingredients, it’s a cost-effective option for vegan dessert recipes that your friends will rave about.
Key Benefits
So, why should you jump on the maple tart train? let’s dive into the benefits! first off, these little gems are not just delicious; they also come with some health benefits .
Using pure maple syrup not only satisfies your sweet tooth, but it’s also rich in antioxidants. coupled with coconut milk in the filling, you get a creamy texture without any dairy.
Talk about a guilt-free indulgence!
These tarts are perfect for special occasions —think thanksgiving or cozy winter gatherings. they shine brightly as vegan holiday desserts , and trust me, no one will miss the eggs or dairy.
Plus, they’re incredibly versatile. if you’ve got guests with dietary restrictions? easy peasy! you can make gluten-free tarts simply by swapping out the flour.
Just imagine the smile on your friends’ faces when you present them with homemade tarts that cater to everyone!
Another great thing? the maple butter filling is super easy to customize! you could add a little cinnamon or even a splash of bourbon for that extra kick.
Pair these tarts with a scoop of vegan ice cream , and you’ve got yourself a dessert that warms the heart and soul.
Seriously, it’s one of those autumn desserts you’ll want to make over and over again.
Now, before you grab your apron, let's check out the ingredients you’ll need to get started on this delightful journey!
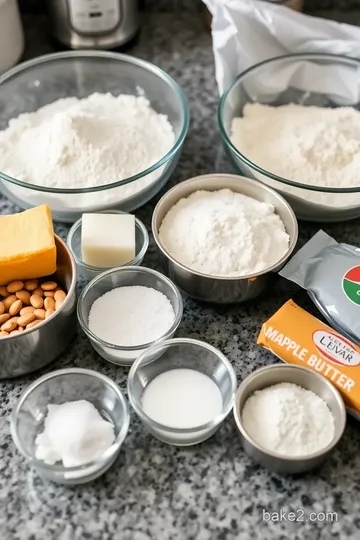
Essential Ingredients Guide
Alright, my friends, let’s dive into the essential ingredients guide that'll help you whip up sweet treats like those vegan maple butter tarts ! trust me, this guide is worth its weight in gold, especially if you’re ready to wow family and friends with some scrumptious vegan dessert recipes .
Premium Core Components
First off, let’s talk Premium Core Components . For those buttery, flaky tart crusts, you need the right ingredients.
- All-Purpose Flour : Go for 1 ½ cups (180g) . Make sure it’s fresh; aged flour can lead to a tough crust.
- Coconut Oil : Use ½ cup (120ml) . It should be solid but softened. Trust me, the creamy richness is unmatched.
- Maple Syrup : You’ll add 2 tablespoons for the dough and 1 cup (240ml) for that gooey filling. Look for the good stuff—pure maple syrup makes all the difference.
Once you have those essential ingredients ready, pay attention to quality indicators . Freshness is key! Make sure your coconut oil is not rancid; it should be slightly fragrant but not overpowering.
And don’t forget about storage guidelines . keep your flour in a cool, dry place for up to 6 months, while syrup can last a year unopened.
After you open it, it's good in the fridge for about a year, so no need to stress about waste!
Signature Seasoning Blend
Now onto the Signature Seasoning Blend . Ever thought about why some treats hit just right? Spoiler alert: It's all in the spices.
- Cinnamon : Just ½ teaspoon adds warmth and depth! You really can't go wrong with a touch of this spice.
- Vanilla Extract : A classic! Just 1 teaspoon makes everything feel fancier.
For those adventurous souls, don’t hesitate to mix in some herb selections . Adding a pinch of nutmeg can give those warm desserts with tea a whole new vibe!
Smart Substitutions
We’re all about flexibility! Let’s explore some Smart Substitutions to help you out in the kitchen.
- Coconut Milk : If you’re out, grab some almond or soy milk. They’ll work like a champ!
- Maple Syrup : Agave syrup or even brown rice syrup can swap in, but we’re talking a different flavor profile.
- Emergency Replacements : If you don’t have cornstarch, a bit of arrowroot powder can hold things together in a pinch.
Kitchen Equipment Essentials
Okay, so you’ve got your ingredients sorted. Now, what about tools? Let’s go over some Kitchen Equipment Essentials .
- Muffin Tin : Essential for tart baking. If you don’t have one, small ramekins can work too, though they won’t give you the cute tart shape.
- Rolling Pin : You’ll need this baby to get that dough nice and flat. No fancy baker’s tools required!
For prepping and storing, invest in some good-quality mixing bowls and a whisk. A little organization goes a long way in the kitchen!
Closing Thoughts
There’s a whole world of flavors waiting for you as you prepare to bake vegan maple butter tarts | delicious treats that will amaze your taste buds! remember, every ingredient plays an important role in the story of your dish.
From flaky tart crusts to maple butter filling , understanding what you’re working with elevates your game.
So, now that you're armed with all this knowledge about ingredients, let’s transition into the instructions. grab your aprons and let’s get to it! you’re on your way to creating some delicious plant-based snacks that will have everyone begging for the recipe.
Get ready to impress!
Professional Cooking Method: Mastering the Basics for Vegan Maple Butter Tarts
When you dive into baking vegan treats , there's something magical about transforming simple ingredients into sweet vegan treats that everyone loves.
One recipe that'll blow your mind? bake vegan maple butter tarts | delicious treats. but before we get into the taste explosion that is maple syrup goodness, let’s chat about the professional cooking methods that will elevate your baking game.
Essential Preparation Steps
First things first, let’s start with mise en place . it sounds fancy, but it’s simply about having everything in place before you start cooking.
Measure out your ingredients—trust me, it saves time and keeps your kitchen organized. like, who wants to rummage around for coconut oil when your dough is ready to go? not me!
Then there's time management . i’ve burned cookies because i got distracted—think did i put the flour in? that's where cooking timers come in.
Set one for each step, especially during the baking process. your tarts will be perfectly golden at 25- 30 minutes without second-guessing.
Speaking of organization, how about keeping your workspace tidy? cleaning as you go not only speeds up the process but also keeps your sanity intact.
Tossing used utensils in the sink can prevent that overwhelming "where do i even start?" feeling after baking marathons!
And please, remember safety considerations ! Always use oven mitts when taking hot trays out. Cooking is all fun and games until someone gets burned!
Step-by-Step Process
Ready to dive into the good stuff? Here’s the straightforward way to make those fabulous tarts.
-
Prepare the dough —mix flour, salt, coconut oil, and maple syrup. gradually add in cold water. chill it for 30 minutes .
Chilling helps shape a flakier tart crust, so it’s worth the wait.
-
Next, preheat your oven to 350° F ( 175° C) . While it warms up, roll out your dough and shape it into those cute little shells in a muffin tin.
-
Now, let's make the filling! in a saucepan, whisk blend together maple syrup, coconut milk, cornstarch, vanilla, cinnamon, and a pinch of salt.
Heat this over medium until it thickens for about 5- 7 minutes .
-
Assemble your tarts by pouring the warm filling into the shells, filling them about 3/4 full . Trust me, this gooey goodness is worth it.
-
Bake these beauties for 25- 30 minutes until the edges are golden and the filling is set. You'll want to keep an eye on them—who doesn't love that delicious maple aroma filling their home?
Expert Techniques
As a home baker, i've learned a few nifty tips along the way. first, always make sure your filling has thickened enough before pouring it in.
This is a critical step; if it’s too runny, you’ll end up with a big mess—not cute!
While you're at it, use quality maple syrup. the flavor is everything in your maple syrup desserts . plus, literacy on texture helps—flaky crusts need careful handling.
If there are cracks, patch them up with extra dough.
And if something goes wrong? don’t panic! a little troubleshooting can come in handy. for instance, if your tart shells are overbaked, give them a light dusting of powdered sugar to mask any imperfections.
Success Strategies
Now let's get real about common mistakes . Overfilling the tart shells is a rookie move. You want that filling to set nicely, not overflow. Remember to leave a bit of room!
And don't forget about quality assurance . Taste your filling before baking—it's a delicious plant-based snack in its own right!
One last tip? Consider making a double batch of these tarts. You’ll thank yourself during the holiday gatherings or just cozy nights at home with warm desserts over tea.
Additional Information
Now that you’ve got the pro tips for creating perfect vegan treats , you’re more than ready to whip up those vegan maple butter tarts.
These dairy-free treats are not only delicious but also ideal for friends with dietary restrictions. pair them with vegan ice cream for a rich dessert experience or serve them warm with spiced cider to elevate your autumn evenings.
Feel free to experiment, play around with fillings, and make them your own! Happy baking, friends! Remember, the kitchen is your playground, so have fun with it! Can't wait for you to try these out!
look into Into Deliciousness: Bake Vegan Maple Butter Tarts | Delicious Treats
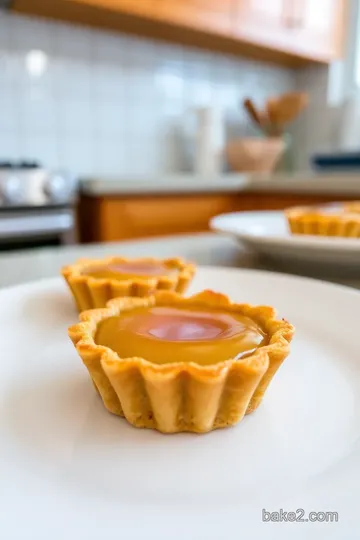
Let me just say, these vegan maple butter tarts are total game changers. i’m telling you, once you dive into that rich, gooey filling and that flaky tart crust , you’re not coming up for air.
Seriously. they bring everything you love about traditional canadian desserts , but without any of the guilt. so here are my personal insights, tips, and a little magic to spice up your baking experience!
Pro Tips & Secrets
First things first, chill your dough ! keeping that crust cold is key to achieving a perfectly flaky texture. after mixing, let it chill for about 30 minutes —your future self will thank you.
And while your dough is chilling, let’s talk about the filling. use high-quality maple syrup . a good syrup brings out the richness in these tarts like nobody’s business.
Need a little shortcut? skip the store-bought crust and make your own! it sounds fancy, but it’s an easy vegan recipe that takes just a few minutes.
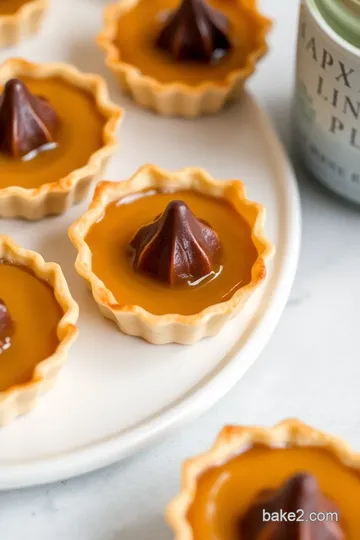
Plus, it’ll impress your friends, and who doesn’t love homemade tarts? when it comes to flavor, you can play with spices too.
A pinch of nutmeg or even a splash of bourbon can elevate those flavors to the next level. just imagine.
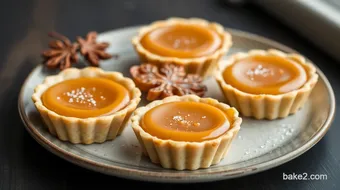
Perfect Presentation
Okay, let’s be real for a sec—how your tarts look is almost as important as how they taste. when it comes to plating techniques , don’t overthink it! just pop them on a nice platter.
Drizzle some extra maple syrup on top for that wow factor. and if you’re feeling artsy, throw on a mint leaf or two for a burst of color.
For garnish ideas , crushed nuts add not just flavor but also a nice crunch. and hey, if you’re opting for that chocolate twist i mentioned, sprinkle a few dairy-free chocolate chips on top.
Color combinations are also a thing! think about contrast; the golden tarts next to dark chocolate or vibrant fruits can make your dessert table pop!
Storage & Make-Ahead
Now, let’s chat storage because we all know life gets busy. you can store these bad boys in an airtight container in the fridge for up to 5 days .
But if you’re like me and love to plan ahead, make-ahead is the way to go. you can whip up the crust a day in advance and just fill and bake when you’re ready.
Need them for the holidays? you bet!
When it comes to reheating , simply pop them in the oven at a low temp until warmed through. Nobody wants a soggy tart, right? Keeping them cool until serving helps maintain freshness, and we all want those signature textures!
Creative Variations
Let’s be real: baking should be about creativity! you can easily switch things up. wanna try gluten-free tarts ? use your favorite gluten-free flour blend.
If you’re feeling adventurous, how about adding in some chopped nuts for that extra texture? you could even toss in seasonal flavors like pumpkin spice for autumn desserts.
Vegan baking tips are all about experimenting! you can swap out the maple syrup for agave if you’re looking for something different.
Create a custom filling with fruits or chocolate—just think of the possibilities!
Complete Nutrition Guide
Now, we can’t ignore the nutritional side, right? these sweet vegan treats have about 200 calories per serving , packed with just enough fats and carbs to satisfy without weighing you down.
It’s the best of both worlds! feeling good about yourself while enjoying delicious food? yes, please!
Plus, you’re getting the benefits of maple syrup. It’s not just a sweetener; it’s packed with antioxidants. So next time you enjoy these tarts, just know you’re indulging in a guilt-free indulgence if there ever was one!
Expert FAQ Solutions
Got questions? i hear ya! common ones are all about baking time and how to store leftovers. just remember, every oven is different! keep an eye on those tarts in the oven to prevent burning, and don’t hesitate to taste as you go when mixing.
If you run into trouble, don’t sweat it! whether you’re a seasoned pro or just getting into homemade tarts , remember: if they don’t turn out perfect, it’s still going to be delicious.
Sometimes those happy accidents become the best guilt-free desserts !
So, gather your friends and get baking! whether it's for a casual get-together or that fancy vegan-friendly gathering you've been planning, these delicious plant-based snacks are sure to steal the show.
Every nibble of your vegan maple butter tarts will remind you just how sweet life can be. go on—enjoy the journey!
Vegan Maple Butter Tarts Card
⚖️ Ingredients:
- 1 ½ cups (180g) all-purpose flour
- ½ cup (120ml) coconut oil (solid but softened)
- 2 tablespoons maple syrup
- 1/4 teaspoon salt
- 2-4 tablespoons cold water
- 1 cup (240ml) pure maple syrup
- 1/4 cup (60ml) coconut milk (full-fat for richness)
- 1 tablespoon cornstarch
- 1 teaspoon vanilla extract
- 1/2 teaspoon ground cinnamon
- Pinch of salt
🥄 Instructions:
- Step 1: In a mixing bowl, combine flour and salt.
- Step 2: Add the coconut oil and maple syrup, mixing until crumbly.
- Step 3: Gradually add cold water, one tablespoon at a time, until a dough forms.
- Step 4: Chill the dough in the refrigerator for 30 minutes.
- Step 5: Preheat your oven to 350°F (175°C).
- Step 6: Roll out the dough on a floured surface to about 1/4 inch thick.
- Step 7: Cut out circles to fit the muffin tin and press them into the tin.
- Step 8: In a saucepan, whisk together maple syrup, coconut milk, cornstarch, vanilla, cinnamon, and salt.
- Step 9: Heat over medium heat, stirring constantly, until gently thickened (about 5-7 minutes).
- Step 10: Pour the filling into each tart shell, filling them about 3/4 full.
- Step 11: Bake for 25-30 minutes or until the edges are golden and the filling is set.
- Step 12: Allow tarts to cool in the tin for 10 minutes, then transfer to a wire rack to cool completely.
Previous Recipe: How to Make Microwave Mini Marshmallows Quick Recipe: A Sweet Treat!
Next Recipe: Discover the Best Bake Maple Butter Tart Squares | Easy Dairy-Free Treat