Baked Bars: 5 Amazing Ways to Enjoy Chewy Oatmeal Treats!
Looking for baked bars? Try our chewy oatmeal chocolate chip baked bars recipe, packed with flavor and perfect as a healthy dessert! Discover it now.

- Master the Art of Chewy Oatmeal Chocolate Chip Baked Bars
- Why This Recipe Will Amaze You
- Health and Nutrition Highlights
- Recipe at a Glance
- Premium Ingredients Guide
- Kitchen Equipment Essentials
- Professional Cooking Guide
- Expert Kitchen Wisdom
- Perfect Presentation
- Storage and Make-Ahead
- Creative Variations
- Complete Nutrition Guide
- Expert FAQ Solutions
- Recipe Card
Have you ever found yourself in the snack-o-sphere, standing in front of an open fridge, feeling like every option just doesn’t hit the spot? you know the drill: those pre-packaged snacks are calling your name, but deep down, you’re craving something a bit more wholesome.
Well, what if i told you that you can whip up some chewy oatmeal chocolate chip baked bars that hit the sweet spot but are also healthier than your average store-bought option? these bars are bringing together nostalgia with a bit of modern flair, and the best part? they take just 40 minutes to prepare.
Pretty neat, huh? and don’t stress about it; this is an easy baking recipe, perfect for kitchen novices and seasoned bakers alike.
Now, let’s delve a bit into the story of these magical bars, shall we? oatmeal has been a staple in the anglo-saxon diet for centuries, gracing tables at breakfast and even appearing in hearty baked goods.
Oats were seen not just as food but as comfort, nourishment for hard-working souls. fast forward to today, and you’ll find oatmeal popping up in everything from overnight recipes to those ultra-popular energy bars you see everywhere.
This recipe is special for several reasons. first, it marries that warming comfort of old-school oatmeal with the decadent delight of chocolate.
It’s not just about taste; it’s about creating a snack that feels good to eat. plus, these bars are super versatile—you can make them gluten-free or even dairy-free, depending on your needs.
And don’t even get me started on how they can be easily customized with nuts or dried fruit, making them the ideal snack bars recipe!
Master the Art of Chewy Oatmeal Chocolate Chip Baked Bars
So, let’s explore the culinary heritage a bit. oats have undoubtedly stood the test of time. they were a vital part of many british households, renowned for their hearty flavor and nutritional benefits.
The origin of our beloved baked bars can be traced back to folk wisdom—especially that old adage, "use what you have.
" a bunch of oats, a few eggs, and some sweetening agent—voilà, you’ve got a dish that has cultural significance and a delightful flavor.
Fast-forward to today, and chewy oatmeal chocolate chip bars are enjoying a resurgence, thanks to the health-conscious crowd seeking quick, healthy snack ideas.
They’re all over social media, celebrated for their impeccable balance of flavor and nutritional value. i'm telling you, these bad boys have got staying power!
Why This Recipe Will Amaze You
Alright, let’s chat about flavor. the combination of chewy oats, rich brown sugar, and melting chocolate chips is a match made in heaven.
Honestly, when you take that first bite, it’s like a warm hug with a sweet little smile. and for the techniques—don’t worry if you’re not a baking whiz! this recipe is foolproof.
With simple, clear steps and a very forgiving batter, you’ll find success is practically guaranteed.
And because we’re living in the age of busy schedules, these bars save you time. just mix, bake, and cool! the best part? you can make a big batch and snack on them throughout the week.
Who needs to buy energy bars or snack bars when homemade baked bars are just a few steps away?
Health and Nutrition Highlights
Let’s not forget the “healthy” in these healthy dessert recipes. they not only satisfy your sweet tooth but also come packed with fiber, thanks to the rolled oats.
Plus, you can make them vegan and dairy-free by switching up a few ingredients. they make for a hearty and nutritious snack without all the junk.
And if you’re looking to balance out your sweetened oatmeal bars with some wholesome ingredients, trust me, you’ll feel good about munching on these.
Recipe at a Glance
- Preparation Time: 15 minutes
- Cooking Time: 25 minutes
- Total Time: 40 minutes
- Serving Size: 12 bars
- Skill Level Required: Easy
- Cost Efficiency: Budget-friendly!
So, you’ve got a great family-friendly recipe that’s easy on the pocket. ready to dive into the ingredients? stay tuned, as we’ll unlock the secrets behind those chewy, chocolatey gems! with just a few simple ingredients, you’ll be on your way to mastering the art of baked bars.
Trust me, you won't regret it!
Premium Ingredients Guide
So, you’re ready to dive into the world of tasty baked bars, huh? if you're anything like me, the thought of whipping up some chewy oatmeal chocolate chip baked bars gets you all excited! but before we get into the crunchy, gooey goodness of it all, let's take a sec to chat about our premium ingredients.
It’s all about quality, baby!
Premium Core Ingredients
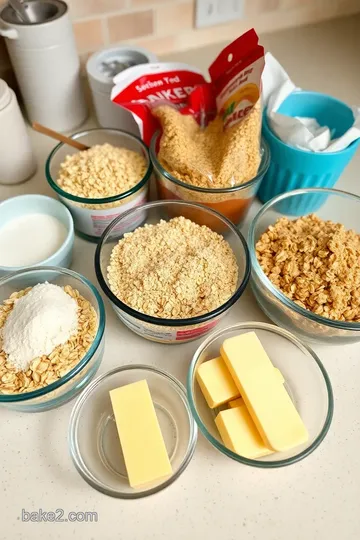
When it comes to crafting the perfect batch of baked bars, you want to start with the best stuff. Here’s a quick breakdown of what you’ll need:
-
Dry Ingredients:
For these oatmeal bars, you’ll need 2 cups of rolled oats and 1 cup of whole wheat flour. Quality oats should look plump and have a golden hue. -
Wet ingredients:
brown sugar is the star with 1 cup packed—go for the dark variety for a richer flavor.And when you melt that unsalted butter (or coconut oil), it should be smooth and free of lumps.
Selection Tips: Look for grains that are organic or minimally processed when you can; it makes a huge difference. Oh, and don’t buy the dusty stuff off the bottom shelf in the store—check expiration dates!
Storage Guidance: Keep your nuts and grains in airtight containers to prevent them from going stale. And for those luxurious chocolate chips? Store them in a cool, dry place, or they might get a bit melty before you even start baking!
Signature Seasoning Blend
What’s a baked bar without a little pizzazz? Spice it up!
-
Spice Combinations:
For these bars, simple is best. A dash of salt brings out those sweet flavors beautifully. -
Herb Selections:
Not a ton of herbs here, but you could add a pinch of cinnamon for warmth—seriously, it’s like a hug in a bar. -
Flavor Enhancers:
A teeny splash of vanilla extract makes everything pop! -
Aromatic Additions:
For an extra twist, consider adding a bit of orange zest. Trust me, it brightens things up!
Smart Substitutions
Sometimes, you’re knee-deep in a recipe and realize you don’t have everything. No worries; we’ve got you covered!
-
Alternative Options:
Don’t have brown sugar? You can use granulated sugar; just add a bit of molasses to mimic that deep flavor. -
Dietary Swaps:
If you’re all about that vegan life, swap the eggs for a flax egg or two. It works like magic! -
Emergency replacements:
no oats on hand? try using quick oats or even smashed banana in a pinch; it gives you a much different taste, but sometimes it’s fun to mix things up. -
Seasonal Variations:
In the fall? Toss in some pumpkin puree! In the summer? Try fresh berries instead—those fruity baked bars will shine!
Kitchen Equipment Essentials
We need to talk tools, my friends! You can’t bake these chewy delights without a few trusty gadgets.
-
Must-Have Tools:
A big mixing bowl and a spatula are musts for stirring that scrumptious batter together. -
Recommended Appliances:
An oven thermometer is a game-changer. It ensures your baking temperature is spot-on, and we want those bars achieving perfect chewy goodness! -
Helpful Gadgets:
A good set of measuring cups makes everything easier. Precision matters—even a little too much flour can turn those delightful bars into a brick! -
Home Alternatives:
Don’t have a baking pan? Use a square cake pan or even a muffin tray to create bite-sized versions—how cute is that?
Pro Ingredient Tips
Alright, before we jump into the steps for our oatmeal chocolate chip baked bars, I’ve got a few pro tips to keep in mind.
-
Selection Secrets:
Look for oats that say “whole grain” on the label—this way, you know you’re not just munching on empty carbs. -
Quality Markers:
For eggs, free-range is always a win—your baked bars deserve the best! -
Storage Solutions:
After baking, let those lovely bars cool on a rack so they won't sweat. Stack 'em in an airtight container, and they’ll stay fresh longer. -
Money-Saving Tips:
Buy ingredients in bulk; it saves cash and the environment. Plus, you’ll always have stuff on hand for a last-minute baking session!
And there you have it, the essential ingredients guide to take your oatmeal chocolate chip baked bars to the next level.
Now that you’re set up with all this knowledge, let’s talk about the fun part—making these delicious treats! we’re just moments away from those warm, gooey bites that’ll make you smile.
Grab your apron, and let’s roll up those sleeves!
Professional Cooking Guide
Oh my gosh, i have to tell you about my latest baking adventure. picture this: one sunny afternoon, i decided to whip up some chewy oatmeal chocolate chip baked bars.
These aren’t just any bars; they’re perfect for snack time, dessert time, or when you need that little pick-me-up. plus, you can even jazz them up with some nuts or dried fruits if you're feeling fancy!
But before we dive into the deliciousness, let’s talk about the essentials. having everything organized beforehand makes such a difference.
It’s all about that mise en place—having all your ingredients prepped and ready to go. trust me, it saves you from scrambling around the kitchen while flour’s flying, and the oven’s beeping.
Essential Preparation Steps
First thing’s first: mise en place . gather all your ingredients and tools. for these baked bars, you’ll need rolled oats, whole wheat flour, brown sugar, butter, eggs, and those all-important chocolate chips.
A 9x13-inch baking pan is a must, too. if you’ve got parchment paper, great! it makes for easy cleanup.
Next, we need to cozy up with some prep techniques. the dry ingredients get their own bowl. that’s where the oats, flour, baking powder, baking soda, and salt hang out.
Give them a good whisk to mix them up nicely.
Then comes the time management part. you’ll be surprised how quickly 15 minutes goes by when you’re chatting with a friend—or, you know, binging on some netflix while baking.
Just make sure you don’t wander off too far.
Finally, organization tips! think of your kitchen as a little theatre. everything has its place, from measuring cups to mixing bowls.
Have a clean workspace, and it’ll make the process so much smoother. you’ll want to focus on the delicious aroma wafting through your kitchen instead of searching for that elusive teaspoon.
Professional Cooking Method
Now onto the fun part: the actual cooking! begin by preheating your oven to 350°f (175°c). while that’s heating up, mix your dry ingredients in one bowl and whisk the wet ingredients in another.
When they're ready to meet, combine them but don’t overmix. the aim is to keep those chewy vibes intact.
When you’re pouring the mixture into the pan, spread it evenly. this is a critical step because uneven baking leads to some sad, dry edges.
Pop it into the oven and set your timer for 25-30 minutes. you’ll know they’re ready when the edges turn a lovely golden brown, and a toothpick inserted in the center comes out with just a few crumbs clinging to it.
That’s when the true magic happens!
Expert Techniques
Let’s talk success indicators, shall we? honestly, the smell of baked goods is always a dead giveaway. you’re going to want to take a sneaky peek around the 25-minute mark.
But remember, don’t open the oven door too soon or your bars might sink.
If you’re new to baking, precision is key. measure correctly, snag a timer, and keep an eye on your temperature.
Also, it’s worth noting that letting the bars cool completely helps enhance that chewy texture we’re aiming for—so don’t that skip step!
Success Strategies
Now, what if things don’t go quite as planned? don’t stress if your bars don’t look perfect. here’s a troubleshooting tip: if they come out too dry, the next time you bake them, pull them out a wee bit earlier.
And if they flop altogether? well, they’re still edible—just consider them a crunchy topping for your next yogurt bowl!
For quality assurance, always taste before serving. If they're a hit with you, they’ll be a hit with everyone else!
Now you’re all set to whip up some absolutely delightful oatmeal chocolate chip bars. oh, and if you’re looking for some fun variations—consider adding dried fruits or switching to nutty baked bars for added flair.
Make it your own!
Additional Information Section
These baked bars are not just a simple sweet snack; they offer endless possibilities. whether you want them for breakfast on the go, an afternoon pick-me-up, or a healthy dessert option, they’ve got your back.
Keep experimenting with flavors and ingredients to create your version of yummy snack bars. and stay tuned for more about creative ways to store your baked goodies and other recipe ideas! enjoy!

Oh my gosh, if you’re looking for a way to whip up something that hits the sweet spot but doesn’t leave you feeling like you just inhaled a whole cake, let me tell you about these chewy oatmeal chocolate chip baked bars .
Seriously, they’re the perfect blend of chewy and chocolatey without putting you in a sugar coma. plus, they’re kinda healthy! can we talk about the balance?
Expert Kitchen Wisdom
Let’s dive into what makes these baked bars so fantastic! first off, i love how simple they are to put together.
You could almost do this in your sleep! cooking up these bars really is an excellent way to flex your kitchen muscles.
Professional chefs might roll their eyes at how easy this is, but there’s something about nailing it, right? my pro tip? use good-quality chocolate chips.
You can go dark for a richer flavor or stick with semi-sweet if that's your jam.
The magic is in the technique, my friends. when mixing your dry and wet ingredients, don’t overdo it! just combine until everything’s happily married.
Overmixing can lead to dense bars, and we want these chewy and delightful, not heavy.
Perfect Presentation
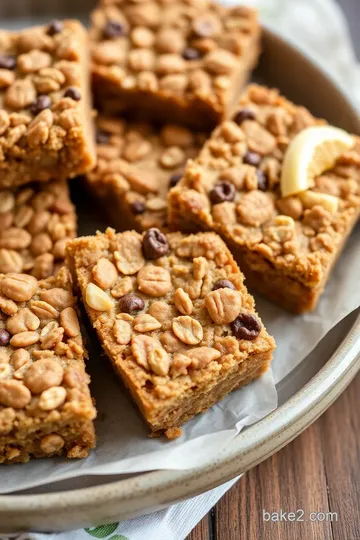
Now onto the fun part – the visuals. plating these bad boys isn’t all that complicated, and honestly, it's mostly about making them look inviting.
When you cut them into bars, stack a few on a pretty plate. you could sprinkle a bit of a flaky sea salt on top for that fancy chef vibe, or a drizzle of melted chocolate for that extra wow factor.
Maybe throw on some fresh berries for color!
For a plant-based twist, try serving them with a dairy-free yogurt on the side. It’s not only a great complement but also gives a nice contrast when served. Pretty bars, happy snacking!
Storage and Make-Ahead
One of the best things about these oatmeal bars is their versatility. you can totally make them ahead of time! just store them in an airtight container at room temperature for about five days.
Sometimes i get lazy and shove them in the fridge, which extends their life for a week, but fresh is always best.
If you freeze them, make sure to wrap each bar individually. when you’re having a long day, just pop one in the microwave for about 10-15 seconds to bring back that chewy texture.
Creative Variations
Need some pizzazz? play around with flavor adaptations! swap half the oats for almond meal, or use almond butter instead of melted butter for a nutty twist.
You could even sneak in some shredded coconut for a hawaiian touch. if you're bringing these to a party, try adding dried cherries or cranberries for some fruity fun.
Also, if you’re focused on health, experiment with whole wheat flour or even gluten-free baking options with almond flour. There are just so many flavor pathways to explore!
Complete Nutrition Guide
Okay, here comes the best part – the guilt-free goodness. each of these bars is packed with oats, so you get fiber right off the bat.
With a calorie count of around 180 per bar, they fit into a healthy dessert recipe lineup, or even a cheeky afternoon snack.
You’ve got healthy fats coming from the nuts if you choose to add them. plus, brown sugar gives it that lovely caramel-y flavor without being too cloyingly sweet.
Expert FAQ Solutions
Now, i bet you’re wondering if you can mess this up. trust me, i’ve had my share of baking bloopers! usually, it’s just about tweaking ingredients to suit your taste.
If you find your bars are coming out crumbly, it might be that the wet ingredients didn’t bind enough; add a touch more honey or experiment with an extra egg next time.
When in doubt, reach out! I’m always here to say, “Yes, you can salvage it!”
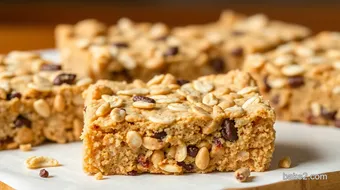
These chewy oatmeal chocolate chip baked bars are the ultimate snack that pleases both kids and grown-ups alike. they’re easy, adaptable, and deliciously satisfying.
So next time you’re craving something sweet, but not too rich, whip up a batch and enjoy! happy baking, my friends!
Baked Bars: 5 Amazing Ways to Enjoy Chewy Oatmeal Treats! Card
⚖️ Ingredients:
- 2 cups rolled oats
- 1 cup whole wheat flour
- 1/2 teaspoon baking powder
- 1/2 teaspoon baking soda
- 1/4 teaspoon salt
- 1 cup brown sugar, packed
- 1/2 cup unsalted butter, melted (or coconut oil for a dairy-free version)
- 1/2 cup honey (or maple syrup for a vegan option)
- 2 large eggs
- 1 teaspoon vanilla extract
- 1 cup semi-sweet chocolate chips (or dark chocolate chips)
- 1/2 cup chopped nuts (walnuts or pecans, optional)
🥄 Instructions:
- Step 1: Preheat your oven to 350°F (175°C). Grease a 9x13-inch baking pan or line it with parchment paper for easy removal of the bars.
- Step 2: In a large mixing bowl, combine the rolled oats, whole wheat flour, baking powder, baking soda, and salt. Whisk until evenly mixed.
- Step 3: In another bowl, whisk together the brown sugar, melted butter, honey (or maple syrup), eggs, and vanilla extract until well blended and smooth.
- Step 4: Pour the wet ingredients into the bowl with the dry ingredients. Stir using a spatula or wooden spoon until just combined. Be careful not to overmix.
- Step 5: Gently fold in the semi-sweet chocolate chips and chopped nuts (if using) until evenly distributed in the batter.
- Step 6: Spread the mixture evenly into the prepared baking pan. Use a spatula to smooth the top.
- Step 7: Bake in the preheated oven for 25-30 minutes or until the edges are lightly golden, and a toothpick inserted in the center comes out mostly clean (a few crumbs are okay).
- Step 8: Remove from the oven and allow to cool in the pan for about 10-15 minutes. Once cool enough to handle, lift the bars out using the parchment paper (if used) and place on a wire rack. Let cool completely before cutting into 12 bars.
Previous Recipe: Easy cottage cheese bake: 5 Delicious Ways to Savor Dinner!
Next Recipe: Starbucks Potato Chive Bake Recipe: The Ultimate Comfort Dish to Share!