Baked Lay's Chips with Flavorful Dips
Craving crispy treats? Try my easy recipe for Baked Lay's Chips! They're guilt-free and pair perfectly with zesty salsa. Let's munch together!

A Snack Revolution: Baked Lay's Chips with Flavorful Dips
Have you ever found yourself sitting on the couch, flipping through channels with a plate full of soggy, store-bought chips? it’s a sad sight, really! i remember a game day when i was surrounded by friends, and all we had were those bland chips that crushed our spirits faster than a last-second field goal.
That's when i thought, there’s gotta be a better option . enter baked lay’s chips ! i found out that making homemade potato chips not only satisfies my cravings but also keeps my snack game strong without the guilt.
Let’s dive into this chip-tastic journey!
Recipe Overview
So, let’s set the scene, shall we? potato chips date way back to the 19th century—a genius creation by a chef who just wanted to make his customers happy.
Fast forward to today, and these crispy delights are an american classic, perfect for everything from backyard barbecues to cozy movie nights with your fave flick.
This easy chip recipe takes around an hour and a quarter, but trust me, the little bit of prep time is totally worth it!
When it comes to cost, making baked chips at home is a total win. a few medium-sized russet potatoes and some basic seasonings won’t break the bank.
You can make about two cups of chips for roughly the price of a snack at the corner store. that means more flavor for less dough!
Key Benefits
The beauty of these crispy baked chips lies in their health benefits. let’s be real: we all love to snack, and opting for homemade options means you control what goes into your food.
These chips are baked, so they’re lower in fat than traditional fried snacks. and if you're into guilt-free snacking , you can enjoy them without that heavy feeling afterward.
And here's the kicker—these chips are as versatile as you want them to be! you can dip them into tasty dipping sauces like zesty salsa or creamy ranch, perfect for any occasion, even a big game day gathering.
Serve them up at parties, or gobble them up while binge-watching your favorite series. you can even whip up some healthy dip options like guacamole or hummus.
Talk about the ultimate snack idea for kids and adults alike!
Plus, there’s something about making your own chips that’s just plain satisfying. you can experiment with different seasonings, creating your very own potato chip seasoning.
Make them spicy, herby, or cheesy with a sprinkle of nutritional yeast! honestly, don’t you want to impress your friends with those options?
How to Make the Chips
Ready to get cooking? Here’s how to whip up those delightful Baked Lay’s !
- Prep Those Potatoes: Start by washing and peeling four medium russet potatoes.
- Slice ‘em Up: Use a mandoline slicer or a sharp knife to create thin slices (about 1/8 inch). Uniform slices ensure they cook evenly.
- Soak it Up: Soak those slices in cold water for about 30 minutes. This little trick removes excess starch and amps up the crispiness. You seriously don’t want soggy chips.
- Season Well: After patting them dry (don’t skip this step!), toss the slices in a bowl with olive oil, salt, paprika, garlic powder, and black pepper.
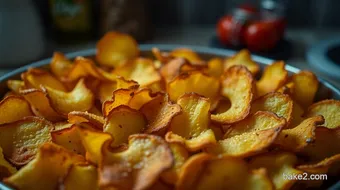
- Baking Time: Preheat your oven to 400° F ( 200° C) and let those chips bake for 25- 30 minutes. Remember to flip them halfway through for even crispiness.
- Cool and Crunch: Once they’re golden brown, let them cool on a baking sheet. Then, serve them warm, because who wants cold chips?
I can’t stress enough how fun it is to make these crispy snacks for movie night or any casual gathering.
Plus, it’s a fantastic way to engage kids in the kitchen. everyone can get involved in creating their own unique chip variations!
So there you have it—your guide to making homemade potato chips that’ll have everyone asking for seconds. you’ll love knowing exactly what’s in them, and your guests will feel like they’ve hit the jackpot with each bite.
Let’s move on to those ingredients, because the magic is about to happen!
Essential Ingredients Guide: Elevating Your Snack Game with Baked Lay's Chips
So, you’re diving into the world of homemade snacks, huh? welcoming, in fact! let’s chat about the essential ingredients that will take your snacks from blah to wow , especially when making your very own baked lay’s chips .
These crispy baked chips aren’t just a treat – they’re a guilt-free way to satisfy that crunchy craving without frying your health goals.
Trust me; once you get this down, it’s game time for those movie nights, game day snacks, and everything in between!
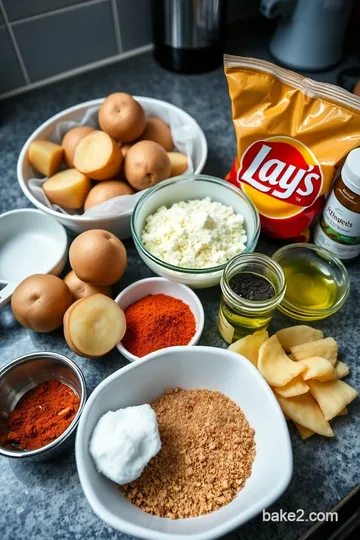
Premium Core Components
First up, let’s talk quality ingredients . when it comes to potatoes, i always go for russets – they’re perfect for that crispy texture! you’ll need about 4 medium russet potatoes (around 1.
5 lbs or 700 g ). if your potatoes feel soft, skip ‘em – you want them firm.
Next, grab a good olive oil . you’ll only need 2 tablespoons (30 ml) , but trust me, a good extra-virgin olive oil will elevate your flavor.
And speaking of flavor, you’ll want salt (1 teaspoon or 5 g), paprika (1 teaspoon or 5 g), garlic powder (½ teaspoon or 2 g), and black pepper (½ teaspoon or 2 g).
These guys are your flavor squad!
Storage guidelines? keep your potatoes in a cool, dark spot – they’ll last longer without sprouting. once you’ve baked those chips, keep them in an airtight container for up to 2 days .
But who are we kidding? they’ll vanish before that!
Signature Seasoning Blend
Now for the fun part – let’s talk seasoning ! if you want to kick the flavor up a notch, try variations.
Mix in chili powder or cumin for a spicy twist. feeling cheesy? sprinkle on some nutritional yeast before you pop those chips in the oven.
And don’t forget about the dips! a simple salsa made of 1 cup diced tomatoes , ½ cup onion , and coriander with a twist of lime really goes a long way.
It’s one of those tasty dipping sauces that’ll have your friends asking for the recipe.
Smart Substitutions
What if you don’t have certain ingredients? no problem! don’t worry. you can swap out the russet potatoes for sweet potatoes if you fancy a sweeter chip.
You can even use avocado oil instead of olive oil or make your chips totally vegan by ditching the cheese.
My tip? have fun with it!
Kitchen Equipment Essentials
Okay, let’s gear up! you’ll need a mandoline slicer or a sharp knife to slice those potatoes super thin – about 1/8 inch thick, if you want them to be crispy! a baking sheet lined with parchment paper works best for those perfectly baked chips.
Don’t skimp on that parchment; nobody likes a sticky situation!
Finally, a little prep tip: after you slice the potatoes, soak them in cold water for 30 minutes . it helps pull out some of that excess starch, giving you crispy baked chips that you’ll love.
Conclusion: Snack Smart, Snack Fresh
And there you have it! these ingredients will set you up for easy cooking techniques that’ll have you whipping up crispy snacks for movie night in no time.
Just remember to store leftovers properly and have fun experimenting with flavors. you’ll end up with a stand-out recipe that’s perfect for gatherings or just chilling on your couch.
Now that we’re all prepped and ready, let’s jump right into those step-by-step instructions to bring your homemade Baked Lay’s Chips to life. It’s gonna be delicious!
Unleashing the Secrets of Professional Cooking: How to Get Your Kitchen Game On
When it comes to professional cooking, there’s an art to it that can feel a bit daunting at first. but trust me, it’s all about breaking it down into bite-sized pieces.
Think of it like whipping up a batch of baked lay’s chips —you need good prep, solid techniques, and a sprinkle of flair.
Let’s dig in, shall we?
Essential Preparation Steps
First things first: mise en place . sounds fancy, huh? it’s just a french term meaning “everything in its place.” before you turn on that stove, gather all your ingredients and tools.
It saves you time and stress. no one likes scrambling for the salt mid-recipe!
Now, let’s chat about time management . set aside that hour to organize your food prep. you’ll want at least 15 minutes to get everything ready and 30 minutes for your chips to soak.
Oh, and don’t forget safety —always wash your hands before you dive in and be careful with those sharp knifes!
Step-by-Step Process
Here comes the fun part! Let’s break this down with some easy steps for your homemade potato chips:
-
Prep Potatoes : Start off by washing and peeling 4 medium russet potatoes . A mandoline slicer is your best buddy here. Aim for 1/8 inch thickness so they all cook evenly.
-
Soak Slices : Toss those slices in cold water for 30 minutes . This little soak will help you achieve crunchy, crispy perfection.
-
Dry Slices : Pat them dry; this is a biggie! We’re talking about avoiding soggy chips. Nobody likes them limp, right?
-
Season : in a mixing bowl, add your potatoes, 2 tablespoons of olive oil , and the spices (that’s 1 teaspoon of salt , 1 teaspoon of paprika , ½ teaspoon of garlic powder , and ½ teaspoon of black pepper ).
Give ‘em a good toss until they’re coated in that flavor!
-
Arrange on Baking Sheet : Lay them out on a parchment-lined baking sheet. Make sure they aren’t overlapping.
-
Bake : preheat your oven to 400° f ( 200° c) and pop those bad boys in for 25- 30 minutes .
Flip them halfway through to get that even golden color.
-
Cool : Once you pull them out, let your chips cool for a bit. They’ll get crunchier as they cool down.
-
Dipping : While those chips are mellowing out, whip up a simple salsa dip with your diced tomatoes, onions, and cilantro. Just mix with lime juice and a dash of salt.
Expert Techniques
Ready to take it up a notch? Here are some pro tips :
-
Critical Steps : Don’t skimp on the soaking or drying. It’s what separates the crispy from the squishy.
-
Quality Checkpoints : Check for that golden brown color—this is your sign of doneness. Trust me, you’ll know when you see it!
-
Troubleshooting : If they turn out a bit chewy, try lowering the oven temperature to 375° F ( 190° C) next time and extend the baking time.
Success Strategies
We all mess up, trust me! Here’s how to keep your game tight:
-
Common Mistakes : Overcrowding your baking sheets? Nope, don’t do it! Always give those chips room to breathe.
-
Quality Assurance Tips : Taste as you season! Everyone’s spice preference is different, so adjust to your liking.
-
Make-Ahead Options : You can prep the potatoes and soak them a day in advance. Just store them in the fridge until you’re ready to bake.
Baked lay’s chips make an excellent desire for guilt-free snacking . they’re a healthier alternative to the traditional fried snack. think about it—crispy snacks for movie night, and you'll be the hero of game day with those crispy baked chips served alongside some tasty dipping sauces .
Before we wrap this up, i wanna share some quick storage tips . keep your chips in an airtight container to ensure they stay crisp for a couple of days.
Ain’t nobody got time for soggy chips!
Now, if you’re craving even more deliciousness, let’s move on to some additional information on baked snacks and dips you can whip up alongside your homemade chips.
Additional Recipe Information
When it comes to making baked lay’s chips at home, there are a few tricks of the trade i’ve picked up over the years.
Trust me, this isn’t just another easy chip recipe —it’s a chance to turn those spuds into crispy baked chips that’ll blow your mind.
Here’s how you can take your chip game to the next level.
Pro Tips & Secrets
First off, let’s talk timing . for the crispiest results, let your potato slices soak in cold water for at least 30 minutes .
This step helps pull out the starch, giving them that delightful crunch. after soaking, don’t rush—make sure to pat them dry .
If they’re wet, they won’t crisp up right—it’s like soggy fries, yuck!
Feeling adventurous? toss in some potato chip seasoning . mix things up with flavors like chili powder or even ranch mix.
The world is your oyster (well, not literally, that’d be weird)! and hey, always flip the chips halfway through baking for that golden color all around.
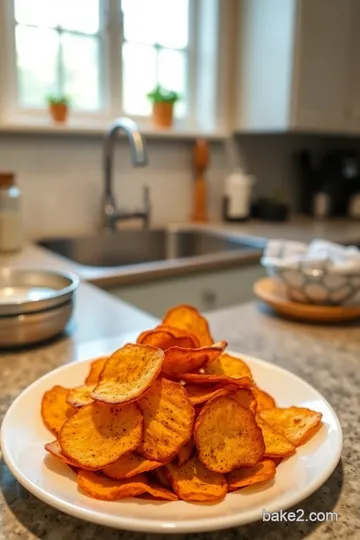
Perfect Presentation
Now, presentation is key, especially if you’re serving these at a party or for game day. when you pile those chips on a plate, think about color combinations .
Maybe some greenery from fresh herbs or a dip that pops.
Garnish with a sprinkle of paprika or freshly chopped cilantro to give it that classy touch. it’s all about the wow factor ! plus, your friends will be snapping pics faster than you can say “homemade potato chips.
” trust me; everyone loves a good instagram moment.
Storage & Make-Ahead
Let’s be real—not all chips make it past the first night, but if you find yourself with leftovers, here are some smart storage guidelines .
Aim for an airtight container , and keep those chips for up to two days. just remember , they’ll be best when fresh.
If you want to prep ahead, slice and season the potatoes, but store them separately in the fridge. Bake them up just before your guests arrive for that fresh-out-of-the-oven vibe.
Creative Variations
Looking to spice things up? you have tons of creative variations at your disposal! instead of russet potatoes, try using sweet potatoes for a different taste.
Want to make it seasonal? bake up some vegetable chips using zucchini or carrots—perfect for a colorful platter!
If you’re catering to dietary needs, consider grilling up some of these vegan chip recipes or going gluten-free. you can even experiment with textures! throw a little marinade on your chips before baking and nudge them into a flavorful zone.
Complete Nutrition Guide
Speaking of catering, let’s look at the health aspect. each serving of these chips clocks in around 130 calories . they’re way better than those oil-soaked store-bought ones.
Toss in some fiber from the potatoes, and you've got yourself a guilt-free snacking option.
Want to keep track of what you’re munching? A quick look at the nutrition facts for baked chips can be a lifesaver for those mindful munchers.
Expert FAQ Solutions
Okay, real talk—we all mess up in the kitchen sometimes. ever wonder why your chips turned out soggy? it’s usually the presence of moisture.
If you have questions about troubleshooting , like why they didn’t crisp up enough, always double-check that drying step!
Also, if you’re looking for success tips , remember to keep the layers thin. if they’re too thick, you’ll end up with oven-baked fries rather than that perfect chip crunch we all crave.
But don’t fret! If you mess up, you can just blend them into crispy potato soup , and voilà!
Wrapping It Up with Encouragement
In the end, cooking is all about experimenting and having fun . these homemade baked lay’s chips can be your canvas! so get in the kitchen, play around with flavors, and whip up those crispy snacks for movie night or your next gathering.
Trust me; once you make these, you’ll realize how quick and easy it is to create something magical with just a few potatoes.
Share them, enjoy them, and don’t forget to dip! happy cooking, friends!
Baked Lay's Chips with Flavorful Dips Card
⚖️ Ingredients:
- 4 medium russet potatoes (about 1.5 lbs / 700 g)
- 2 tablespoons olive oil (30 ml)
- 1 teaspoon salt (5 g)
- 1 teaspoon paprika (5 g)
- ½ teaspoon garlic powder (2 g)
- ½ teaspoon black pepper (2 g)
- 1 cup diced tomatoes (fresh or canned, 240 g)
- ¼ cup diced onion (40 g)
- ¼ cup chopped cilantro (10 g)
- Juice of 1 lime (30 ml)
- Salt to taste
🥄 Instructions:
- Step 1: Wash and peel the potatoes. Slice them thinly using a mandoline slicer (about 1/8 inch thickness) for uniformity.
- Step 2: Place the potato slices in cold water for 30 minutes to remove excess starch; this helps to achieve maximum crispiness.
- Step 3: Drain and thoroughly pat the potato slices dry with a clean kitchen towel to remove moisture.
- Step 4: In a large bowl, toss the dry potato slices with olive oil, salt, paprika, garlic powder, and pepper until evenly coated.
- Step 5: Line a baking sheet with parchment paper and arrange the potato slices in a single layer
- Step 6: Preheat the oven to 400°F (200°C) and bake the chips for 25-30 minutes, flipping halfway through, until golden brown and crisp.
- Step 7: Remove chips from the oven and allow them to cool for a few minutes on the baking sheet before serving.
- Step 8: In a bowl, combine diced tomatoes, onion, cilantro, lime juice, and salt for the dip. Stir well and let sit for flavors to meld.
- Step 9: Serve chips warm with the prepared dip.
Previous Recipe: How to Make Taylor Street Baked Ziti: An Ultimate Comfort Delight
Next Recipe: Easy Baked Potato No Foil: 5 Delicious Secrets to Perfection!