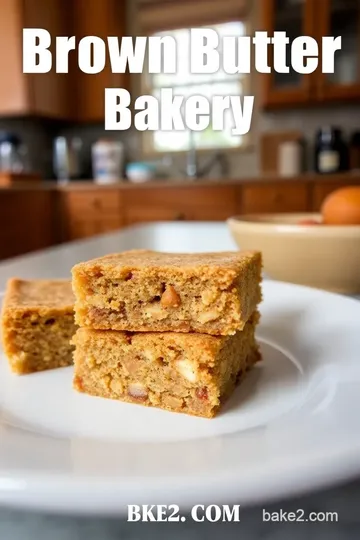
Brown Butter Bakery Bliss Bars
Looking for a sweet treat? Discover the magic of brown butter bakery with our bliss bars recipe. Indulge in nutty flavors! Try it today.

Have you ever wondered what makes a dessert truly unforgettable? Is it the sparkle of chocolate chips, the delightful aroma of vanilla, or perhaps a technique that transforms simple ingredients into something magical? Welcome to the world of Brown Butter Bakery Bliss Bars , where the answer lies in a rich, nutty flavor that dances on your tongue with every bite!
So, what’s the deal with these bars? they’re not just any ol’ treat; they're a glorious union of caramel-colored brown butter , sweet vanilla, and a chewy texture that makes every afternoon feel like a special occasion.
With about 15 minutes of active prep time and a modest skill level, even novice bakers can whip these up and impress their friends.
You might want to clear your schedule for about an hour and ten minutes total, but trust me, it’s worth every second!
A Sweet look into into History
The origins of brown butter —or beurre noisette as the fancy french call it—go back centuries, with roots wafer thin and rich as cream.
It’s like a beloved family secret passed down through kitchens, adding depth to sauces and pastries alike. this little technique turns ordinary butter into a blissful key ingredient in bakery desserts that have library volumes dedicated to them.
Brown butter has a unique charm; its warm, caramel notes transform baked goods from everyday snacks into blissful bites that we find ourselves dreaming about long after the last morsel is gone.
You see, these bliss bars don’t just have the usual ingredients; they draw their artisanal richness from that lovely brown butter.
You’ll feel like an old-world baker, channeling the spirits of your ancestors as you create these decadent delights. the moment the warm butter melts away, releasing that comforting nutty aroma, you’ll understand why this dessert has stood the test of time and continues to be the talk of gatherings today.
What Makes This Recipe Special
Okay, let’s spill the tea about what makes these bars so divine. the first thing you'll notice is the nirvana of flavor combinations —the sweet, nutty essence of brown butter paired with that delightful hint of vanilla creates an addictive balance that keeps you reaching back for just one more bite.
Plus, the technique itself is pretty foolproof! with my expert-tested method , you’ll have a dessert that doesn’t just look amazing, but also carries that decadent bakery vibe straight to your table.
Health and Nutrition Highlights
Now, i know what you might be thinking: "but is this healthy?" well, let’s break it down. while these aren’t exactly salad bars, they do offer hands-on opportunities to explore gluten-free dessert options or even substitute healthier ingredients if you’re feeling adventurous.
With a couple of tweaks, you can enjoy balanced nutrition nutrients that support sweetness without going overboard. picture yourself indulging in that nutty flavor while knowing you’ve got the option to customize.
Recipe at a Glance
Ready for the breakdown? Here's the 411:
- Total Preparation Time: 1 hour 10 minutes
- Skill Level Required: Medium
- Serving Size: 12 bars
- Cost Efficiency: Perfectly reasonable, especially for the impressive result !
But before we dive into the ingredients for these dreamy bars, let’s take a moment to chat about some kitchen essentials that’ll not only make this baking process smoother but also elevate your game when it comes to baking with chocolate chips or experimenting with different dessert pairings .
Next up, gather your ingredients, and get ready to embark on this delicious journey with me as we create the ultimate brown butter bakery treats!
Essential Components Guide
So, you’re looking to elevate your baking game, huh? let’s dive into some essential components that will make your kitchen feel more like a cozy bakery than a mere space for cooking.
Whether you’re dreaming of brown butter cookies or a sweet treat after a long day, we’ve got you covered with the best ingredients and tips to make it all happen!
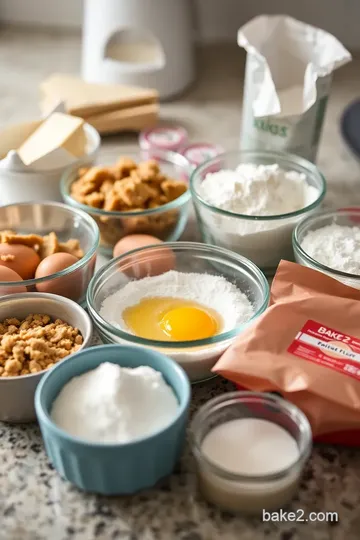
Premium Core Ingredients
First things first—let's chat premium core ingredients . Think of this as the treasure chest of your pantry. For our Brown Butter Bakery Bliss Bars , you’ll need:
- 1 cup (225 g) unsalted butter : Look for high-quality butter. Organic is always a plus!
- 1 cup (200 g) packed brown sugar : The darker the sugar, the richer the flavor! Just make sure it’s soft and easily packable.
- 2 large eggs : Always opt for free-range if you can. It makes a difference in taste—and it feels good too!
- 1 teaspoon vanilla extract : The real deal, please! Artificial vanilla just doesn’t do those brown sugar desserts justice.
Signature Seasoning Blend
When it gets to the flavor magic , don't skimp on a signature seasoning blend . For these bliss bars, we keep it simple but impactful:
- A pinch of salt : Don’t overlook this! It balances sweetness and brings out that nutty flavor in the brown butter.
- Optional toppings like chocolate chips or nuts: Go nuts! Pecans or walnuts blend perfectly in these chewy bars.
Smart Substitutions
Sometimes life happens, and you might not have everything on hand . That’s when smart substitutions come into play:
- If you run out of brown sugar , regular granulated sugar will work too, although it’s not quite as rich.
- For a gluten-free dessert option , grab a 1:1 gluten-free flour blend.
- Running low on eggs? You can swap one egg for 1 tablespoon of ground flaxseed mixed with 2.5 tablespoons of water . Simple, eh?
Kitchen Equipment Essentials
Now that we've got our ingredients out of the way, let’s move on to the kitchen equipment essentials that every home baker should have.
Trust me, having the right gear makes a world of difference.
- Mixing bowls : You'll want a few in different sizes. They’re like the unsung heroes of baking!
- Whisk : This little guy helps blend those eggs and sugar to perfection.
- 9x13-inch baking pan : Ideal for those bakery-style treats . Trust me; you’ll use this pan a lot.
- Parchment paper : It’s a game changer for easy cleanup and bar removal!
Pro Ingredient Tips
When you’re diving headfirst into the wonderful world of baking, don’t forget these pro ingredient tips :
- Look for quality markers : Whether it’s the sheen on your butter or the aroma of your vanilla. It all counts!
- Storage solutions : Keep your sugars and flours in airtight containers to prolong freshness.
- Money-saving tips : Bulk buying can save you a pretty penny, especially for things like flour and sugar!
After you’ve collected all these heavenly ingredients and essential tools, you’ll be ready to create some truly indulgent snack bars ! imagine how delightful it will be to pull those rich, chewy squares out of the oven, the aroma wafting through your home.
And speaking of which, are you ready to turn those ingredients into magic? Let’s jump into the instructions section . Here’s where the real fun begins!
Professional Cooking Guide: Brown Butter Bakery Bliss Bars
Oh my gosh, i just have to share this incredible recipe for brown butter bakery bliss bars ! trust me, once you bite into these, you'll understand the power of brown butter.
It makes everything so much richer and gives a nice, nutty flavor to your sweets. seriously, if you’re into baking like i am, you’re in for a treat! let’s dive into the nuts and bolts of getting these delightful bars from your kitchen to your mouth.
Essential Preparation Steps
First things first, we need to get our mise en place sorted. you know, that fancy term that means getting everything set before diving into the recipe! measure out all your ingredients because trust me, it makes the process so much smoother.
Before starting, I make sure I have my kitchen essentials at hand: a medium saucepan for browning the butter, mixing bowls for my ingredients, and a whisk to bring it all together.
Prep techniques: when you’re browning butter, it’s all about watching it carefully. too long, and you’ve got burnt butter, which is not the vibe we want for homemade bars! just melt it over medium heat and keep stirring until it turns a lovely shade of golden brown.
Time management: you’ll want to set aside about 15 minutes for prep and then another 30 minutes of chilling time after baking, so plan accordingly! the bake itself only takes about 25 minutes.
Organization Tips: Lay out all your baking tools and ingredients before you start. You’ll feel like a professional baker in no time!
Professional Cooking Method
Alright, let’s get into the step-by-step magic.
-
Brown the butter: melt that 1 cup of unsalted butter in your saucepan over medium heat. stir it until it turns golden brown followed by that scrumptious nutty aroma.
Seriously, this is aromatherapy for bakers!
-
Mix sugars: in a mixing bowl, combine 1 cup of packed brown sugar and ½ cup of granulated sugar. then, pour the brown butter over the sugar mix.
Whisk it until smooth. it should look like a beautiful syrupy concoction.
-
Add eggs and vanilla: whisk in 2 large eggs, one at a time (don’t skip this)! and oh, don’t forget that 1 teaspoon of vanilla extract.
Your kitchen will smell like a vanilla cloud.
-
Combine Dry Ingredients: In a separate bowl, whisk together 2 cups of all-purpose flour, a teaspoon of baking powder, ½ teaspoon baking soda, and ¼ teaspoon salt.
-
Fold Ingredients: Now, gently fold the dry mix into the wet ingredients until just combined. If you’re feeling wild, toss in ½ cup of chocolate chips or some nuts at this stage!
-
Prepare Baking Pan: Preheat your oven to 350°F (175°C) and line your 9x13-inch baking pan with parchment paper. This makes for easy cleanup and prevents your bars from sticking to the pan.
-
Bake: Pour that gorgeous batter into your prepared pan and smooth the top. Bake for 20-25 minutes, until they’re golden brown and a toothpick inserted comes out clean.
-
Cool and Serve: Let them cool completely before cutting into bars. Patience is key here!
Expert Techniques
When you’re working with a brown butter recipe, precision is everything, folks! Here are some quick critical steps to ensure success:
- Keep an eye on your butter while it’s browning; a minute too long can ruin the whole batch.
- Remember that chilling your bars helps them set properly, enhancing that perfect chewy texture.
- To check the quality of your bars, tap the edge of the pan after cooling. They should feel firm but have a little give when gently pressed.
Success Strategies
Now, what if things don't go as planned? Don't stress! Here are some handy troubleshooting tips :
- If your bars are too gooey in the center after baking, give them extra time in the oven, checking every minute.
- For perfect results, always stick to the recipe measurements—baking is chemistry!
- Store your bliss bars in an airtight container, and they’ll stay fresh for up to a week.
And there you have it! With your brown butter bakery bliss bars, you're wading into the delicious world of gluten-free dessert options and easy dessert recipes that are perfect for all occasions!
Next up, we’ll explore some additional information that will help elevate your baking game even further! Whether you’re considering flavor variations for your desserts or needing substitutions for those pantry staples, stay tuned!
Master Chef's Advice
Alright, friend, let’s chat about the secrets to making the perfect brown butter bakery bliss bars! if there’s one thing i’ve learned over my years of baking—it’s this: the magic often lies in the details .
Professional Insights
Making brown butter is like a rite of passage for any baker. seriously, it transforms a simple butter dessert recipe into something utterly delightful! that nutty aroma? oh my gosh, it’s heaven! the trick here is patience; keep your eye on that pot.
Expert Techniques
Once you’ve mastered browning butter, don't be shy to use it in other bakery-style treats . a couple of brown butter cookies can go a long way to impress your friends.
Just whisk the brown butter with sugars until it's gloriously smooth—that’s where the magic happens.
Kitchen Wisdom
A good tip? when mixing in the chocolate chips, don’t just dump them in. gently fold them! it helps keep your bliss bars chewy and oh-so-delicious.
Trust me on this one— perfecting dessert textures should be your mission!
Success Guarantees
Follow these simple techniques, and I promise you’ll be munching on some seriously indulgent snack bars. Your taste buds will thank you!
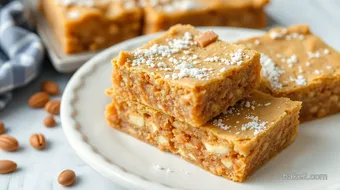
Perfect Presentation
Now, if you thought the taste was all that mattered, think again! When it comes to sweets, visual appeal is everything.
Plating Techniques
After baking those bliss bars to golden perfection, give them the royal treatment when plating. i love cutting them into nice, even chunks for a bakery-like finish—this keeps things tidy and presents them beautifully.
Garnish Ideas
Drizzle a bit of melted chocolate over the top or sprinkle some sea salt for that sweet and salty dessert combo.
A sprinkle of crushed nuts on top? i’m drooling just thinking about it!
Serving Suggestions
These bars are totally perfect with a scoop of vanilla ice cream or a cup of steaming tea. Just imagine the bliss of sweet afternoon treats !
Visual Appeal Tips
Oh, and don’t forget to snap a few photos before you dive in. a well-lit shot of these brown butter delights can add a whole new level of bakery desserts vibe on your instagram.
We eat with our eyes, after all!
Storage and Make-Ahead
Okay, let’s talk about practicality. Life’s too short to eat stale bars!
Storage Guidelines
Store your bliss bars in an airtight container to keep them dreamy and soft for up to a week. To keep those flavors fresh, make sure they are at room temperature.
Preservation Methods
If you want to keep them for a longer stretch, you can freeze them! Just slice and wrap individual bars in plastic wrap. Perfect for when you get a sweet craving.
Reheating Instructions
When you’re ready to indulge, just pop a frozen bar in the microwave for about 15 seconds. Voila! Fresh and ooey-gooey again!
Freshness Tips
If you do find leftover bars (which is a rarity!), just store them in the fridge and enjoy them cold for a delightful twist—chilled dessert bars anyone?
Creative Variations
Now let’s unleash your creativity in the kitchen!
Flavor Adaptations
Wanna spice things up? Add lemon zest for a zing that balances the richness of brown butter. Or, keep it classic and add some chocolate chips.
Dietary Modifications
Don’t forget about your friends with dietary restrictions! You can easily adapt this recipe to be gluten-free dessert options by using a suitable flour substitute. Everyone deserves a delicious bliss bar!
Seasonal Twists
Seasonal adjustments are where the magic happens! think about adding pumpkin spice in the fall or some fresh berries in the summer.
Those seasonal twists can take your bliss bars from ordinary to extraordinary.
Regional Variations
Feeling adventurous? Try incorporating spices or flavors that resonate with different cultures. Why not add a hint of chai spice for an Indian-inspired bliss bar?
Complete Nutrition Guide
Now, let's get down to the nitty-gritty.
Detailed Breakdown
Each bar packs about 230 calories —a reasonable number for such a delightful treat! They have a delightful mix of fats and sugars but remember, moderation is key, my friend.
Health Benefits
Though they're more of a treat, brown butter can offer some unsaturated fats. Throw in nuts, and boom—extra protein and crunch!
Dietary Information
For those keeping an eye on sugar intake, always feel free to play around with sugar substitutes to keep your brown sugar desserts sweet but not so sugary.
Portion Guidance
Keep it classy with portion sizes. A two-inch square should do it! Perfect for that satisfying bite.
Expert FAQ Solutions
What are some common concerns people have? Let’s dive in!
Common Concerns
“Will my bars be too dry?” Not if you keep an eye on that baking time! Remember, you want to take them out just when they’re golden.
Expert Answers
Another question might be if you can use different types of butter. Sure thing! Just remember, the flavor might change slightly but still delicious.
Troubleshooting Guide
If your bars are too crumbly, you may not have mixed well enough. Always fold gently to maintain that chewy texture!
Success Tips
And lastly, don’t be afraid to experiment! Your kitchen is your arena—make it fun!
There you have it, my friend! a deep dive into creating the best brown butter bakery bliss bars. whether you’re impressing a crowd or enjoying a quiet night in, these bars are your best bet for satisfying that sweet tooth.
Happy baking!

Brown Butter Bakery Bliss Bars Card
⚖️ Ingredients:
- 1 cup (225 g) unsalted butter
- 1 cup (200 g) packed brown sugar
- 1/2 cup (100 g) granulated sugar
- 2 large eggs
- 1 teaspoon vanilla extract
- 2 cups (250 g) all-purpose flour
- 1 teaspoon baking powder
- 1/2 teaspoon baking soda
- 1/4 teaspoon salt
- 1/2 cup (90 g) chocolate chips
- 1/4 cup (20 g) chopped nuts (e.g., pecans or walnuts)
🥄 Instructions:
- Step 1: In a medium saucepan, melt unsalted butter over medium heat.
- Step 2: Continue stirring until the butter turns golden brown and has a nutty aroma. Remove from heat.
- Step 3: In a mixing bowl, combine brown sugar and granulated sugar.
- Step 4: Pour in the brown butter and whisk until smooth.
- Step 5: Whisk in the eggs one at a time.
- Step 6: Stir in vanilla extract until fully incorporated.
- Step 7: In another bowl, whisk together flour, baking powder, baking soda, and salt.
- Step 8: Gradually fold dry ingredients into the wet mixture until just combined.
- Step 9: If desired, stir in chocolate chips and nuts.
- Step 10: Line a 9x13 inch baking pan with parchment paper and preheat the oven to 350°F (175°C).
- Step 11: Pour the batter into the prepared pan and smooth the top.
- Step 12: Bake for 20-25 minutes or until golden brown and a toothpick inserted in the center comes out clean.
- Step 13: Allow to cool completely in the pan on a cooling rack.
- Step 14: Cut into bars and serve.
Previous Recipe: Baked Jalapeno Chips: Easy and Delicious Crunchy Snack Recipe!
Next Recipe: What Does Bake Cake in Slow Oven Mean: Discover the Secret Recipe!