Coco Baked Coconut and Chocolate Pudding
Craving a creamy treat? Discover how to make coco baked chocolate and coconut pudding that’s easy, dairy-free, and simply indulgent! Try it today!

- Master the Art of Coco Baked Coconut and Chocolate Pudding
- The Magic Behind This Recipe
- Health and Nutrition Highlights
- Recipe at a Glance
- Master Ingredient List
- Kitchen Equipment Essentials
- Perfect Cooking Technique
- Game-Changing Tips
- Perfect Presentation
- Storage and Make-Ahead
- Creative Variations
- Complete Nutrition Guide
- Expert FAQ Solutions
- Recipe Card
Have you ever thought about the wonders that happen when you combine coconut and chocolate? it’s like the universe decided to create a dessert that wraps you in warm, velvety bliss.
If you’re scratching your head, wondering how such a tasty union can exist, let me introduce you to my absolute favorite sweet indulgence: coco baked coconut and chocolate pudding.
Trust me, this is one dessert that feels fancy without requiring a degree from culinary school. it takes about 15 minutes of prep and 30 minutes of baking—so you're looking at less than an hour to heavenly.
With a medium difficulty level, this recipe is perfect for both seasoned bakers and those just venturing out of the microwave-ready meals zone.
Now, let’s talk history for a moment. coconut and chocolate desserts have a rich cultural heritage, especially in tropical regions.
Think about it—coconuts are like the multi-talented performers of the ingredient world. they bring sweetness, creaminess, and a bit of tropical flair.
Meanwhile, chocolate has been adored since the aztecs first prepared it over a thousand years ago. this recipe is a harmonious blend of these two timeless ingredients that not only tastes amazing but also tells a story of culinary love across continents.
So why is our coco baked pudding so special? first off, you can whip it up in a pinch. you know those nights when you just want something sweet without all the fuss? this is the dessert for you.
Beyond its ease, this pudding strikes a perfect balance—it’s rich enough to satisfy your chocolate cravings yet light enough to make you feel good about indulging.
Plus, it’s dairy-free and gluten-free , making it a versatile option for various dietary needs.
Master the Art of Coco Baked Coconut and Chocolate Pudding
Let’s dive deeper into the fascinating origins of this delightful pudding. the world through the lens of food is ever-evolving, and this dish is no exception.
Coconuts are often found in the traditional cuisines of southeast asia and the caribbean, while cocoa has an equally illustrious path, transforming from bitter drink to sweet melted luxury.
This pudding has become a beloved dessert across the globe, particularly in vegetarian communities, where it tantalizes taste buds while keeping things entirely plant-based.
In modern times, this pudding has found its way into countless dessert menus. whether you’re walking into a hip café or enjoying a lazy sunday at home, it's practically a rite of passage to savor something that combines the richness of chocolate with the creamy allure of coconuts.
And what's truly beautiful about it? you get to personalize it! from adding nuts for a delightful crunch to serving it with fresh berries, the possibilities are as endless as your imagination.
The Magic Behind This Recipe
Now, what really makes this pudding sing? oh, the flavor combinations ! the cocoa powder lends a robust chocolateiness, while the coconut milk adds a smooth, creamy texture that makes you feel like you’re on a tropical vacation—don’t you just love that? you’ll discover some foolproof techniques here too.
Trust me, whisking constantly while combining your dry and wet ingredients is the key to a smooth pudding. i’ve learned this the hard way, believe me.
A few lumps here and there can really mess with the silky texture you're after.
What’s beautiful about these methods is they’ve been expert-tested over countless trials (with the occasional kitchen disaster thrown in). as for time-saving tips, you can even prep the ingredients ahead of time and pop them in the fridge, making this dessert your best friend on a busy day.
Just remember that oven can be tricky sometimes—don't be tempted to overbake; you want that wonderful, jiggly center that’s like dessert poetry.
Health and Nutrition Highlights
Let’s not forget the perks of this beautiful creation! each serving gives you a dose of healthy fats from the coconut milk, as well as a good mix of carbohydrates and proteins.
With just 280 calories per serving, it's a delicious way to treat yourself without total dessert guilt. plus, if you’re watching your sugar intake, opting for a sugar substitute can allow everyone to indulge without sacrificing taste.
For those conscious about dietary restrictions, this pudding is a dairy-free dream! you can easily swap in nut milks if coconut isn’t your jam.
And if you're venturing into the gluten-free territory, don't fret—this recipe checks those boxes too, making it the ideal dessert for any gathering or myself as it seems to disappear quicker than my willpower at a chocolate shop.
Recipe at a Glance
- Total Preparation Time: 15 minutes
- Cooking Time: 30 minutes
- Serving Size: 4 servings
- Difficulty Level: Medium
And let’s keep it real—this pudding is also budget-friendly! Most ingredients are things you can easily find tucked away in your pantry.
Now that you’re all warmed up to the idea of whipping up some Coco Baked Coconut and Chocolate Puddding, let’s get down to the delicious nitty-gritty—shall we dive into the ingredients ?
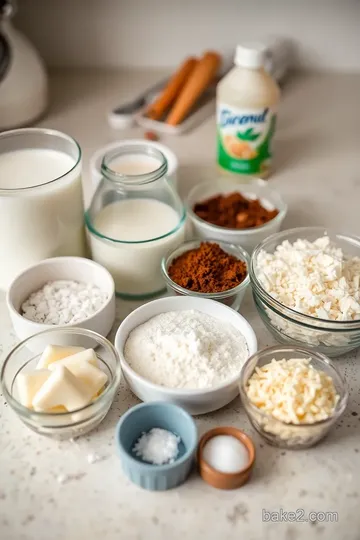
Master Ingredient List
Premium Core Ingredients
-
1 cup unsweetened coconut milk: look for a brand that doesn’t contain additives. the richer the milk, the creamier the dessert.
Shake the can before opening; that’ll mix the coconut cream on top!
-
1 cup whole milk: this adds to the creaminess. if you're dairy-free, substitute with almond milk or an extra cup of coconut milk.
Just remember, it won’t be quite the same as that glorious dairy richness.
-
1/2 cup granulated sugar: Ah, sugar, the sweet nectar! Be careful not to get the powdered stuff here; granulated sugar is where it's at for that perfect texture.
-
1/4 cup unsweetened cocoa powder: This chocolatey wonder needs to be rich and dark. Dutch-processed cocoa will jazz up the flavor, but stick to unsweetened for this recipe.
-
1/4 cup cornstarch: This heavenly thickener is critical for that pudding-like texture we crave. Ensure it’s fresh; old cornstarch can lose its magic.
-
1 teaspoon vanilla extract: invest in quality vanilla here. i learned the hard way that the imitation stuff just doesn’t cut it when it comes to desserts.
A good extract makes your dessert sing.
-
1/2 teaspoon sea salt: Just a pinch brings the sweet flavors out. Don't skip this; it's like a secret handshake for flavors!
-
1/2 cup shredded sweetened coconut (topping): I love getting the bigger flakes! Choose a brand that uses coconut without preservatives for the best experience.
-
1/4 cup dark chocolate chips (topping): Use the good stuff, folks. Dark chocolate chips have that lovely bittersweet contrast that makes everything pop.
Signature Seasoning Blend
Let’s not forget the magic of flavors!
-
Cocoa powder: Besides its essential role in our pudding, it adds an earthy richness that pairs perfectly with coconut.
-
Vanilla extract: Besides the actual ingredient, think of adding a pinch of freshly grated nutmeg if you're feeling adventurous.
-
Aromatic additions: Want to take it up a notch? Try adding a dash of cinnamon or even cardamom in the mix. Trust me; the fragrance alone is worth it.
Smart Substitutions
-
Nut milk alternatives: Don't have coconut milk? Almond milk is a great substitute, just maybe leave out a bit of the sugar. Added nuttiness can be a fun twist!
-
Sugar alternatives: Swap out granulated sugar for agave syrup or coconut sugar. Just adjust the measurements, as some of these are sweeter than regular sugar.
-
Cornstarch swap: If you’re feeling fancy, tapioca starch is a fantastic and slightly nutty alternative.
-
Seasonal variations: Fresh coconut can be a delightful addition if it’s in season! You can use it for texture and flavor.
Kitchen Equipment Essentials
-
Must-have tools: You’ll need mixing bowls, measuring cups, and a whisk. A good whisk is your best friend in this recipe!
-
Recommended appliances: An oven and a medium-sized saucepan should do the trick. Nothing fancy; just solid. If you've got a spatula and a baking dish, you're golden.
-
Helpful gadgets: A fine sieve strain can help if you want smooth pudding. I sometimes take the lazy route, but it can really make a difference if you have the time.
-
Home alternatives: If you don’t have a whisk, a fork can do wonders—just don’t expect it to be quite as easy!
Pro Ingredient Tips
-
Selection secrets: For coconut milk, aim for the creamiest option possible. Shake and check those labels!
-
Quality markers: A good cocoa powder should smell rich and inviting. You’ll want to dive into the bag right away!
-
Storage solutions: Leftovers? Store them in an airtight container! It can last in the fridge for a few days, but I doubt it’ll last that long.
-
Money-saving tips: Buy in bulk, especially for cocoa and sugar. It makes those sweet treats even sweeter on your wallet.
So, there you have it! this ingredient breakdown sets the stage for the delicious magic that follows in the cooking instructions.
I can already feel the excitement building! let’s dive into making this beautifully rich and indulgent coco baked coconut and chocolate pudding .
When you finally scoop into that warm, velvety goodness, i'm sure you’ll be as smitten as i am. let’s get cooking!
Perfect Cooking Technique
Alright, friends, gather ‘round because today i’m excited to share my go-to recipe for coco baked coconut and chocolate pudding ! if you’re anything like me, you crave a dessert that’s creamy and rich but also has that tropical twist.
I mean, coconut and chocolate? what’s not to love? so, let’s dive into this delightful concoction and talk about the perfect cooking techniques that will elevate your dessert game.
Essential Preparation Steps
First things first, mise en place . This fancy French term just means prepping everything before you start cooking! Grab:
- 1 cup of unsweetened coconut milk
- 1 cup of whole milk
- 1/2 cup of granulated sugar
- 1/4 cup of unsweetened cocoa powder
- 1/4 cup of cornstarch
- 1 teaspoon of vanilla extract
- 1/2 teaspoon of sea salt
- 1/2 cup of shredded sweetened coconut (trust me, this is a game-changer!)
- 1/4 cup of dark chocolate chips.
Check that you’ve got a baking dish ready — an 8x8 inch works perfectly. And don’t forget to preheat your oven to a cozy 350°F (175°C) while you’re at it.
For time management, i often find that measuring everything out before you start cooking helps keep my stress levels down.
Believe me, there's nothing worse than scrambling around looking for an ingredient when your pudding is simmering away.
Professional Cooking Method
Now, onto the fun part! Here’s my step-by-step magic:
-
Warm the milk : in a large saucepan, combine the coconut milk, whole milk, and vanilla extract over medium heat.
Just warm it until it’s hot but not boiling — about 5 minutes should do the trick. i usually give it a gentle whisk here too, just to blend everything nicely.
-
Mix dry stuff : in another bowl, whisk together your dry ingredients: sugar, cocoa powder, cornstarch, and sea salt. this prepares them for a smooth transition into the wet mix and avoids those pesky lumps.
-
Combine like friends : gradually add the dry mix to the warm milk, whisking continuously. this keeps it silky smooth.
Let it cook over medium heat, stirring constantly until it thickens — think pudding-like consistency! this usually takes around 5-10 minutes, and you’ll know it’s ready when it starts to bubble slightly.
-
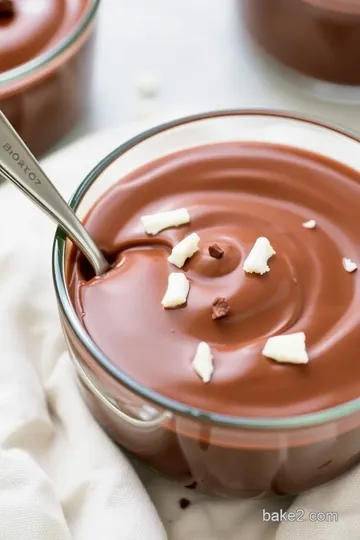
The Great Pour : Once you've reached that dreamy consistency, pour the mixture into your greased baking dish. Don’t worry about being too precise; just get it in there!
-
Bake Away : Place your pudding in the oven and let it bake for about 20 minutes. You want it to be set around the edges but still a little jiggly in the center — that’s your success indicator!
-
Toppings frenzy : after 20 minutes, take it out and sprinkle your shredded coconut and dark chocolate chips on top.
Put it back in the oven for another 5 minutes, just until the chocolate melts. feel free to sneak a taste — i won’t tell!
-
Chill or No Chill : Let it cool at room temperature for a bit, then decide if you want to serve it warm or chilled. Either way, it’s a treat!
Expert Techniques
One critical tip i've learned through the years — don’t rush the whisking. when i first started baking, i would get impatient, and lumps would show up uninvited.
So stand there, whisk away, and enjoy the moment.
Also, if you’re feeling adventurous, substitute all the milk for coconut milk for a more tropical vibe. or sprinkle some crushed nuts on top for added texture.
Who’s up for a nutty twist on the classic?
Success Strategies
If your pudding seems too liquidy, don’t worry! just let it bake a little longer. and remember, it gets firmer as it cools.
If it's a little too firm, a drizzle of warm coconut milk before serving can smooth it right out.
Quality assurance is key here. After baking, give it a gentle poke; if it feels like it’s set but still a little jiggly in the center, you’ve hit the jackpot!
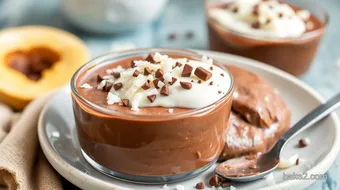
For the full experience, serve it up with fresh berries or whipped cream — it really elevates the dish and balances the richness.
This Coco Baked Coconut and Chocolate Pudding is one of those indulgent desserts that just makes life a bit sweeter.
As we wrap up this culinary journey, don’t forget to check out the additional information section for some creative serving ideas and the best options for pairing this chocolatey coconut dream!
Game-Changing Tips
Professional Insights
When it comes to making my coco baked coconut and chocolate pudding, the key is patience. i remember the first time i rushed the whisking process—what a disaster! the texture was all off, and i was left with a lumpy pudding that tasted more like glue than dessert.
So, if there’s one thing i’ve learned, it’s to take your time when combining your ingredients.
Expert Techniques
Make sure you're using a heavy-bottom saucepan . this prevents any hot spots that could scorch the pudding. when you combine the wet and dry ingredients, use a whisk like your grandmother would whip her egg whites—fervently and with love.
This guarantees a smooth, velvety finish.
Kitchen Wisdom
An old-timey trick: if you ever find yourself with a lumpy pudding, don’t despair! simply strain it through a fine mesh sieve.
That’ll take care of any errant lumps and give you a silky smooth pudding.
Success Guarantees
Follow the baking instructions closely. the pudding might look undercooked when you remove it from the oven, but rest assured, it continues to firm up as it cools.
That small amount of jiggle is what you want; it's the hallmark of a perfect coco baked creation.
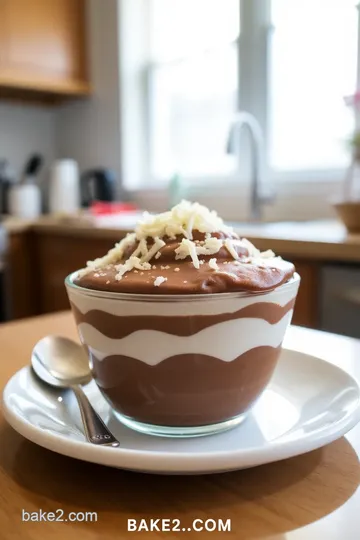
Perfect Presentation
Plating Techniques
Now, let’s talk about how to make your dessert as delicious to the eyes as it is to the palate.
When plating, i recommend using shallow bowls for the pudding. it allows the toppings to shine and makes it feel more inviting.
Garnish Ideas
Sprinkle some shredded sweetened coconut on top right before serving for an enticing touch. you could even toss on some dark chocolate shavings or a few whole berries to really jazz it up.
Serving Suggestions
For a dinner party vibe, serve your pudding in cute individual ramekins. Not only do they look charming, but they also allow guests to have their own little coconuts of joy!
Visual Appeal Tips
Don’t forget to show off that melty chocolate on top! A drizzle of melted dark chocolate or a smidge of whipped cream can elevate your dessert from homely to haute cuisine.
Storage and Make-Ahead
Storage Guidelines
Leftover Coco Baked pudding can be stored in an airtight container in the fridge for up to three days. Though it’s usually gone in a day, right?
Preservation Methods
Freezing this pudding isn't the best idea, as the texture may change. Leave it in the fridge instead—trust me!
Reheating Instructions
To reheat, pop it in the microwave for about 30 seconds or until warm. Just keep an eye on it—nobody wants molten pudding!
Freshness Tips
If you prefer it chilled, let it sit in the fridge for at least an hour before serving. This makes the flavors even richer and oh-so-satisfying.
Creative Variations
Flavor Adaptations
I’ve tried making this pudding with almond milk, and it’s a game changer! If you like a nutty flavor, I'm telling ya—go for it.
Dietary Modifications
For a vegan dessert, replace the whole milk with coconut milk or almond milk. It's rquired change, but trust me, it still tastes divine !
Seasonal Twists
In wintertime, adding a dash of peppermint extract could be fun! Or how about some orange zest in the summer for a refreshing zest?
Regional Variations
You could even try adding some spices —like a pinch of cinnamon or cardamom—if you’d like to give your pudding a twist of your heritage. Fantastic for a cozy evening!
Complete Nutrition Guide
Detailed Breakdown
Each serving has about 280 calories . While it’s not the healthiest option, it surely is a delightful splurge.
Health Benefits
Coconut milk is known for its good fats and being dairy-free, so this dessert can be a lighter alternative to traditional puddings. That’s a win in my book!
Dietary Information
With this recipe being vegetarian and gluten-free , it opens delightful doors for various dietary preferences.
Portion Guidance
Keep it to a modest serving; with pudding as rich as this, a little goes a long way. Sharing is caring, right?
Expert FAQ Solutions
Common Concerns
"I can't whisk for the life of me!" A common shout from my friends. Consider using an electric whisk if you're struggling; it saves time and effort.
Expert Answers
Wondering about substitutions? Yes, feel free to swap regular sugar for a sweetener; it works well, though it may alter the taste slightly.
Troubleshooting Guide
If you notice your pudding is too firm, add a splash of warm milk before serving to loosen it up—easy peasy!
Success Tips
Always taste as you go. Not only does it ensure a balanced flavor, but it also lets you enjoy the sweet process of making this dessert.
In conclusion, this coco baked coconut and chocolate pudding is not just about satisfaction; it’s about making memories in the kitchen.
Whether you're sharing it with loved ones or indulging on your own, these tips and tricks will elevate your cooking experience.
Enjoy every silky, chocolatey bite!
Coco Baked Coconut and Chocolate Pudding Card
⚖️ Ingredients:
- 1 cup unsweetened coconut milk
- 1 cup whole milk
- 1/2 cup granulated sugar
- 1/4 cup unsweetened cocoa powder
- 1/4 cup cornstarch
- 1 teaspoon vanilla extract
- 1/2 teaspoon sea salt
- 1/2 cup shredded sweetened coconut (for topping)
- 1/4 cup dark chocolate chips (for topping)
🥄 Instructions:
- Step 1: Preheat your oven to 350°F (175°C).
- Step 2: Grease a medium-sized baking dish (about 8x8 inches) with butter or cooking spray to prevent sticking.
- Step 3: In a medium bowl, whisk together the granulated sugar, cocoa powder, cornstarch, and sea salt until well combined.
- Step 4: In a large saucepan, combine the coconut milk, whole milk, and vanilla extract. Place over medium heat and warm gently, stirring occasionally, until hot but not boiling (about 5 minutes).
- Step 5: Gradually add the dry ingredient mixture to the warm milk mixture. Whisk continuously to avoid lumps. Continue to cook over medium heat, whisking constantly until the mixture thickens (about 5-10 minutes).
- Step 6: Pour the mixture into the prepared baking dish. Smooth out the top with a spatula.
- Step 7: Bake in the preheated oven for about 20 minutes, until the surface is set but still slightly jiggly in the center.
- Step 8: Remove the dish from the oven and sprinkle the shredded coconut and chocolate chips evenly over the top. Return to the oven and bake for an additional 5 minutes, just until the chocolate chips melt.
- Step 9: Allow the pudding to cool slightly at room temperature. You can serve it warm or chilled, as you prefer.
Previous Recipe: Unbaked Cookie and Cream Cake Pop Recipe: 7 Sweet Tips for Success
Next Recipe: Seafood Bake: 9 Best Tips for a Flavorful Delight