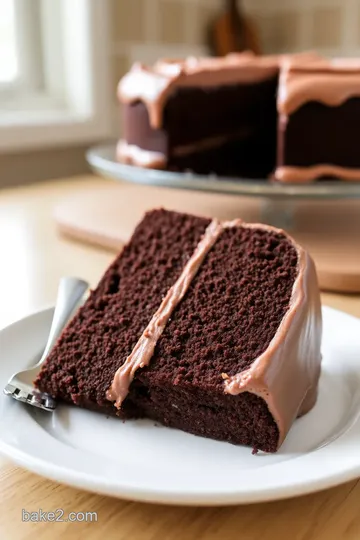
Silken Chocolate Cake
Make this Silken Chocolate Cake in just 50 minutes! A moist chocolate delight featuring rich cocoa and silky frosting, perfect for any occasion. Serves 8.

- The Ultimate Guide to Silken Chocolate Cake
- The Magic Behind This Recipe
- Health and Nutrition Highlights
- Recipe at a Glance
- Perfect Ingredients Selection
- Kitchen Equipment Essentials
- Foolproof Cooking Steps for Silken Chocolate Cake
- Professional Secrets to Baking Success
- Perfect Presentation: Making Your Cake Shine
- Storage and Make-Ahead Tips
- Creative Variations for Every Palate
- Expert FAQ Solutions to Common Concerns
- Complete Nutrition Guide
- Recipe Card
Ah, the wonderful world of cakes! If you've ever had a nibble of a silken chocolate cake, you know there's something truly magical about its rich, moist layers. This delight has roots that span centuries, with traces of chocolate-based desserts found as far back as the ancient Mesoamericans. They, the pioneers of cocoa, transformed an ancient food into what many consider today’s ultimate indulgence— chocolate cake. And here we are, with a modern take on a classic chocolate cake, just to tickle your taste buds.
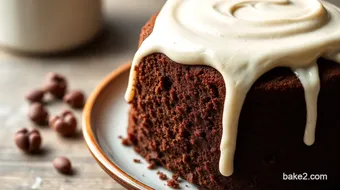
Now, why is this silken chocolate cake recipe special, you ask? Well, it’s not just the irresistible moist texture that turns heads; it's also the joy of baking it from scratch without needing a PhD in patisserie! Every slice speaks of homemade goodness, and trust me, nothing beats that fresh-out-of-the-oven aroma wafting through your kitchen! Plus, the silken frosting? Oh, that silky smoothness wraps around the cake like a warm hug, creating a balance of flavors that's pure heaven.
The Ultimate Guide to Silken Chocolate Cake
This cake isn't just a recipe; it's a slice of history on a plate. With a heritage steeped in culinary tradition, silken chocolate cake has evolved from simple baked goods to an art form. It marries textures and flavors in a way that taps into the heart of many cultures around the world. Think about it—everyone from grandmothers to professional bakers has their own spin on chocolate cake, and the variations are virtually endless!
Its captivating origin story brings us feelings of nostalgia—perhaps it's the cake your mum made on your birthday or the one that earned you the title of "Class Baker" when you brought it to school. In today’s world, this cake has become a staple at parties, gatherings, and quiet evenings with a cup of coffee. Seriously, whether it’s a birthday bash or a casual Sunday dessert, silken chocolate cake reigns supreme!
The Magic Behind This Recipe
So, what's the secret sauce? Or should I say, what magic makes this silken chocolate cake stand out? For starters, it’s about those unique flavor combinations. The interplay of cocoa and espresso—yes, I said espresso—elevates the chocolate richness to a whole new realm! And let’s not forget the texture—it’s achieved using foolproof techniques that I promise you, even baking newbies can follow.
I've had my fair share of kitchen mishaps, and let me tell you, undercooked, dry, or overly dense cakes can hit hard. But this recipe? It’s been tested and approved in my own kitchen (with a few friendly blunders). Along the way, I’ve learned that the key to the light and fluffy frosting lies in using room temperature ingredients. A little tip for ye who wish to bake with joy—don't rush, just enjoy the process!
Health and Nutrition Highlights
Now, before temptation completely takes over, let’s address the elephant in the room: nutrition! Sure, it's a chocolate cake, but it has some surprising benefits tucked away. For example, it boasts protein and iron, essential goodies our bodies crave. If you’re looking for a treat that still feels a bit good-for-you, this cake can be made with whole milk alternatives or egg substitutes, like flaxseed mixed with water for an egg-free version.
Thinking of indulging while keeping an eye on wellness? You’ve got options! With some creativity, this recipe can fit snugly into gluten-free diets, or even dairy-free rituals. It’s all about balance and knowing how to modify without sacrificing that beloved silken cake texture!
Recipe at a Glance
Let’s keep it straightforward. This silken chocolate cake requires about 20 minutes of prep time and 30 minutes of cooking time. That’s just 50 minutes until pure bliss! It serves eight, making it perfect for sharing with family or friends (or maybe just saving for your midnight snack, no judgment here!). Plus, the skill level? It's medium. So even if you’ve had a few cake disasters in the past, don't shy away—this recipe could be your golden ticket!
And the best part? It's surprisingly cost-effective! So, you're not breaking the bank for a merry little treat. So, ready your apron, gather your ingredients, and let’s get baking! This silken chocolate cake is whispering your name, and you won’t regret it!
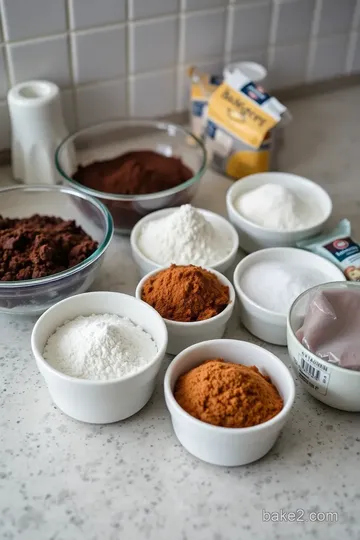
Perfect Ingredients Selection
Baking a scrumptious silken chocolate cake starts with the right ingredients. Trust me, I've learned this the hard way after attempting to cut corners—let’s dive into how to ensure your cake turns out perfect every time!
Premium Core Ingredients
-
For the Cake:
- All-Purpose Flour: 1 ¾ cups (220g). Look for unbleached flour; it’s kinder to your cake’s structure and flavor. Freshness matters here; old flour can lead to a dense cake—yikes!
- Cocoa Powder: ½ cup (50g) unsweetened. Honestly, I always opt for quality here—aim for dutched cocoa for a richer flavor. The best cocoa powder for baking can transform your cake from good to oh-so-great!
- Baking Powder and Baking Soda: 1 ½ teaspoons and 1 teaspoon, respectively. Check the dates! Expired leavening agents can leave you with a flat chocolate pancake instead of a fluffy cake.
- Salt: ½ teaspoon. This is important; it elevates all the flavors. Trust me, don’t skip it.
- Sugars: ½ cup (100g) granulated sugar and ½ cup (100g) packed brown sugar. Different sugars give different textures, so use both for that moist chocolate cake we all love.
-
For the Silken Chocolate Frosting:
- Butter: ½ cup (115g), softened. Go for unsalted to control the saltiness in your frosting.
- Powdered Sugar: 1 cup (120g). Sift it! I forgot to sift once, and it turned out lumpy—what a mess!
- Heavy Cream: ¼ cup (60ml) for that luscious silken texture in your frosting. You could try coconut cream for a dairy-free alternative.
- Vanilla Extract: 1 tablespoon. Quality matters—pure vanilla extract will make your cake smell and taste divine.
Storage Guidance: Keep your dry ingredients in airtight containers to prolong freshness. Opened cocoa powder keeps for about a year in a cool, dark place. Fresh eggs? Use them before a month rolls by.
Signature Seasoning Blend
While the core ingredients create your base, a little extra magic is in the spices and herbs. Although this cake is pretty straightforward, there are twists to consider.
- Aromatics: A pinch of espresso powder (about 1 teaspoon) mixed with your cocoa can amplify the chocolate flavor. I learned that little trick from a barista friend—it’s glorious!
Smart Substitutions
We all have different tastes and dietary needs, and that’s totally cool!
- Flour: If you're looking for gluten-free options, use a 1-to-1 gluten-free flour blend. It works wonders!
- Egg Alternatives: I often substitute each egg with ¼ cup applesauce for an egg-free cake. It's a lifesaver when some guests show up unannounced!
- Dairy Alternatives: Use almond or oat milk instead of whole milk for a dairy-free version. We all have that one friend who can’t do dairy, right?
Emergency replacements: Running out of one ingredient? I've used yogurt instead of eggs once—deliciously surprising!
Kitchen Equipment Essentials
Now that we have our ingredients, we can't forget about the tools!
- Must-Have Tools: A whisk, mixing bowls, and a spatula are essentials. I love my silicone spatula; it scrapes every last bit of frosting from the bowl.
- Recommended Appliances: An electric mixer speeds up the frosting process tremendously. It's worth the investment if you plan to bake often.
- Helpful Gadgets: A digital scale for precise measurements can help if you're using different flours or scales.
Pro Ingredient Tips
To ensure your silken chocolate cake is as delicious as can be:
- Selection Secrets: Buy fresh eggs from a local market for the best flavor and texture. You can even test an egg's freshness by placing it in water—if it floats, it’s past its prime.
- Quality Markers: Look for a rich color in your cocoa powder—dull brown might mean it's old and tired.
- Storage Solutions: Freeze your cake layers wrapped tightly for a month if you bake in advance—defrost completely before frosting to keep them perfectly moist.
Enjoy the joyful chaos of baking your silken chocolate cake! Embrace the mess and savor the victories, because, at the end of the day, it’s all about sharing a slice (or two) with those we love most.
Foolproof Cooking Steps for Silken Chocolate Cake
Essential Preparation Steps
Before diving into the delightful world of baking, let’s talk about mise en place—essentially, it means having everything ready to roll. I always find that gathering my ingredients before getting started really helps. So, grab those chocolate cake ingredients: flour, cocoa powder, sugars, eggs, and all that. Measure them out and set them aside. It just makes the process smoother, you know?
While prepping, remember to sift your cocoa powder to avoid those pesky lumps. A small but crucial step—I’ve had my share of unexpected surprises when I skipped this. The flour and cocoa blanket will sit together nicely in one bowl, needing a good whisk before we add the wet to the dry.
Time management is key here. I usually put the kettle on to boil while mixing; I mean, what’s a little multitasking, right? Just a friendly tip—make sure to get your pans ready by greasing and flouring them to keep the cakes from sticking.
Professional Cooking Method
Let’s get into the heart of this chocolate cake! First things first, preheat your oven to 350°F (175°C). Trust me; you want to avoid that last-minute scramble to heat it up after mixing your batter. When the oven is ready, mix your dry and wet ingredients in their respective bowls as per the previous prep.
Now comes the moment of truth: Combine those wet and dry ingredients. I do it a bit at a time, folding gently. No need for overmixing here; we’re not looking to create a gluten monster—just a fluffy chocolate cake, thank you very much! Then, slowly pour in that boiling water. It might seem weird, but it’s essential for that silken texture. A thin batter is the goal here.
Pour your batter into the prepared cake pans and pop them in the oven. Now, resist the urge to open the door too early! Bake for 30-35 minutes. That toothpick test is your best friend; if it comes out clean, you’re set!
Expert Techniques
Once your cakes are out and cooling—don’t forget, ten minutes in the pans is a must—it's frosting time! For the silken chocolate frosting, beat your softened butter first till it’s creamy. You want that light, fluffy texture, so don’t skip this step. Add in powdered sugar and cocoa, and after that’s well mixed, pour in your cream.
The secret? Taste along the way! You might need to adjust sweetness or add a pinch more cocoa for your perfect layering. Quality checks are all about trusting your palate. Oh, and keep your cakes cool before frosting them; it’ll save you from a melty mess. We’ve all been there.
Success Strategies for Chocolate Cake
If you encounter any hiccups—like a cake that doesn’t rise as expected—don’t panic. Double-check your baking powder; maybe it’s expired. Remember, freshness is key in baking. Suppose the cake comes out too dry? I find that slightly under-baking is better than overbaking. Just aim for that moistness.
While serving, I suggest warming a slice a tad in the microwave for 10–15 seconds—it really brings out the chocolate goodness. And don’t forget those accompaniments! A scoop of vanilla ice cream or fresh berries brings an extra zing to your silken chocolate cake.
Lastly, embrace the imperfections. It’s all part of the journey of baking. Trust me, those little mistakes and learning moments only add character to your cake. My first attempt had an awkward lean to it; who knew chocolate cake could stand on a slant? But hey, it still tasted glorious!
There you have it, a step-by-step guide to your new favorite recipe. I hope you enjoy baking this silken chocolate cake as much as I do! Happy creating!
Professional Secrets to Baking Success
Expert Techniques for a Fluffy Chocolate Cake
Baking the perfect chocolate cake takes a bit of finesse. Start with your ingredients at room temperature; it really makes a difference! I learned this the hard way, once mixing cold eggs into my batter and ending up with a dense, sad cake. Lesson learned: room temperature ingredients blend better and give that lovely fluffy texture you want.
Kitchen Wisdom and Tips
One pro tip I swear by is sifting the cocoa powder and flour together. It sounds tedious, but this little act helps to aerate the dry ingredients and removes lumps. It took me a few tries to figure out why my cakes weren’t rising properly, but once I adopted this habit, my cakes turned out light and moist. Remember, the secret to a great silken chocolate cake is in the mixing!
Guaranteed Success
To up your chances of nailing this recipe, ensure your oven is calibrated correctly and avoid opening the door too much during baking. Patience pays off when you let the cake cool completely before frosting. I’ve tried frosting a cake while it was still warm—let me tell you, it’s a chocolate disaster waiting to happen!
Perfect Presentation: Making Your Cake Shine
Plating Techniques for Visual Appeal
When it comes to serving your Silken Chocolate Cake, presentation is key. Place your cake on a pretty cake stand; it instantly elevates the display. Use an offset spatula to spread frosting smoothly, then run a knife gently through the frosting for a textured look. I often use a bench scraper around the sides for that sleek finish, and it never fails to impress.
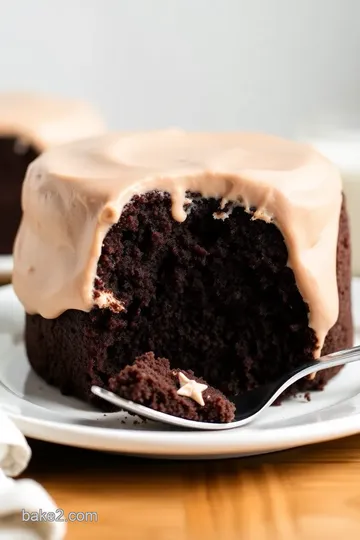
Garnish Ideas and Serving Suggestions
Fresh berries or a sprinkle of powdered sugar adds a pop of color. Drizzle a bit of chocolate sauce over the top for show. Trust me, it’s the kind of ‘wow’ that gets folks ooh-ing and aah-ing. Pairing it with a scoop of vanilla ice cream is always a winner, too; the combination of warm cake and cold ice cream is a pure delight!
Storage and Make-Ahead Tips
Smart Storage Practices
To keep your cake moist, wrap it tightly in plastic wrap after it's completely cool. This prevents it from drying out. I accidentally left mine uncovered one day, and it was as sad as a burnt toast. Learning to store it right was a game-changer!
Preservation Methods
You can keep the silken chocolate cake at room temperature for a couple of days. But if you want to stretch it out, pop it in the fridge. I’ve frozen pieces before, and they thaw beautifully. Just wrap each piece individually for easy access during your late-night chocolate cravings.
Reheating Instructions
If you’ve stashed leftovers in the fridge, a quick nuke in the microwave for about 15 seconds can revive that warm, fresh-outta-the-oven vibe. Just don’t forget to remove any frosting or garnishes before heating!
Creative Variations for Every Palate
Flavor Adaptations
Feeling adventurous? Add a pinch of espresso powder to intensify the chocolate flavor. I once made a mocha version unsucessfully (my friends were not amused), but that little addition definitely did the trick for the next batch!
Dietary Modifications
You can easily modify this recipe for various dietary needs. For a gluten-free chocolate cake, simply swap regular flour for a high-quality gluten-free blend and keep everything else the same. For a dairy-free version, use almond or coconut milk instead of whole milk—it’s surprisingly good!
Seasonal Twists and Regional Flavors
In the fall, why not add some pumpkin spice to the mix? It’s reminiscent of a cozy autumn day. If you're feeling nostalgic, try incorporating some toffee bits for a crunchy texture.
Expert FAQ Solutions to Common Concerns
Addressing Common Questions
"What if my cake sinks in the middle?" It could be due to underbaking. Always trust your toothpick; it’s your best friend. Check it at the 30-minute mark, and if it’s gooey, give it a few more minutes.
Troubleshooting Guide
When a cake looks glorious on the outside but tastes dry, you've probably overbaked it. I’ve been there, wondering if I’d put too much love into it. Take note of your baking times—and trust your oven timer.
Expert Answers to Snowballing Issues
If your frosting seems too runny, add more powdered sugar until you reach that fluffy, thick consistency needed for proper cake decoration. It should hold its shape, just like my patience while baking!
Complete Nutrition Guide
Detailed Nutritional Breakdown
One serving of this silken chocolate cake packs approximately 290 calories, which sounds indulgent, but it’s rich in flavor. Each slice offers around 5 grams of protein—who knew cake could be nutritious?
Health Benefits
Chocolate, especially dark chocolate, has antioxidants. So while you may be indulging, you're also giving your body a little boost. Just remember, everything in moderation!
Dietary Information for Mindful Eating
If you’re tracking dietary intake, this dessert contains sugars and fats. But when enjoyed as part of an overall balanced diet, it's a delicious treat worth every calorie.
Portion Guidance
I recommend slicing the cake into generous servings of about 1-2 pieces. Don't skimp on yourself—life's short, and cake is meant to be savored!
So, there you have it—a sneak peek into my baking kitchen's little secrets! Just remember to have fun while you bake, and don't stress over the little things. Happy baking!
Silken Chocolate Cake Card
⚖️ Ingredients:
- 1 ¾ cups (220g) all-purpose flour
- ½ cup (50g) unsweetened cocoa powder
- 1 ½ teaspoon baking powder
- 1 teaspoon baking soda
- ½ teaspoon salt
- ½ cup (100g) granulated sugar
- ½ cup (100g) packed brown sugar
- 1 cup (240ml) whole milk
- ½ cup (120ml) vegetable oil
- 2 large eggs
- 2 teaspoons vanilla extract
- 1 cup (240ml) boiling water
- ½ cup (115g) unsalted butter, softened
- 1 cup (120g) powdered sugar
- ½ cup (50g) unsweetened cocoa powder
- ¼ cup (60ml) heavy cream
- 1 tablespoon vanilla extract
🥄 Instructions:
- Step 1: Preheat your oven to 350°F (175°C). Grease and flour two 9-inch round cake pans or line them with parchment paper.
- Step 2: In a large mixing bowl, sift together the flour, cocoa powder, baking powder, baking soda, and salt.
- Step 3: Add the granulated sugar and brown sugar to the dry mixture and whisk until well combined.
- Step 4: In a separate bowl, combine the milk, vegetable oil, eggs, and vanilla extract. Whisk until smooth.
- Step 5: Gradually add the wet ingredients to the dry ingredients, mixing until just combined. Be careful not to overmix.
- Step 6: Slowly stir in the boiling water until the batter is smooth (the batter will be thin
- Step 7: Pour the batter evenly into the prepared cake pans. Bake for 30-35 minutes, or until a toothpick inserted into the center comes out clean.
- Step 8: Allow the cakes to cool in the pans for 10 minutes, then turn them out onto wire racks to cool completely.
- Step 9: In a bowl, beat the softened butter with an electric mixer until creamy and smooth.
- Step 10: Gradually add the powdered sugar and cocoa powder, mixing well.
- Step 11: Pour in the heavy cream and vanilla, then beat until the frosting is light and fluffy.
- Step 12: Once the cakes are completely cooled, spread a generous amount of frosting between the layers and over the top and sides of the cake.
Previous Recipe: Easy & Juicy Bake Chicken Drumsticks with Crispy Herb Crust: My Family's Favorite!
Next Recipe: Oven-Baked Vietnamese Catfish Delight