Identify Flour with Easy Water Test
Ever wondered how to identify flour types? This easy water test made my baking journey so much easier, and I'm excited to share my tips with you!

- Flour Identification Made Easy: The Water Test Method
- Unlocking the Secrets of Flour: Your Essential Ingredients Guide
- Professional Cooking Method
- Pro Tips & Secrets for Flour Identification
- Perfect Presentation
- Storage & Make-Ahead
- Creative Variations
- Complete Nutrition Guide
- Expert FAQ Solutions
- Recipe Card
Flour Identification Made Easy: The Water Test Method
You know that moment when you’re all set to bake, and you open your pantry only to find a bunch of bags of flour staring back at you? oh my gosh, it can be so overwhelming! it reminds me of the time i accidentally made cookies with bread flour instead of all-purpose flour.
Spoiler alert: they turned out like little hockey pucks! ever found yourself wondering how to identify flour with easy water test ? well, you’ve come to the right spot.
This method is a total game changer for home bakers, especially if you’ve got different types of flour hanging around.
Let’s dive into how this simple yet effective technique can clear up the mystery of your flour stash.
Understanding the Basics of Flour
Flour isn't just flour, you know? close your eyes and think of all those different types: all-purpose , bread , whole wheat , and even cake flour .
Each has its own character, and using the wrong one can throw your baking off balance. the water test for flour gives you a chance to understand those distinct personalities.
This method originated from practical kitchen experiments, making it easy for anyone, whether you’re a novice or a seasoned pro, to pick the right flour like a baking boss!
This easy test won't eat up your time either—it takes just about 10 minutes ! yep, you heard it right.
No complicated techniques here. plus, you don’t need some fancy flour testing equipment. just some bowls and a measuring cup! it’s a budget-friendly solution to making sure your baking projects turn out beautifully.
Key Benefits of the Water Test Method
Now, let's talk about why you should care. first off, knowing how to identify flour types not only boosts your baking confidence but also improves the taste and texture of your treats.
You wouldn’t want to use cake flour for a loaf of bread, right? totally not gonna work!
The health benefits? well, whole wheat flour has a plethora of nutrients, like fiber and protein, which you miss out on when using all-purpose flour.
Plus, if you’re venturing into gluten-free baking, this test is a great way to assess how your flours will perform in your recipes.
Now think about this: have you ever had to whip up a last-minute treat for a birthday party or a holiday gathering? trust me, the water test can help you figure out which flour works best for those special occasions! get the right flour, and you’re already one step closer to winning over your friends and family.
Challenges and Tips
When i first started baking, i faced challenges like everybody else—flour confusion being at the top of the list. but here's the good stuff: this method empowers you to be hands-on in your flour texture analysis .
I encourage you to make notes on how each flour behaves. keep a mini journal, or even a fun baking scrapbook.
It’ll save you a heap of trouble down the line.
Don’t forget—use fresh flour! old flour can throw a wrench in your analysis. and if you’re feeling adventurous, add some alternative flours into the mix! testing gluten-free flour blends can add so much to your baking repertoire.
Ready to Get Started?
Alright, you’re almost ready to roll. armed with your flour samples and a little water, you’ll unlock the mysteries of your pantry in no time.
But before you jump in, get your mixing bowls and measuring cups ready because we’re about to dive into the fun part—testing those flours! the result will guide you in crafting delicious bread, pastries, and beyond.
Flour is a crucial part of nearly every baked good, and understanding flour varieties is essential for great results. so, let's get to it! it’s time to mix flour and water and start testing.
This isn't just a method; it’s the foundation for baking success. are you excited? i know i am!
Unlocking the Secrets of Flour: Your Essential Ingredients Guide
Welcome to the world of baking ! when diving into baking projects, understanding flour is like discovering the secret ingredient to success.
Let’s break down everything you need to know about flour, including how to identify flour with an easy water test .
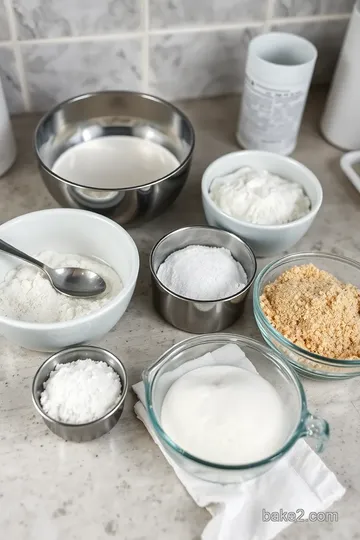
Premium Core Components
First things first, let's talk about the core ingredients . Here’s a quick rundown:
-
Measurements : Whether you’re measuring in cups or grams, accuracy matters. For every cup of flour, that’s about 120 grams . Keep a kitchen scale handy for precise baking!
-
Quality Indicators : Fresh flour smells nutty and wholesome. If it has an off smell, it’s probably past its prime. Ditch it!
-
Storage guidelines : store flour in a tightly sealed container in a cool, dry place. whole wheat flour tends to have a shorter shelf life—about three months —while all-purpose can last for up to a year.
-
Freshness tips : when choosing flour, look for a recent expiration date . if you’re unsure about its freshness, feel free to give it a quick taste test (just a tiny bit!) to check for any off flavors.
Signature Seasoning Blend
Moving on to spices and herbs! The right blend can make or break your dish. Here’s what you need to know:
-
Essential Spice Combinations : Think garlic powder and onion powder, or a pinch of cayenne to kick it up a notch.
-
Herb Selections : Fresh or dried herbs like basil and oregano pair beautifully with many savory dishes. Experiment with what’s in season!
-
Flavor Enhancers : Don't forget about aromatics like onions, garlic, and ginger . They work wonders both in savory and sweet recipes.
Smart Substitutions
When it comes to substituting ingredients , don’t panic! Here’s a quick checklist:
-
Common Alternatives : Got no salt? A splash of soy sauce can do the trick in savory dishes!
-
Dietary Modifications : If you’re gluten-free, try coconut flour or almond flour. Just remember, these flours behave a little differently. They can absorb more moisture than all-purpose flour.
-
Emergency Replacements : Ran out of baking powder? Mix 1 teaspoon of vinegar with ½ teaspoon of baking soda to give your baked goods some lift.
-
Seasonal Options : Use pumpkin puree in the fall for a moist texture in cakes. It’s such a game-changer!
Kitchen Equipment Essentials
Ready to bake? Make sure you've got these tools handy:
-
Must-Have Tools : Invest in a good mixing bowl, measuring cups, and parchment paper. Trust me, they’ll save you a ton of headaches.
-
Alternative Equipment Options : Don't have a rolling pin? Any sturdy bottle will do! Just make sure it’s clean first.
-
Preparation Tips : Always preheat your oven and check that your baking sheets are lined and ready to go.
-
Storage Solutions : Keep your utensils organized. I like to use magnetic strips for my measuring spoons. It’s a total game-changer in keeping things tidy!
Speaking of keeping things tidy, let’s take the leap into identifying flour with that nifty water test.
Getting into the Water Test for Flour
Alright, here comes the fun part! To understand flour varieties , using the water test can really help. It’s super easy and can make your baking life so much simpler.
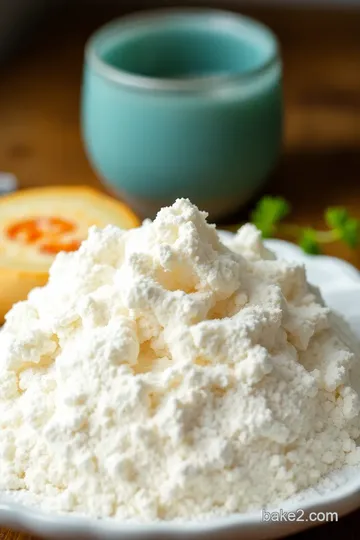
Grab your flour samples—let's say all-purpose, bread, whole wheat, and cake flour . add some room temperature water to each and mix it up.
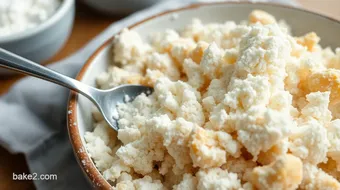
In just a few minutes, dough consistency evaluation will help you distinguish bread flour from cake flour.
- Bread Flour : Smooth and elastic. Perfect for those dreamy loaves.
- Cake Flour : Soft and crumbly. It's what you want for that light-as-a-feather cake.
- Whole Wheat Flour : Dense and nutty, giving that wholesome feel.
This simple test gives you a solid grip on what each type of flour can do! play around and take notes, cause trust me, you'll want to know the ins and outs for future baking projects.
Now that you know how to identify flour, you’re ready to jump into your baking adventures. Let’s dive into those delicious recipes waiting for you!
Professional Cooking Method
Cooking can be intimidating for some, but trust me, once you grasp the professional cooking method , it’s all downhill from there! let’s dive into the nitty-gritty of each essential step that makes cooking not just easier, but also way more enjoyable.
Essential Preparation Steps
First off, let’s talk mise en place. sounds fancy, right? it just means “everything in its place.” before you even think about turning on that stove, gather all your ingredients.
Chop, measure, and set everything out. this way, when the heat is on, you won’t be scrambling like a headless chicken trying to find the olive oil in the back of the cupboard.
Time management is your best friend in the kitchen. allocate specific times for each task, and honestly, don't forget to breathe! set a timer for each step if you have to.
Maybe you need 5 minutes to chop veggies, or 10 minutes for boiling pasta. stick to it!
Now, let’s get organized. use bowls for prep and put like-items together. it saves you from the apocalyptic kitchen look that might cause you to lose your cooking mojo.
Oh, and safety first! keep a clean workspace and always use pot holders for those hot pans. scalding yourself is no joke!
Step-by-Step Process
Alright, let’s get down to the nitty-gritty. Here’s a step-by-step process that’ll have you channeling your inner chef:
-
Preheat your oven to 350° F ( 175° C) . Get that thing ready while you work.
-
Gather your ingredients and place them in front of you.
-
Follow your recipe like it’s your favorite playlist—don’t skip around! Measure carefully and use a digital scale if you can. Weight matters!
-
Temperature control is crucial! For instance, if you're melting butter, keep it below 250° F ( 121° C) —you don’t want it burning.
-
Pay attention to timing. Bake that cake for exactly 30 minutes . Trust me, checking every 5 minutes will just drive you nuts.
-
Look for visual cues! Is that chicken turning golden brown? Are those cookies spreading? That's your sign that things are cooking just right.
Expert Techniques
This is where we unlock some expert techniques ! use a good knife for chopping; it saves time and effort.
When sautéing veggies, make sure not to overcrowd the pan. it leads to steaming rather than that deliciously golden brown you’re going for.
Always check for quality. If something looks or smells off, don’t hesitate to toss it. And if you don’t know how to troubleshoot a burnt dish, just add some sugar or honey! It’s a game-changer!
Success Strategies
Let’s make sure you nail it every time with some handy success strategies . a common mistake? not tasting as you go.
Seriously, how do you expect it to be perfect if you aren’t checking on flavors?
Quality assurance means you take a second to verify you’re using the right flour types —it can be the difference between a flat bread and a glorious loaf.
For instance, if your recipe calls for bread flour, don’t substitute with cake flour. they’re literally worlds apart!
Now, for those busy bees, here’s a make-ahead option : shower prep with a bit of foresight. chop veggies the night before and store them in the fridge.
Your future self will be pumped you did!
Identify Flour with Easy Water Test
And speaking of flour, if you’ve got various types in your pantry, have you ever tried to identify flour with an easy water test ? just mix equal parts flour and room temperature water, and you'll see different textures based on the type.
All-purpose flour will yield a smooth dough, while whole wheat flour may be grainy. it’s a neat trick for knowing just what you’re working with!
Baking is all about understanding flour varieties and the science behind it. So don't hesitate to get hands-on. Mix, evaluate dough consistency, and even have fun experiments with specialty flours!
Additional Information
Now, whether you're a newbie or a seasoned pro, remember that cooking is all about having a bash in the kitchen.
Explore, taste, and don't be afraid of a little mess. after all, that’s the joy of cooking!
Pro Tips & Secrets for Flour Identification
Hey, fellow bakers! if you're diving into the flour world and need some clarity, let’s spill the beans on insider tips for identifying flour types.
Honestly, knowing your flour can be a total game-changer in baking! it can help you bake fluffy bread or delightfully tender cakes.
Chef's Personal Insights
Here's a little secret: fresh flour can make all the difference! stale flour can affect dough consistency and leave you guessing if you did something wrong.
So keep that pantry stocked, and use fresh flour for testing! also, make sure you measure accurately ; a little too much or too little can seriously mess with your results.
Time-Saving Techniques
Got several types of flour to test? grab your mixing bowls and measure all your flour and water together before you get mixing.
This not only saves you time but also helps keep your workspace organized!
Flavor Enhancement Tips
While you're at it, think about the flavors. for instance, when you test whole wheat flour , it’ll have a nuttier taste than all-purpose flour .
This can lead to some delicious recipes later down the line! play with the flavors; understanding the characteristics of different flours will help you pick the right one for every recipe.
Presentation Advice
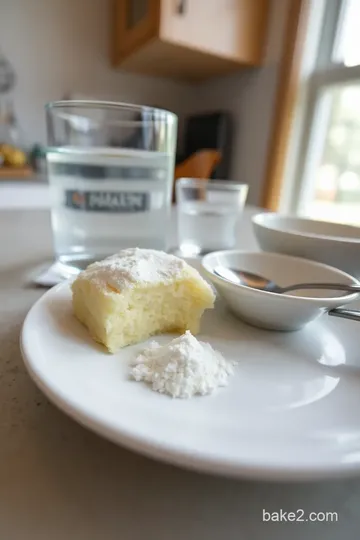
Now, once you've nailed your flour and tested it out, presentation matters! bake something with your newly identified flour and plate it nicely.
A dusting of powdered sugar or fresh fruits can take a simple loaf or cake to the next level. remember, people eat with their eyes first!
Perfect Presentation
Once you’ve determined which flour works best for your baking project, it’s time to think about how to serve it up gorgeous!
Plating Techniques
Layering a cake or slicing into a loaf? stack those slices neatly and place them on a colorful plate. if you want to impress, consider adding a drizzle of icing or a dollop of whipped cream.
It’s all about aesthetics!
Garnish Ideas
Fresh herbs, fruits, or even edible flowers can add a wow factor. for example, a sprinkle of mint leaves can make a chocolate cake look like it belongs in a fancy restaurant.
Garnishing adds that touch of elegance.
Color Combinations
Play with colors that pop! A slice of pale pound cake pairs beautifully with vibrant berries. It’s visually appealing and much more Instagrammable!
Visual Appeal Tips
Making sure the outer layer of your baked goods looks tempting is key too. Aim for that golden-brown crust, it’s a sign of tasty success!
Storage & Make-Ahead
Now, let’s talk about how to keep your flour fresh!
Storage Guidelines
Keep flour in air-tight containers to extend its shelf life. Make sure to label each kind if you’re like me and have a bunch in your pantry.
Preservation Methods
For longer storage, consider freezing. Just portion out the flour and stash it in freezer bags. Just remember to thaw it out before using if you go this route!
Reheating Instructions
When using flour types that you’ve frozen, you won’t need a reheating method but ensure to check for any moisture.
Freshness Duration
Generally, all-purpose and bread flour can last up to a year. But whole wheat? That’s about six months because it has more natural oils .
Creative Variations
Once you grasp your flour types, get creative!
Flavor Adaptations
Substituting flours can bring such diverse tastes. Swap all-purpose for almond flour in muffins for a fun nutty profile.
Dietary Modifications
Need it gluten-free? Test out your recipes with gluten-free flour blends and see how they hold up. It’s all about experimenting!
Seasonal Twists
In fall, why not try a spiced flour blend? Adding a bit of cinnamon or nutmeg to your cake flour can elevate those flavors.
Regional Variations
In different regions, you’ll find unique flour blends. Try a regional twist that matches local favorites; it can inspire your next baking project!
Complete Nutrition Guide
Understanding your flour isn't just a baking must. It’s also a nutrition conversation.
Detailed Breakdown
Know the nutritional info! Whole wheat flour provides more fiber compared to cake flour. It’s an essential detail if you’re health-conscious.
Health Benefits
Different flours have different health perks. If you’re looking to up the protein intake, bread flour is your buddy!
Dietary Considerations
Don’t forget to check gluten content, especially if you have friends who are gluten-sensitive.
Portion Guidance
Pay attention to serving sizes; it’s easy to overdo it on carbs if you're not careful. A good rule of thumb? Keep it moderate!
Expert FAQ Solutions
Lastly, here are answers to some of the most common questions we get!
Common Questions
"How do I know if my flour is good?" If it smells off or has a weird texture, it’s time to toss it.
Troubleshooting Guide
If your dough isn’t rising, check your flour type. It could be due to a mix-up; all-purpose won’t rise like bread flour!
Success Tips
Always err on the side of too little moisture when mixing. You can always add more but taking moisture out is no fun!
Variations Explained
Feel free to blend different types of flour—like a 50/50 mix of whole wheat and all-purpose for unique tastes and textures.
At the end of the day, don’t stress! the journey of identifying flour with easy water test techniques is just the beginning of your baking endeavors.
With confidence in your flour choices, you’re set to unleash some delicious creations. so go ahead, give it a try, and remember—baking is about having fun! happy baking!
Identify Flour with Easy Water Test Card
⚖️ Ingredients:
- 1 cup (120g) All-Purpose Flour
- 1 cup (120g) Bread Flour
- 1 cup (120g) Whole Wheat Flour
- 1 cup (120g) Cake Flour
- Room temperature water (approximately 1/2 cup or 120ml per test)
🥄 Instructions:
- Step 1: Gather your flour samples in separate bowls, labeling each bowl as per the type of flour.
- Step 2: Add the same amount of room temperature water (approximately 1/2 cup) to each bowl of flour.
- Step 3: Slowly mix the flour and water together until a dough forms. Use the spoon to mix initially, then use your hands to combine if necessary.
- Step 4: Assess the dough texture: Smooth and elastic for Bread Flour, Soft and crumbly for Cake Flour, Moderate elasticity for All-Purpose Flour, Dense and grainy for Whole Wheat Flour.
- Step 5: Let the dough rest for 5 minutes and check for changes.
- Step 6: Determine the flour type based on texture analysis.
Previous Recipe: How to Bake Mickey Mouse Chocolate Chip Delights: 5 Simple Secrets!
Next Recipe: How to Make Easy Dairy-Free Rice Krispies Treats: A Chewy Delight!