Lightened Baked Alaska: A Healthier Twist on the Classic Dessert
Wondering if is baked alaska healthy? Discover how to enjoy a guilt-free Baked Alaska with our easy, delicious recipe and helpful baking tips. Try it today!

- The Allure of Lightened Baked Alaska
- The Classic with a Health Kick
- Unique Features of Lightened Baked Alaska
- Health and Wellness in Every Bite
- Recipe at a Glance
- Quality Ingredients Breakdown
- Kitchen Equipment Essentials
- Lightened Baked Alaska: A Healthier Twist on the Classic Dessert
- Success Guaranteed Tips
- Perfect Presentation
- Storage and Make-Ahead
- Creative Variations
- Complete Nutrition Guide
- Expert FAQ Solutions
- Recipe Card
The Allure of Lightened Baked Alaska
Have you ever had a dessert that made you feel fancy without needing a tiara and a gown? that’s what baked alaska does! but here's the kicker: have you ever wondered if is baked alaska healthy? well, today, we're diving into a delightful twist on this classic treat — a lightened baked alaska that keeps all the flair but sheds some of the guilt.
What sets this recipe apart? for starters, it’s all about balance: rich ice cream, a fluffy meringue, and a lighter cake base come together without sending your waistline into a spiral.
And don’t worry, it’s not a nightmare in the kitchen — with a preparation time of about an hour and a medium difficulty level, you won't need to earn a michelin star to impress your friends at the next gathering!
The Classic with a Health Kick
Let’s roll the clock back a bit, shall we? the origins of baked alaska tap into the 19th-century culinary scene in the united states.
Inspired by the icy landscapes of alaska, this dessert combines ice cream cake recipes and toasted meringue — a true showstopper at any dinner party or festive occasion.
Modern-day food culture has seen baked alaska resurrected, often as a dazzling centerpiece that stirs nostalgia and indulgence.
Why is this twist on baked alaska perfect for today? because we're pulling together historical allure with the benefits of health-conscious cooking — think about enjoying some guilt-free baked alaska variations! it's about creating a feast for the eyes and taste buds that also ticks those nutritional boxes.
Unique Features of Lightened Baked Alaska
So, what makes this Lightened Baked Alaska so special? First off, the flavor combinations will take your taste buds on a trip! Picture this: creamy low-fat ice cream , a subtly sweet cake base made with healthy cake recipes , and a cloud-like meringue topping — just divine!
Our techniques are foolproof, crafted to help anyone from beginners to seasoned chefs whip up a stunning dessert. plus, there are time-saving tips like using unsweetened applesauce for a lighter cake base.
This means you can enjoy a slice without sacrificing your health goals. epic, right?
Health and Wellness in Every Bite
Now, let’s chat about health because we want to know: is baked alaska healthy? this version highlights key nutritional benefits, like low-calorie baked desserts that use alternative sweeteners for baking .
We're talking balanced nutrition: with the protein and fiber content, it checks the boxes for being both satisfying and nourishing.
And for those monitoring their sugar intake, don’t fret — we’ve got options to reduce sugar in desserts while still serving something delicious.
Recipe at a Glance
- Total Preparation Time: About 1 hour
- Skill Level Required: Medium
- Serving Size: Serves 8
- Cost Efficiency: Budget-friendly with simple ingredients!
The next part is where the magic happens, friends! gather your ingredients because i'm about to share how to make this delightful treat.
From easy meringue techniques to serving suggestions topped with fresh fruit or a light whipped topping, you're going to love how customizable and fun this dessert is.
Whether you're prepping for a summer bash or a cozy family dinner, this lightened baked alaska is sure to be the star of the show!
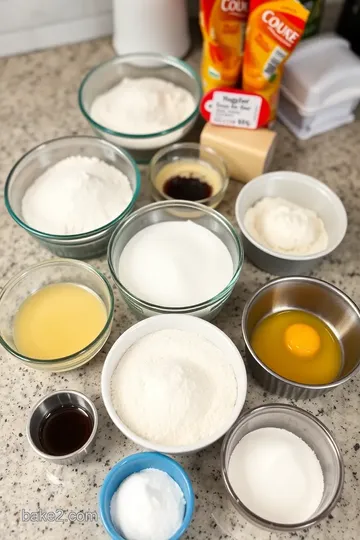
Quality Ingredients Breakdown
Alright, my friend, let’s dive into the world of ingredients that will elevate our lightened baked alaska ! every masterpiece starts with quality ingredients, and knowing their ins and outs is essential for a delightful treat.
Trust me, i’ve had my share of mishaps, and the secret often lies in what we use.
Premium Core Ingredients
To kick things off, let’s talk about the cake base. for this recipe, you’ll need 1 cup of all-purpose flour , which is your canvas.
Look for a fine texture; it should feel soft like a cloud when you touch it. next up is 1/2 cup of granulated sugar .
If you’re feeling adventurous, try 1/4 cup of honey instead. just remember, it’ll sweeten the deal but change the moisture level a bit.
Pro tip : blend the honey well into your wet ingredients.
Now, onto 1/2 cup of unsweetened applesauce —a total game changer! it gives moisture without the calories of additional sugar.
When choosing applesauce, opt for the organic variety if you can; it tastes fresher and more real. then we’ve got 2 large eggs —always go for the freshest ones you can find.
Don’t forget about 1 tsp of vanilla extract ; it’s the kind of thing that makes your kitchen smell amazing while the cake bakes! oh, and keep 1/2 tsp of baking powder and 1/4 tsp of salt close at hand for that lift and balance.
Storage Guidance
Don’t let your ingredients go to waste. Store your flour in an airtight container away from light to keep it fresh. Sugar? Just keep it sealed, and it’ll last practically forever.
Signature Seasoning Blend
Here’s where the magic happens! the meringue topping is what makes this dish so visually stunning. for our 4 egg whites , make sure they’re at room temperature for good volume.
You’ll also need 1/2 cup granulated sugar , or coconut sugar if that’s your jam, plus 1/4 tsp of cream of tartar (this helps the egg whites whip beautifully).
Don’t skip the pinch of salt; it may be small, but it’s mighty!
What I love about this recipe is how customizable it is. Want a fruity twist? Mix in some berry essence or use flavored extracts with your meringue.
Smart Substitutions
Let's chat substitutions. if you’re avoiding sugar, there are alternative sweeteners for baking that fit the bill, like stevia or monk fruit.
Even better, if you're looking at those pesky calories, consider low-fat ice cream options!
And for the cake base, if gluten is a no-go for you, gluten-free flour can easily replace the all-purpose flour.
You can even make an egg-white recipe for those maybe following a more protein-heavy diet.
Kitchen Equipment Essentials
Now, about the tools we’ll need! a must-have in your kitchen is a 9-inch round cake pan for our cake base.
Make sure it’s non-stick for easier removal; nothing is worse than cake heartbreak!
An electric mixer is invaluable for making that dreamy meringue. if you don’t have one, you can still whisk by hand—it just requires a bit of arm muscle! and rubber spatulas are fantastic for scraping down bowls and keeping every bit of batter.
Pro Ingredient Tips
Don’t underestimate the power of selection secrets ! for quality eggs, look for the “pasture-raised” label. trust me, they make a difference.
When it comes to flour, check the milling date if you're at the store; fresher is always better.
Storage solutions ? I always keep my baking items in clear containers so I can see what I have. It sounds simple, but it saves a lot of time and fuss.
Money-saving tips include buying in bulk; places like Costco can be a treasure trove for staples. And you’ll have enough flour to bake to your heart’s content!
With these ingredients and tools, I can’t wait to share how to assemble your Lightened Baked Alaska . Stay tuned, ‘cause coming up is the fun part: making it all come together in those easy-to-follow instructions ! You’ll be impressing your friends with this classic dessert made healthier! Is Baked Alaska healthy? With all these swaps, it sure can be!
Lightened Baked Alaska: A Healthier Twist on the Classic Dessert
Oh, my goodness! have you ever tried making a baked alaska? it’s like a magical dessert that layers ice cream, cake, and meringue.
And guess what? i’ve found a way to lighten it up a bit. let’s dive into this lightened baked alaska adventure together, because who says you can't be a little indulgent while keeping things healthier?
Essential Preparation Steps
First things first, let’s talk mise en place . this fancy french term just means having everything ready before you start cooking, which is a total game changer.
Grab your ingredients and let’s get organized:
- Ingredient Prepping: Measure out 1 cup of flour, half a cup of sugar... or go wild with honey if you’re feeling adventurous. Get your eggs ready, and don’t forget the applesauce! It’ll replace some of that sugar and fat while keeping things moist. You'll want this cake base ready and waiting.
- Time Management: You’ll need about 20 minutes to prep and another 30 minutes for chilling. Make the most of this by cleaning as you go. Trust me, you don’t want a mountain of dishes staring you down after you’ve baked something fabulous.
- Organizational Tips: Have your cake pan greased and floured beforehand. It’s like setting up your own little bakery at home. Keep everything in its own place!
Professional Cooking Method
Alright, once you’re prepped, it’s time to get down to business.
- Make the Cake Base: Preheat your oven to 350°F (175°C) . Grease that pan like you mean it! Mix the dry and wet ingredients in separate bowls before combining them. It’s like a dessert team-up!
- Ice Cream Layer: Once your cake has cooled—this usually takes about 30 minutes —it's time to spread that low-fat ice cream over the top. I like to add some fresh berries for a little flavor kick. Then, pop it in the freezer to solidify; about another 30 minutes does the trick.
- Craft the Meringue: With the egg whites, beat them until you’ve got stiff peaks forming. This might take a while and some elbow grease, but it’s worth it! It should look glossy and hold its shape.
Now, when it comes to baking the whole thing, you’ll want to slide it under your broiler for 8-10 minutes .
You’re aiming for that toasty golden brown that makes everyone’s mouth water!
Expert Techniques
Here’s where that extra finesse comes in. You want your meringue to shine, literally and figuratively! A few precision points :
- Make sure your mixing bowl for the meringue is spotless. Any grease can prevent those egg whites from whipping up nicely—you don’t want to mess up your hard work!
- Timing precision is key when broiling. It can go from perfect to burnt in a matter of seconds, so stand by that oven and keep an eye on it. If it looks golden brown, take it out!
Success Strategies
Let’s face it; baking can be tricky! Here are a few troubleshooting tips to help you achieve Baked Alaska bliss:
- Egg whites not whipping up? They might not be fresh, or there might be a bit of yolk mixed in. It’s a total bummer, but don’t fret—just try again with a clean bowl and fresh eggs.
- If your meringue weeps (that's when moisture escapes), it might be a sign of over or undercooking, so learn from your mistakes.
- Quality checks: After your Alaska leaves the broiler, let it sit for about 5 minutes . The flavors will marry beautifully before you dig in!
Wrapping It Up
So, is baked alaska healthy? with this version, yes! we’ve managed to reduce sugar and incorporate healthier substitutes, making it a guilt-free indulgence.
It’s such a fun dessert to serve at gatherings, too, especially when you drop a few facts about the history or share stories while slicing through the layers.
Who knew you could serve up a classic dessert while still being health-conscious?
I cannot wait to share some additional information next about ways to customize this delightful dessert even further, including the best ice cream cake recipes and how to make it gluten-free or low-sugar while enjoying all those decadent flavors!
In the meantime, get excited, grab those ingredients, and let’s make some magic happen in the kitchen! You’ve got this!

Success Guaranteed Tips
When it comes to whipping up a lightened baked alaska , it’s all about setting yourself up for victory in the kitchen.
Trust me, having a few professional insights can really make the difference. first, let's talk about expert techniques . whipping meringue to perfection takes practice, but here’s a little secret: make sure your mixing bowl is completely clean and dry.
Any leftover grease or moisture can send your whites into a sad puddle instead of fluffy peaks.
And let’s not forget some good old kitchen wisdom . always separate the egg whites from the yolks when they're cold, then let them come to room temperature before whipping.
This gibberish translates to more volume and fluffiness, which we all want for our guilt-free baked alaska !
I’ve had my share of kitchen hiccups, and if I’ve learned anything, it’s that patience guarantees success . So, don’t rush, and enjoy the process!
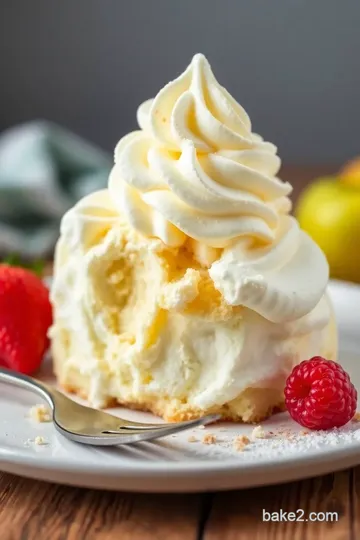
Perfect Presentation
Okay, now let’s get into the fun part—presentation! a baked alaska is all about visuals. to make your dessert pop, try out some creative plating techniques .
Consider using a large, flat plate to really showcase your ethereal meringue and glistening ice cream beneath.
For garnishing, think fresh berries or a drizzle of homemade berry coulis . the contrast between the bright colors of fruit and the white meringue is drool-worthy! you can also sprinkle edible flowers for that extra wow factor.
And when it comes to serving suggestions, slice it in front of your guests for dramatic flair. As you cut through the layers, they’ll see that rich ice cream and light cake—and trust me, they'll be captivated immediately!
Storage and Make-Ahead
Now, let’s chat storage, because i get it, life gets busy! after assembling your baked alaska , it’s best to pop it in the freezer if you aren’t serving it right away.
This keeps everything perfectly intact and prevents any soupy ice cream disasters. storage guidelines suggest keeping it wrapped in plastic wrap for a few days at most; just remember to slice only what you need before returning to the freezer.
When it comes to reheating —well, you really don't want to reheat a baked alaska , since it’s meant to be served frozen.
If you experiment and decide to make variations, like adding the lovely light whipped toppings , you might want to keep those separate until the last minute for maximum freshness.
Creative Variations
One of the coolest things about this recipe is its adaptability! for some fun flavor adaptations , try swapping out the vanilla for mint or strawberry ice cream.
Ooh, or how about a divine chocolate swirl? if you’re making this for someone with dietary needs, think about diabetes-friendly desserts —you can use alternative sweeteners to keep the sweetness without the sugar spike!
Seasonally, consider poking in some berries in the summer or maybe pumpkin during the autumn. The flexibility is endless! Honestly, the famous question, is Baked Alaska healthy? Well, with our lighter approach, you can definitely say yes while enjoying this classic dessert!
Complete Nutrition Guide
Let's break down what makes this dessert a little more guilt-free. the use of unsweetened applesauce not only reduces calories but also adds moisture and flavor.
Plus, swapping in low-sugar desserts can significantly decrease sugar content with minimal impact on taste. grab your nutrition calculator if you're looking to track calories; there are about 200 per serving, so make sure to enjoy!
The best part is that this dessert is still bursting with flavors that make your taste buds dance. It's a win-win situation, right?
Expert FAQ Solutions
I’ve collected some of the common concerns people have about making this fabulous dessert—like, “how do i make sure my meringue actually turns out stiff?” well, the troubleshooting guide here would be to ensure your egg whites are at room temp and your bowl is squeaky clean.
If you’re worried about it collapsing or not holding shape, a touch of extra cream of tartar can help stabilize! keep experimenting and don’t be afraid to seek more success tips if something doesn’t go as planned.
Conclusion
So, whether you’re looking to impress friends or simply indulge in a sweet treat without the guilt, this lightened baked alaska is your ticket to success.
With a bit of practice and creativity, you'll master all the nuances of this classic dessert while keeping it healthier.
Happy baking, my friends! enjoy every delicious bite!
Lightened Baked Alaska: A Healthier Twist on the Classic Dessert Card

⚖️ Ingredients:
- 1 cup (120g) all-purpose flour
- 1/2 cup (100g) granulated sugar (or 1/4 cup honey)
- 1/2 cup (120ml) unsweetened applesauce
- 2 large eggs
- 1 tsp vanilla extract
- 1/2 tsp baking powder
- 1/4 tsp salt
- 2 cups (480ml) low-fat vanilla ice cream or yogurt
- 1/2 cup (120ml) fresh berries (optional for flavor)
- 4 large egg whites
- 1/2 cup (100g) granulated sugar (or coconut sugar)
- 1/4 tsp cream of tartar
- Pinch of salt
🥄 Instructions:
- Step 1: Preheat the oven to 350°F (175°C). Grease and flour the cake pan. In a bowl, whisk together the flour, sugar, baking powder, and salt.
- Step 2: In another bowl, combine applesauce, eggs, and vanilla. Mix until well blended. Gradually add the dry ingredients to the wet ingredients until combined.
- Step 3: Pour into the prepared pan and bake for 25 minutes or until a toothpick comes out clean.
- Step 4: Once the cake has cooled, place it on a serving dish. Soften the ice cream slightly and spread it over the cake layer. If using, scatter fresh berries on top. Freeze to firm up, about 30 minutes.
- Step 5: In a clean mixing bowl, beat egg whites with an electric mixer until foamy. Add cream of tartar and pinch of salt, then gradually add sugar, beating until stiff peaks form.
- Step 6: Spread meringue over the ice cream layer, sealing the edges.
- Step 7: Preheat the broiler in your oven. Place the Baked Alaska under the broiler for 8-10 minutes until the meringue is golden brown; watch closely to prevent burning.
Previous Recipe: No Bake Dog Treats: Easy & Delicious Treats for Your Furry Friend!
Next Recipe: Baked Jalapeno Chips: Easy and Delicious Crunchy Snack Recipe!