Quick & Easy Small Batch Royal Icing
Wondering how to whip up royal icing quickly? With my easy small batch recipe, you’ll create glossy icing for all your decorating needs in just 10 minutes!

Mix Small Batch Royal Icing Quickly & Easily
A Sweet Start
Oh my gosh, let me tell you about the time i attempted to make royal icing for the first time.
I thought, "how hard could it be?” spoiler alert: it was more challenging than i expected—but also super rewarding! i ended up with this glossy, smooth icing that transformed my ordinary cookies into these awe-inspiring little works of art.
If you've been feeling the same temptation to dive into baking, let me show you how to mix small batch royal icing quickly & easily .
Trust me, you'll feel like a pro in no time!
The Scoop on Royal Icing
Dating back to ancient times, royal icing first gained popularity in europe. it's the go-to icing for cake decorating, and let me tell you, it’s a classic! today, it’s all the rage for cookie decorating, especially around the holidays.
Everyone loves that hard finish that makes cookies look fancy and keeps them fresh.
This easy royal icing recipe takes about 10 minutes to whip up and is surprisingly foolproof. it's simple enough for beginners, yet versatile for seasoned bakers.
Plus, it's just perfect for smaller batches, making it ideal without requiring a bunch of leftover icing. you can decorate about 12-15 cookies with one cup of icing, which is perfect for a laid-back family gathering or a fun weekend project.
Why You’ll Love It
Now, let’s chat benefits! first off, royal icing is a great way to get creative . you can pipe, flood, or even paint with it if you’re feeling artsy.
The beauty of this icing is that it dries hard, making it great for stacking cookies without wrecking the designs.
It’s also pretty low on calories—there’s hardly any fat, making it a somewhat “healthier” icing option.
Nutritionally , it’s mostly sugar, so that said, moderation is key! but adding a bit of lemon juice in icing gives it a lovely zesty kick that’s sure to impress.
Not to mention, it’s great for special occasions . think wedding cookies, holiday treats, and, of course, epic gingerbread houses. let’s not forget the exhilarating experience of letting guests watch you decorate—it's a real crowd-pleaser!
Plus, if you’re looking at gluten-free or vegan options, there are some recipes out there using aquafaba icing substitute , or even a vegan royal icing recipe .
That’s right, everyone can join in on the fun!
Easy Peasy Consistency and Storage
Having the right royal icing consistency is a game-changer. whether you want to create fine lines or flood the surface of a cookie, knowing how to adjust your icing is essential.
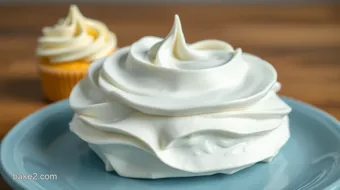
Remember the “stiff peaks icing technique” from baking shows? yeah, that's what you’re aiming for when you first whip it.
If it's too stiff, just add water a teaspoon at a time to thin it out.
Once you've decorated your cookies, you might wonder, "how do i keep this royal icing fresh?" well, royal icing storage tips are easy: cover the unused icing with a damp cloth or plastic wrap to keep it from drying out.
It can last in an airtight container for about three days .
So, whether you're planning to whip up a batch for a bake sale or just want to indulge in some simple cookie decorating ideas with the kids, this small batch icing is your new best friend.
Plus, with the right piping royal icing techniques , you’ll be decorating like a pro without breaking a sweat!
Alright, let’s dive into those ingredient lists so you can get started on this tasty adventure!
Essential Ingredients Guide to Crafting Royal Icing
Alright, friends, let’s dive into the essential ingredients guide you need to pull off that small batch royal icing like a pro.
Whether you're whipping it up for holiday cookie decorating or just jazzing up your favorite treats, knowing your ingredients makes all the difference.
Ready? let's roll!
Premium Core Components
First off, let’s talk about the premium core components you’ll need.
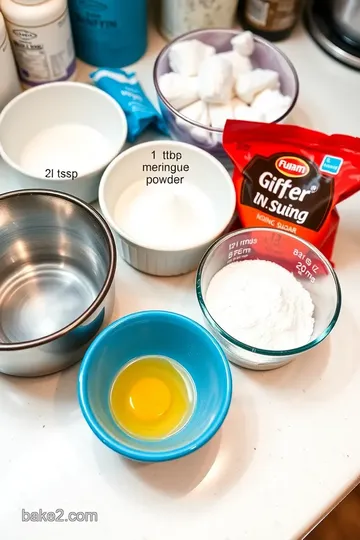
- Powdered Sugar (1 cup or 120g) : This is your main player. Look for a fine, silky texture. You don’t want any lumps messing with your smooth royal icing finish .
- Egg White or Meringue Powder : If you prefer the real stuff, go for one large egg white. But for a safer, no-salmonella option, grab 2 tablespoons of meringue powder . This gives you that classic royal icing consistency without the worry.
- Water (1-2 teaspoons) : You may need some water to get that perfect texture going. Just a little at a time!
- Lemon Juice (optional, ½ teaspoon) : Trust me, a splash adds a lovely tang. Plus, it helps stabilize your icing!
- Food Coloring (optional) : If you want to get creative, pick up some gel food coloring. A little goes a long way!
Now, let’s talk about keeping these ingredients fresh. Always store your powdered sugar in an airtight container and away from humidity. You don’t want it clumping up on you.
Signature Seasoning Blend
Next, you won’t need much for flavoring, but a little creativity can be your best friend.
- Essential Spice Combinations : Think of putting almond extract or vanilla in your icing for an extra burst of flavor!
- Herbs Selections : You probably aren’t going to add fresh herbs to your icing (ew, right?), but if you’re making a savory angled icing for certain culinary creations, you might consider dried herbs.
- Regional Variations : Different areas have their own touch. In some regions, you might find people using citrusy flavors or even unique spices in mixes.
Smart Substitutions
Now, let’s chat about smart substitutions . Sometimes, life throws you a curveball, and you don’t have all the ingredients handy.
- Common Alternatives : If you run out of meringue powder, you can totally use pasteurized egg whites or even skip it for a quicker recipe.
- Dietary Modifications : Need a vegan option? Just switch to an aquafaba icing substitute made from chickpea liquid!
- Emergency Replacements : Don’t have lemon juice? Try vinegar for a little zing!
Kitchen Equipment Essentials
No royal icing adventure is complete without the right tools. Here’s what you’ll need:
- Mixing Bowl : A solid, large one to combine all that goodness!
- Electric Mixer : A handheld mixer will work wonders. You want to whip that icing into stiff peaks in no time.
- Piping Bags and Tips : If you’re going for decorative flair, investing in these is a must.
- Sifter : Always sift that powdered sugar! Trust me, it makes for a much smoother icing.
Getting Started with Your Royal Icing
So, now that you’ve got your essentials sorted, how exactly do you pull off that quick royal icing for cookies ? Here’s the scoop:
Mix your ingredients with love and be patient! remember to keep an eye on that consistency – it should hold up nicely for decorating without running all over your cookies.
And if it gets too stiff, just add a bit of water.
When it's time to whip up that easy royal icing recipe , don’t forget the color glazing techniques and how to add edible glitter for cookies if you want that wow factor.
Remember, as you embark on this icing adventure, keep it fun and simple! Before you know it, you'll master everything from piping royal icing techniques to creating festive cookie decoration ideas .
And there you have it, a laid-back guide to assembling the best ingredients for royal icing. now, get ready to mix small batch royal icing quickly & easily and make those sweet treats shine like a holiday morning! let’s move on to actual instructions so you can start decorating like a champ.
Mix Small Batch Royal Icing Quickly & Easily
Oh my gosh, if you love decorating cookies but don't want to drown in a sea of frosting, you're gonna love this! let me tell you about an easy way to mix small batch royal icing quickly & easily .
If you’re like me, you might have walked into a kitchen event thinking, "how in the world am i gonna decorate these cookies without my royal icing ending up on the ceiling?" well, fear not, my friend!
Essential Preparation Steps
Before you dive in, let's start with some essential preparation steps. it’s all about that - mise en place -, which means everything in its place.
Gather your ingredients: powdered sugar, egg whites (or meringue powder), and maybe even a splash of lemon juice for that zingy flavor.
And hey, don't forget your food coloring if you're feeling fancy!
Next up is time management . set aside around 10 minutes — that’s all you'll need. seriously, less than a commercial break! organizing your workspace helps too.
Make sure everything is within arm's reach; you don’t want to be running around while your icing starts setting up.
Oh, and let's not skip the safety considerations . make sure your eggs are pasteurized if you’re using egg whites to avoid any food safety issues.
No one wants a trip to the er over some holiday cookies, right?
Step-by-Step Process
Alright, let’s break this down into manageable chunks.
-
Prepare Ingredients : Start by gathering and measuring your 1 cup (120g) of powdered sugar . If you're using meringue powder, get that at the ready too.
-
Mix Base : If using egg whites, toss them right into the bowl. If meringue powder is your jam, mix 2 tablespoons of it with 1-2 tablespoons of water .
-
Combine Ingredients : Gradually sift in that powdered sugar while mixing on low speed. Add ½ teaspoon of lemon juice if you wanna kick things up a notch!
-
Whip icing : turn up your mixer to medium and beat it for about 3- 5 minutes until you see those stiff peaks forming.
Honestly, seeing those peaks makes you feel like a pastry pro!
-
Adjust Consistency : If your mix is too thick, add water one teaspoon at a time until you hit that sweet spot.
-
Color Your Icing : If you’re coloring your icing, split it into bowls and mix in gel food coloring for some vibrant hues.
-
Store or Use : Use it right away or keep it in an airtight container. Just remember to cover it well to prevent it from drying out.
Expert Techniques
Okay, so let’s get into some expert techniques for a pro finish. First, always sift your sugar for a smoother texture. Trust me, you'll thank me when it's not all lumpy.
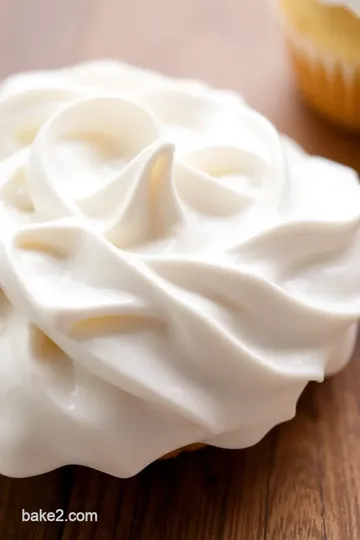
Now, for those pesky quality checkpoints : your icing should hold stiff peaks and look glossy. do the "peak test" by pulling the whisk out of the icing.
If it stands tall, you’re good to go!
Troubleshooting tips : If your icing is too runny, just add more powdered sugar in small amounts. If it’s too stiff, water can be your BFF .
Success Strategies
Here are some success strategies to ensure you're iced to perfection. common mistakes? over or under mixing are big ones! too much mixing will make it thin, while not enough will leave you with a droopy mess.
For quality assurance , always do a taste test. I mean, who doesn’t want to taste their icing?
Hoo boy, and if you’re short on time, don’t fret! this small batch of easy royal icing can be stored for up to 3 days .
Just remember those royal icing storage tips: keep it covered to prevent drying out, or it becomes a brick.
Now you have the perfect guide for homemade royal icing ! whether you're doing some last-minute holiday cookie decorating or crafting a gorgeous gingerbread house, you’ll have just the right amount for your project.
Guess what? we’re almost there, but before we wrap up, let’s smoothly transition to our next section: additional information ! this will have all the little nuggets you need to take your cookie creativity to the next level.
So stay tuned!
Pro Tips & Secrets for Royal Icing
Alright, friends! getting ready to mix small batch royal icing quickly & easily ? let’s talk about some pro tips that will elevate your icing game to a whole new level.
Trust me, even if you're a total newbie, these little insights can change the way you decorate cookies.
First off, time-saving techniques are a life-saver. when you whip up the icing, use room temperature egg whites or meringue powder—it helps achieve that perfect royal icing consistency faster.
Seriously, spend just a few seconds splurging on good quality powdered sugar icing . it's all about that smooth finish!
Another flavor enhancement tip ? a splash of lemon juice gives your icing a zesty kick. it’s a punch of brightness that takes the sweetness down a notch.
And, if you wanna be fancy, toss in some almond extract! your cookies will be the talk of the block.
As for presentation advice , you know people eat with their eyes first! so, don’t skimp on the icing design.
Think about different piping royal icing techniques to create beautiful patterns and designs. trust me; a cute design can turn a plain cookie into a stunning treat!
Perfect Presentation
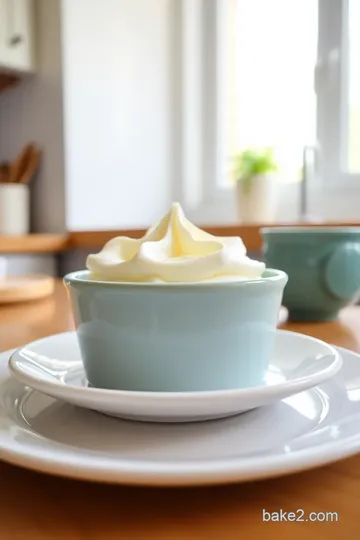
Now, let's chat about perfect presentation . plating isn't just for fancy restaurants. it’s all about showing off what you made! for a great look, try to go for some wonderful color combinations .
Use bright colored icing against the neutral color of the cookie for visual appeal. it’s eye candy, folks!
For garnishing ideas, consider using edible glitter for cookies or sprinkles. It makes your cookies pop with joy! Those little touches set off even a simple design into something fabulous.
When plating, remember to keep it neat! You could use easy cake decorating techniques to elevate your desserts on a cute platter.
Storage & Make-Ahead
Thinking about making your icing ahead of time? no worries! here are some royal icing storage tips for you. first, keep any leftover royal icing in a tightly sealed container.
It can last up to three days in the fridge, but you definitely want to keep it covered to prevent it from drying out.
When you're ready to use it again, simply remove it from the fridge and give it a quick whip to restore that glorious consistency.
If it seems too thick, add a teaspoon of water and whisk a bit more. you’ll be good to go!
Creative Variations
Let’s spice things up a bit with some creative variations ! if you want to switch up the flavors of your royal icing, maybe try out royal icing flavor variations like vanilla or even coconut extract.
Don't shy away from using gel food coloring for that dazzling effect.
For my vegan friends, don’t fret—use aquafaba as a fantastic aquafaba icing substitute . It works wonders and makes it easy for everyone to indulge.
Depending on the season, you could also adapt your colors for that holiday vibe. Whether it's orange and black for Halloween or red and green for Christmas, the options are endless!
Complete Nutrition Guide
Now, about the complete nutrition guide —this icing isn’t your health food, but it’s nice to know what you’re working with.
A serving of this icing packs in about 60 calories, with little fat and a decent amount of carbs. just keep your portions in check if you’re watching your intake.
And hey, it’s all about balance, right?
Expert FAQ Solutions
You might have questions, and that’s totally okay! One common concern is about getting that smooth royal icing finish . If you find your icing is too thick, just add a tablespoon of water—easy fix!
And don’t worry if you mess up a little—troubleshooting is part of the fun. if the icing runs off the cookie, let it dry for a moment, then give it another drizzle with the piping bag for an even finish.
So, are you ready to dive in and mix small batch royal icing quickly & easily ? remember, cooking is all about creativity and having fun.
Don’t stress if your cookies aren’t instagram-ready right away; take your time, and you'll get the hang of it! get those cookies ready, and let your inner baker shine!
Quick & Easy Small Batch Royal Icing Card
⚖️ Ingredients:
- 1 cup (120g) powdered sugar, sifted
- 1 large egg white or 2 tablespoons meringue powder
- 1-2 teaspoons water (as needed)
- 1/2 teaspoon lemon juice (optional, for flavor)
- Food coloring (optional)
🥄 Instructions:
- Step 1: Gather all ingredients and measure out the powdered sugar, egg white (or meringue powder), and optional lemon juice.
- Step 2: If using fresh egg white, add to the mixing bowl. If using meringue powder, mix with the appropriate amount of water (typically 2 tablespoons).
- Step 3: Gradually sift in the powdered sugar while mixing on low speed. Add lemon juice if desired for flavor.
- Step 4: Increase mixer speed to medium and beat until the icing holds stiff peaks (about 3-5 minutes).
- Step 5: If icing is too stiff, add water 1 teaspoon at a time until desired consistency is reached.
- Step 6: If using food coloring, divide icing into bowls and mix in colors as desired.
- Step 7: Use immediately or store in an airtight container for up to 3 days (keep covered to prevent drying).
Previous Recipe: Discover the Best Bake Maple Butter Tart Squares | Easy Dairy-Free Treat
Next Recipe: How to Make Black Icing for Cake Decorating: My Go-To Recipe