No-Bake Horse Treats: Wholesome & Easy Snacks for Your Equine Friends
Wondering how to treat your horse to something special? My No-Bake Horse Treats are wholesome, easy to make, and filled with love! Perfect for your equine friends.

- No-Bake Horse Treats: Wholesome & Easy Snacks for Your Equine Friends
- What’s the Scoop on These Treats?
- Why Make Them?
- Ready to look into In?
- Essential Ingredients Guide to Wholesome Horse Treats
- The Art of Professional Cooking: Elevate Your Culinary Game
- Pro Tips & Secrets to Craft Your No-Bake Horse Treats
- Perfect Presentation Techniques
- Storage & Make-Ahead Tips
- Creative Variations to Spice Things Up
- Complete Nutrition Guide for Horse Treats
- Frequently Asked Questions
- Recipe Card
No-Bake Horse Treats: Wholesome & Easy Snacks for Your Equine Friends
Have you ever looked into those sweet horsey eyes and thought, “what can i whip up to show you just how much i care?” i’ve been there! the other day, my horse, bella, gave me the saddest look when i reached for a store-bought treat.
It honestly broke my heart! that’s when i decided to make no-bake horse treats - wholesome & easy snacks at home.
Trust me, she hasn’t given me that look since!
Making homemade snacks for our furry friends isn’t just a trend; it’s a way to ensure they’re munching down on good stuff.
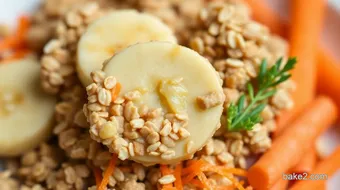
And let me tell you, these easy horse treat recipes couldn’t be simpler. with just some oats, carrots, and a bit of applesauce, you'll have a wholesome feast for your horse.
They’re perfect for those spontaneous moments when you just want to show some love—or reward them after a long ride!
What’s the Scoop on These Treats?
So, where did this whole homemade horse treat passion begin? well, it mixes up a bit of horse care and creativity! back in the day, livestock owners were always on the hunt for better snacks that kept their horses healthy and strong.
Fast forward to today, and it's super popular to treat our equine buddies with natural horse treats that are easy to whip up at home.
Now, let’s get real. how much time does this take? you’re looking at about 15 minutes of prep, plus about 30 minutes to chill.
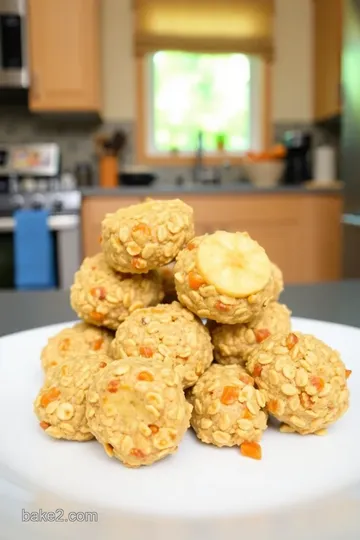
No baking, no fuss—just mix, shape, chill, and serve! this recipe yields around 20 tasty treat balls , which is enough to keep your horse happy for a while.
And cost? let’s just say your wallet will thank you. you can make these treats for a fraction of what you'd pay for store-bought goodies!
Why Make Them?
Okay, but why should you even bother with homemade snacks? well, for starters, they’re good for your horse! packed with oats, these nutritious horse treats are also a fantastic source of fiber and help keep your horse’s digestive system running smoothly.
Not to mention, you can customize them! want to mix in some peppermint for a little zest? go for it!
Plus, these treats are perfect for special occasions . whether it’s a birthday, a successful training session, or just a sunny afternoon, nothing beats having some wholesome horse rewards on hand.
Unlike those sugary, processed snacks, you know exactly what’s going into these treats. love, care, and a dash of applesauce—that’s the secret ingredient!
What about other alternatives? forget the non-veggie snacks. with these oat-based horse snacks , you can rest easy knowing they’re munching on something healthy.
Whether your horse is picky or loves everything, there’s something in these for every taste!
Ready to look into In?
So, are you excited yet to spoil your horse with some homemade equine snacks ? if you’ve got some oats, carrots, and applesauce handy, let’s get started! you’ll want to pull up those sleeves for a treat-making session that your horse will adore.
And spoiler alert: they’re not just good for horses. if you're pulling a double shift in the kitchen, grab these as fun snacks for dogs too!
Now, let’s dive into the ingredient list so you can get cooking—or should I say, mixing? Trust me, your horse will appreciate this extra effort, and it’ll be a tail-wagging success!
Essential Ingredients Guide to Wholesome Horse Treats
When it comes to pampering our equine friends, making homemade horse snacks is a game-changer. ever thought of crafting some no-bake horse treats - wholesome & easy snacks? these delightful delights not only show love but also ensure your horses munch on nutritious ingredients that pack a punch of flavor and benefits.
Let's dive into the essentials of creating these treats that'll make your horse's tail wag—well, at least they’ll be happy!
Premium Core Components
First up, let’s talk about the basic horse treat ingredients you can’t skip if you want to whip up something special.
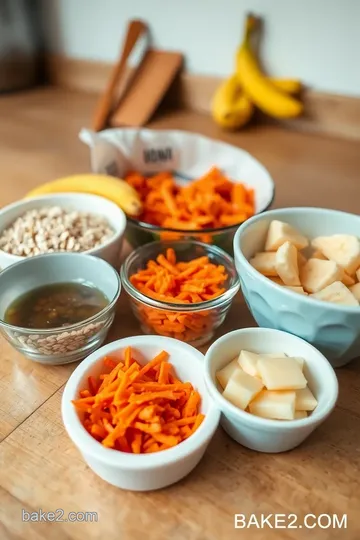
Detailed measurements:
for our no-bake treats, you'll need about 2 cups of rolled oats (180g) and 1 cup of finely grated carrots (around 2 medium carrots or 120g).
Remember, those measurements count!
Quality indicators:
always opt for organic ingredients whenever possible. go for fresh, vibrant carrots and check your oats for any signs of staleness.
Not only does quality enhance flavor, but it also packs more nutrients into those treats.
Storage guidelines & shelf life:
once your homemade horse snacks are ready, store them in an airtight container in the fridge for about a week.
For long-term storage, freeze them and just defrost a few whenever you need a quick reward.
Freshness tips:
you know how it feels when you take a bite of a stale cookie? make sure your ingredients are fresh—use crisp, bright carrots and check that your oats aren't expired .
Signature Seasoning Blend
Wanna add a little pizzazz to those horse treats? Here’s how.
Essential Spice Combinations:
While you might not think of spices for horse treats, cinnamon can actually be a fantastic addition! A teaspoon brings a warm flavor that horses often enjoy.
Herb selections:
fresh herbs can be fun, too. think about trying parsley or peppermint ! these herbs can make your treats aromatic and exciting.
Just remember, a little goes a long way.
Flavor Enhancers:
To make these nutritious horse treats extra special, add details like applesauce (which we totally recommend) for that natural sweetness your horse will adore!
Smart Substitutions
Sometimes, you just don’t have everything you need on hand. No biggie!
Common Alternatives:
If you find yourself out of molasses, honey makes a great substitute. Your horse won’t know the difference!
Dietary Modifications:
If you’re looking for grain-free horse treats , you could use almond flour instead of wheat flour. It’s just as easy to work with.
Emergency Replacements:
What if you’re out of carrots? Grated apples or even sweet potatoes can step in without a hitch.
Kitchen Equipment Essentials
Let’s get into the gear we need to whip these beauties up.
Must-Have Tools:
A good mixing bowl and a spoon are key. You’ll also want measuring cups and a plate or baking sheet for chilling those treats.
Alternative Equipment Options:
A spatula works wonders if you’re not keen on sticking your hands in the mixture right away.
Preparation Tips:
If the mixture gets too sticky, try dusting your hands with a little flour before rolling them into balls. Trust me; it’ll save you from a sticky situation!
Wrap Up the Flavors
Now that you’ve got the lowdown on making No-Bake Horse Treats , you’re ready to start cooking! And by cooking, I mean mixing and rolling, because let’s be real, it’s super easy! Keep those healthy equine treats ready to hand out after a great ride, or use them to bribe your beloved horse during trainin’—they’ll be all about those simple horse treats !
Next up, we’ll get into the step-by-step instructions to bring your horsey friends some delicious, homemade equine snacks that not only taste good but are packed with wholesome ingredients.
So get ready, grab your supplies, and let’s create some tasty equine goodies that'll have your horse prancing with joy!
The Art of Professional Cooking: Elevate Your Culinary Game
If you're looking to take your cooking from home chef to kitchen pro, nailing down a professional cooking method is key.
We’ve all been there, right? sometimes, it feels like we’re just throwing things together and hoping for the best. but let me tell you, with a little organization and the right techniques, you can turn your culinary chaos into a delicious masterpiece.
So, let's dive in!
Essential Preparation Steps
First things first, let's talk about mise en place . it's a fancy french term meaning "everything in its place." seriously, it’s like the golden rule of cooking.
Chop your veggies, measure your ingredients, and have all your tools ready before you even think about turning on the stove.
This not only saves time but also keeps your kitchen from looking like a tornado hit it halfway through the recipe.
Now, about time management —this is huge. you might have a killer recipe in mind, but if you’re standing there trying to figure out what to do next, you’ll be lost in the sauce (pun intended).
Plan out your steps; for instance, while your pasta is boiling, that’s the perfect time to whip up your sauce.
Think of it as cooking multitasking!
And let’s not forget about organization strategies . keep your workspace clean. use separate cutting boards for meat and veggies—this is a safety consideration and keeps your flavors intact.
A clean kitchen is a happy kitchen!
Step-by-Step Process to Flavor Town
Alright, here’s your game plan. Follow these clear, numbered instructions and you’ll be on your way to culinary success:
- Prep your workstation. Gather everything you'll need.
- Set your oven to the right temperature. For example, if you're baking, preheat to 350° F .
- Cook times matter. Time is your friend. Keep an eye on your food. For most meats, you should aim for an internal temperature of 165° F to ensure it’s safe to eat.
- Look for visual cues to tell when your dish is ready. Is your chicken golden brown? Are your veggies vibrant? Trust your eyes!
Expert Techniques to Master
So, how do the pros do it? they master critical steps that you can too. ever heard of the "sizzle test?" it’s the sound your meats make when they hit the pan.
That’s your cue that you're on the right track. plus, keep handy quality checkpoints like tasting your food as you go.
A sprinkle more salt? a dash of spice? trust your taste buds!
And hey, don’t shy away from troubleshooting tips . if your sauce is too thick, whisk in some broth. if your cookies spread too much, chill the dough before baking.
Cooking is all about adaptability!
Success Strategies to Avoid Pitfalls
Here’s the deal—every chef makes mistakes. but knowing the common mistakes to avoid is half the battle. under-seasoning is a biggie; don’t be shy with your spices.
And trust me, no one wants to serve rubbery chicken, so pay attention to cooking times.
Quality assurance tips are essential, too. Always taste test your dishes before serving. You can tweak things along the way to get perfect results!
If you’re short on time, consider make-ahead options . You can prep your meals in advance and store them in the fridge or freezer. This will save you time on busy weeknights.
And speaking of treats, let me pivot for a moment and bring up something a little different but equally delightful—the no-bake horse treats - wholesome & easy snacks .
I mean, who doesn’t love pampering our four-legged friends? these simple horse treats are not just nutritious but also a fantastic activity to do with the kids outside, while keeping your equine buddies happy.
Wrapping It Up
Professional cooking may sound intimidating, but once you nail these methods, you’ll feel like a culinary rockstar in your kitchen.
Remember, it’s all about preparation, organization, and knowing the right techniques. and whether you’re whipping up homemade horse snacks or a fancy dinner for your pals, enjoy the process! cooking’s a journey, so make it a fun one.
Now that you’ve got the basics down, get ready for some additional information to spice up your culinary adventures!
Pro Tips & Secrets to Craft Your No-Bake Horse Treats
Okay, friends, let’s dive into bringing out your inner chef with these no-bake horse treats - wholesome & easy snacks! making homemade horse snacks isn’t just about the ingredients; it’s all about the love and care you put into them.
Here are a few pro tips i’ve learned from my own kitchen mishaps (trust me, there have been a few!)
Chef's personal insights:
when mixing, don’t rush! take your time blending those oats and carrots. the better they mix, the tastier the treats.
And hey, if you want to steal some of your horse’s heart, maybe sneak in a bit of molasses—trust me, they’ll be sniffing your hands when they get wind of that sweetness.
Time-saving techniques:
by the way, get your mixing bowl and spoon ready before you start! you’d be surprised how much time you save by having everything set up like a pro.
Plus, it keeps the kitchen chaos to a minimum. bonus tip: make a big batch and freeze some! these easy horse treat recipes are perfect for when you need a quick reward after a ride.
Flavor enhancement tips:
think outside the box! if your horse has a favorite flavor—like peppermint—feel free to throw some crushed leaves into your mix.
It’ll add a delightful twist to your nutritious horse treats.
Presentation advice:
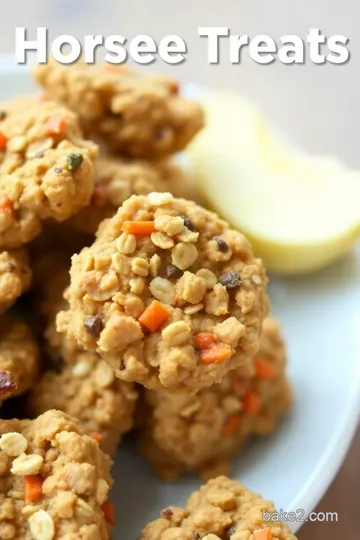
we eat with our eyes first, right? so even though it’s a treat for our horses, make those carrot oat balls for horses look appetizing on a clean plate.
Arrange them neatly and sprinkle a bit of crushed oats on top to make them look fancy!
Perfect Presentation Techniques
Now, let’s talk about how to make those treats pop visually!
Plating techniques:
a simple plate goes a long way. you can use a colorful or rustic plate that matches your barn vibe.
Just pile those round treats in a loose mound, so they’re easy for your horse to grab!
Garnish Ideas:
Garnish? For a horse? Yup! You can arrange a few fresh mint leaves or a sprig of parsley around the edges. What a pretty picture for your Insta feed!
Color Combinations:
Use fresh ingredients like bright orange carrots against golden brown oats. It’s a feast for the eyes and can make your friends green with envy when they see your creation!
Visual Appeal Tips:
Keep it simple, folks. Sometimes less is more. A well-organized plate full of your wholesome horse rewards will look adorable sitting by your barn door.
Storage & Make-Ahead Tips
So, let’s say you’re fortunate enough to have a mountain of these simple horse treats —how do you deal with the overflow?
Storage Guidelines:
After making your treats, squeeze them into an airtight container . They’ll stay fresh for about a week in the fridge. You’ll want to keep those flavors bright!
Preservation Methods:
Funky flavors start arising when treats hang out too long. To preserve their yumminess, try freezing some! They thaw safely and retain all that good stuff.
Reheating Instructions:
No heating is necessary! Just chill the treats after making them. Once they’re ready to serve, you can give them straight from the fridge, making sure their freshness.
Freshness Duration:
Honestly, if you store them properly, they shouldn’t lose that fresh taste for about a week. Note that after a week, they might start to get a bit dry—so make sure to keep an eye on them!
Creative Variations to Spice Things Up
Now, let’s explore some creative variations for those treat-lovin’ horses.
Flavor Adaptations:
Want to swap out flavors? Consider mixing pumpkin purée or mashed bananas for a seasonal twist in the fall. Talk about a treat party!
Dietary modifications:
if you’ve got a horse on a special diet, you can always substitute wheat flour with a gluten-free flour.
There are tons of options out there—just be sure to keep things healthy.
Seasonal Twists:
How about adding a pinch of ginger for a warming sensation in winter? Or even a splash of apple juice for spring? Your horses will think you’re a genius!
Regional variations:
depending on your area, try adding local goodies like dried beet pulp or hay pellets for texture.
Get creative with your diy horse treat guide and experiment; your barn buddies will thank you!
Complete Nutrition Guide for Horse Treats
Wrapping things up with some nutrition gossip!
Detailed Breakdown:
Each of these healthy equine treats should come in at around 50 calories per ball —perfect for treating your horse without adding too much extra weight.
Health Benefits:
With rolled oats and fresh carrots, you’re providing fiber and essential nutrients. It’s a no-brainer when you want healthy snacks for horses .
Dietary Considerations:
Always make sure you keep your horse’s specific dietary needs in mind! If your horse has dietary restrictions, modify the ingredients accordingly—no one wants a tummy ache!
Portion Guidance:
Ideal serving size? About 1 to 2 treat balls depending on your horse's size and activity level. Treats are meant to be just that—a treat, not a meal replacement!
Let’s keep our beloved equines happy and healthy with these no-bake horse treats - wholesome & easy snacks . you’ll not only be crafting yummy bites but also creating memories with your four-legged friends.
So roll up those sleeves, give this a whirl, and enjoy the treat time! your horses will thank you, i promise!
Frequently Asked Questions
What are No-Bake Horse Treats - Wholesome & Easy Snacks made of?
No-Bake Horse Treats are made from rolled oats, finely grated carrots, unsweetened applesauce, molasses, wheat flour, and optional cinnamon. These natural ingredients come together to create delicious and nutritious snacks that your horse will love!
How long can I store No-Bake Horse Treats?
You can store these treats in an airtight container in the refrigerator for up to one week. If you want to keep them longer, consider making a larger batch and freezing them; just be sure to thaw before serving!
Can I customize No-Bake Horse Treats for my horse's dietary needs?
Absolutely! You can substitute oat flour for a gluten-free option, or use honey or agave syrup instead of molasses. Additionally, feel free to experiment with adding flavors like crushed peppermint or dried herbs based on your horse's preferences.
What should I do if the mixture for the No-Bake Horse Treats is too sticky?
If you find the mixture is sticking to your hands, simply dust your hands with a bit of flour while forming the balls. This will make it easier to shape the treats without making a mess!
How can I tell if my horse likes the No-Bake Horse Treats?
The best way to know is to offer them as a reward after exercises or just as a surprise treat! Pay attention to your horse's reaction; if they're eagerly munching away, you know you’ve hit a home run!
Could I use other fruits instead of applesauce in the No-Bake Horse Treats?
Definitely! While unsweetened applesauce is included for moisture and sweetness, you could experiment with pureed bananas or even pumpkin puree. Just ensure that whatever you choose is horse-friendly and doesn't contain any additives.
No-Bake Horse Treats: Wholesome & Easy Snacks for Your Equine Friends Card
⚖️ Ingredients:
- 2 cups rolled oats (180g)
- 1 cup finely grated carrots (about 2 medium carrots or 120g)
- 1 cup unsweetened applesauce (250g)
- ½ cup molasses (120ml)
- ½ cup wheat flour (60g)
- 1 tsp cinnamon (optional, for added flavor)
- ½ cup crushed oats or shredded coconut (for rolling, optional)
🥄 Instructions:
- Step 1: Gather all ingredients and measuring equipment.
- Step 2: In a large mixing bowl, mix rolled oats and grated carrots thoroughly.
- Step 3: In a separate bowl, combine applesauce, molasses, and cinnamon (if using) until well blended.
- Step 4: Pour the wet ingredients into the dry oat mixture. Stir until evenly combined.
- Step 5: Gradually mix in wheat flour until a sticky dough forms.
- Step 6: Using your hands, form the mixture into small balls (about 1 inch in diameter).
- Step 7: Roll the balls in crushed oats or shredded coconut if desired for added texture.
- Step 8: Place shaped treats on a baking sheet or plate and refrigerate for at least 30 minutes before serving.
Previous Recipe: My Grandmother's Bake Navy Beans with Sweet Molasses Flavor
Next Recipe: 5 Amazing Ways to Bake Tasty Beans: A Comforting Family Favorite