Slow-Baked Classic Vanilla Cake
Curious about what does bake cake in slow oven mean? Learn how to make a delicious slow-baked classic vanilla cake with our easy-to-follow recipe. Try it today!

- Master the Art of Slow-Baked Classic Vanilla Cake
- What Makes This Recipe Special
- Health and Nutrition Highlights
- Recipe at a Glance
- Master Ingredient List
- Signature Seasoning Blend
- Smart Substitutions
- Kitchen Equipment Essentials
- Professional Cooking Guide: How to Make a Slow-Baked Classic Vanilla Cake
- Master Chef's Advice
- Perfect Presentation
- Storage and Make-Ahead
- Creative Variations
- Complete Nutrition Guide
- Expert FAQ Solutions
- Recipe Card
Have you ever wondered why some cakes taste like they’re from a fancy bakery while others seem rather… average? what really makes a cake special? if you’ve ever pondered this especially at an afternoon tea, you’re in for a treat! i mean, let’s be real, there are countless ways to bake a cake, yet the slow-baked classic vanilla cake stands out in a sea of desserts.
It takes about 1 hour and 35 minutes from start to finish, and while it’s classified as medium in difficulty, you’ll find that it's approachable enough to be tackled by a home baker with a bit of confidence.
Baking cakes dates back centuries, and did you know that the origins of cake can be traced back to ancient egyptians? since then, cakes have evolved into a myriad of forms, flavors, and styles.
Fast forward to today, where the classic vanilla cake stands as a symbol of celebration—be it birthdays, weddings, or just a cozy afternoon tea with friends.
What’s more, the slow baking technique used in this recipe not only results in a tender crumb cake but also allows for deeper flavor to develop—like a fine wine!
This cake isn't just a pretty face. it's rich in its offerings— moist , luscious, and comfortingly familiar. plus, it’s a versatile canvas for frosting! you can easily elevate it with homemade frosting recipes or flavor enhancements if you’re feeling adventurous.
Let's just say if you’re baking for special occasions, this cake is the real deal .
Master the Art of Slow-Baked Classic Vanilla Cake
The beauty of the slow-baked classic vanilla cake lies in its rich culinary heritage, reflecting generations of baking knowledge passed down through families.
Picture yourself in an old-fashioned kitchen, where ingredients were mixed with love and the smell of cake wafted down the hall.
This cake isn't just a dessert; it's a story —a narrative of warmth and togetherness.
Baking ensoiasts have embraced this cake in modern times, turning it into a staple. why? because it’s not just about throwing some ingredients together; it’s an art.
The slow oven baking method, particularly started in the 19th century, ensures a beautiful texture that has everyone coming back for seconds—if not thirds!
What Makes This Recipe Special
So what’s the secret sauce here? this cake showcases unique flavor combinations that make your taste buds dance. the slow baking technique ensures it retains moisture, making it a moist cake recipe , while the creaming butter and sugar method produces an airy crumb that practically melts in your mouth.
Trust me, it’s foolproof; i’ve made it more than once, and it never disappoints.
Got a bit of a tight schedule? no worries! this recipe has time-saving tips ; you can make it ahead and freeze if you won’t use it immediately.
Just remember that this cake tastes even better the next day!
Health and Nutrition Highlights
Now, i'm not saying that cake should replace your veggies, but let's talk about some of the nutritional benefits here.
Each slice has a good balance of carbs and fat, which can give you a boost of energy when you need it! it’s also adaptable; if you’re mindful of dietary considerations like gluten, you can easily make gluten-free cake recipes by swapping in a gluten-free flour blend.
This classic vanilla cake isn’t just a skip down memory lane; it can fit into various dietary needs without sacrificing that delightful flavor.
Recipe at a Glance
Looking to whip up this beauty? Here’s a quick rundown:
- Total Preparation Time: 1 hour 35 minutes
- Skill Level Required: Medium (but really, if you can whisk, you can make this!)
- Serving Size: Yields about 8-10 servings
- Cost Efficiency: Perfect for sharing; it’s budget-friendly!
Now that you have the lowdown on this scrumptious cake, it’s time to roll up your sleeves and dive into the next section where we’ll gather all the ingredients you’ll need.
Let’s get baking!
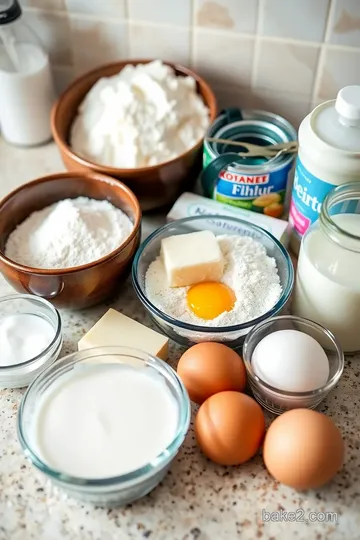
Master Ingredient List
Alright, my fellow baking aficionados, let’s dive into the world of ingredients! honestly, the key to mastering any classic vanilla cake recipe —especially our slow-baked classic vanilla cake —starts with knowing what you’re working with.
So, grab your shopping list, and let’s make sure you're armed with all the essentials.
Premium Core Ingredients
To bake a moist cake that’s got that tender crumb we all love, here’s what you’ll need:
- All-Purpose Flour : 2 cups (240g). Look for a fine, soft texture; it’s crucial for that perfect cake rise.
- Granulated Sugar : 1 ½ cups (300g). Fine sugar creates a beautiful crumb. I always color a bit outside the lines and opt for organic when I can—there’s just something about those finer grains!
- Unsalted Butter : ½ cup (115g) softened. Make sure it’s at room temperature for the best creaming butter and sugar experience.
- Whole Milk : 1 cup (240ml) at room temp. Using whole gives the cake that luscious moist quality.
- Large Eggs : 3 at room temperature; fresh is always best!
- Vanilla Extract : 2 teaspoons. Oh my gosh, real vanilla is a game-changer.
- Baking Powder : 1 tablespoon and a pinch of salt (½ teaspoon). Make sure it's fresh. Old baking powder will leave you with a sad, flat cake.
Selection Tips:
When picking out these items, particularly flour and butter, feel them! you want your flour fine and soft – a bit like snowflakes – and your butter should give a little when you press it.
Storage Guidance:
Keep your flour cool and dry. Lots of people toss theirs in the fridge or freezer—actually, not a bad idea if you aren’t baking all that often!
Signature Seasoning Blend
Now, let’s jazz things up with our Signature Seasoning Blend . No boring cakes allowed!
- Spice Combinations : Sometimes, a dash of cinnamon or nutmeg can turn your vanilla cake variations from ordinary to extraordinary.
- Flavor Enhancers : You can sneak in a spoonful of sour cream or yogurt for richness; it’s like a secret weapon!
- Aromatic Additions : A drop of almond extract can elevate your cake—it’s like sprinkling a little magic!
Smart Substitutions
Alright, let’s say you’re in a pinch. Well, fear not; the baking gods have blessed us with options!
- If you’re out of all-purpose flour , you can use cake flour for a lighter texture or even a gluten-free blend for those who need it.
- For your eggs, try using ¼ cup of applesauce as a swap—it can work wonders for a moist cake recipe .
- Emergency replacements : No milk? Ya know you can use buttermilk or almond milk in a bind!
Kitchen Equipment Essentials
A great cake has great tools behind it! Here’s your baking equipment list :
- 9-inch round cake pans (two): Seriously, you’ll want these for that classic layer cake look.
- Mixing bowls : A variety; trust me, you’ll thank me later.
- Electric mixer or whisk : While I adore my stand mixer, a trusty whisk makes me feel like a true baker.
- Rubber spatula : Essential for scraping down the sides and getting every last morsel!
- Toothpick : Your doneness tester; it’s a game-changer for mastering baking time for cakes .
Pro Ingredient Tips
Here’s the inside scoop from my kitchen to yours:
- Selection Secrets : Check the expiry date on all your ingredients, especially baking powder.
- Money-Saving Tips : Buy in bulk if you’re baking often! It saves pennies and leaves you with a stocked pantry.
- Storage Solutions : Airtight containers are your best friends for keeping everything fresh. I even have a designated spice rack so I know where everything is!
You know, food is all about what feels comforting and familiar, and that’s especially true with baking. now that you have your ingredient arsenal ready, let’s transition to how to actually combine and bake these beauties into a cake that’s perfect for a special occasion or just an afternoon treat.
Get ready for the instructions section where we’ll piece everything together, layer by delicious layer!
Professional Cooking Guide: How to Make a Slow-Baked Classic Vanilla Cake
Oh my gosh, let me tell you about the time i decided to whip up this slow-baked classic vanilla cake for a friend’s birthday.
I was armed with excitement and the smell of vanilla in my air, dreaming of a cake soft enough to make clouds jealous.
Spoiler alert: it turned out fantastic! this moist cake is just the thing for birthdays, afternoon teas, or even just to cozy up and enjoy with a good book.
So let’s dive into the nitty-gritty, shall we?
Essential Preparation Steps
Mise en place is where it all begins. trust me, it’s like gathering all your knights before a battle! you wanna line up your ingredients: flour, sugar, butter, milk, eggs, and vanilla extract.
Measure them out, and feel like the culinary wizard you are. it just makes the whole process so much smoother.
Next up, prep techniques: don’t forget to grease and flour your cake pans! a little butter and flour go a long way in preventing your masterpieces from sticking.
The time management part? i like to think about it like a marathon, not a sprint—focus on one step at a time.
And for organization tips , keep your workspace tidy; you’ll thank yourself when it comes time to clean.
Professional Cooking Method
-
Preheat your oven to 325°F (163°C). This slow baking technique works wonders for flavor; believe me, the magic happens in this gentle heat.
-
In a bowl, whisk together your dry ingredients: that’s the flour, baking powder, and salt. Pro tip—set it aside!
-
Now for the real fun: creaming butter and sugar. in a large mixing bowl, you’ll want to beat the softened butter and granulated sugar until it’s light and fluffy.
This step enhances the tender crumb cake texture, so don’t skimp on it!
-
Next, add eggs and vanilla: crack them in one at a time and mix well after each. It’s like adding little flavor soldiers to your army.
-
Then comes the grand union! Gradually mix the dry ingredients and milk into your butter mixture. Alternate them carefully. And remember, don’t overmix—this is a cake, not a workout!
-
Once everything is combined, divide the batter evenly between your prepared cake pans.
-
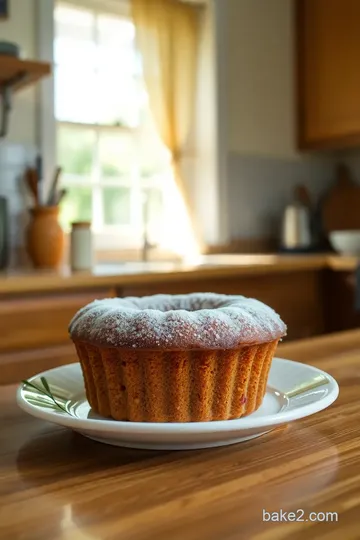
Now, bake that beauty in your preheated oven for about 1 hour and 15 minutes. now, you might wonder, what does bake cake in slow oven mean? it means letting those flavors develop slowly, almost like savoring a fine wine.
-
Keep an eye on it! When a toothpick inserted comes out clean, you’re golden.
-
Once it’s done, let it cool in the pans for about 10 minutes before transferring them to wire racks.
-
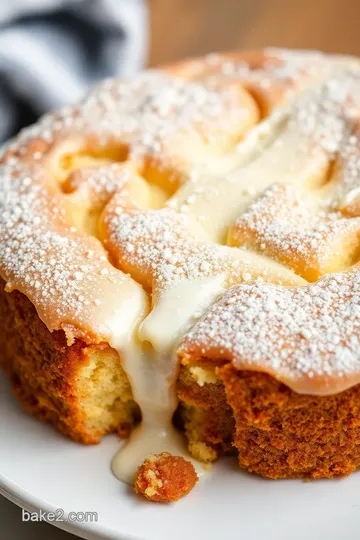
Lastly, you could frost your cake if you want. My go-to is a simple homemade frosting recipe that’s sweet without overpowering.
Expert Techniques
Alright, let’s talk precision—your ingredients must be at room temperature for optimal mixing. This is crucial for a moist cake recipe .
Timing is everything: those 1 hour and 15 minutes can feel long when you’re staring at it, but trust the process!
Quality checks are integral. A perfectly baked cake springs back when lightly pressed. And don’t underestimate the power of a toothpick; it’s your baking lifeline!
Success Strategies
Now, if you experience any hiccups (we’ve all been there), first ask yourself if you followed the oven temperature settings . Too hot? It could dry out the cake.
Another tip: If you find your cake isn’t rising as it should, check your baking powder’s freshness ; you don’t want to be left with a sad, flat disappointment.
For those serving at special occasions, consider cake layering techniques or using flavor enhancements like lemon zest or almond extract. Oh, the variations you can create!
Finally, cooling techniques matter—letting the cake cool completely before frosting keeps it from melting into a gooey mess is key for perfect results.
And hey, if you're feeling adventurous, try out those gluten-free cake recipes out there. It's all about adjusting to dietary needs without sacrificing flavor.
Next up? Let’s dig even deeper into those delicious homemade frosting recipes and cool serving suggestions. Your friends are gonna thank you!
Master Chef's Advice
Oh my gosh, let’s dive into some serious baking wisdom ! when i first started baking, i had no idea what i was doing.
I mean, like most of us, i would just throw ingredients together and hope for the best. but once i got into the nitty-gritty with advice from seasoned chefs, it felt like the clouds lifted!
Professional insights suggest that a big part of achieving that perfect cake texture lies in understanding baking time for cakes and that all-important oven temperature settings .
For example, we’re using a slow oven for our slow-baked classic vanilla cake , and that’s not just for fun.
The slow baking technique allows flavors to deepen, yielding a tender crumb cake that’s hard to resist.
So when it comes to kitchen wisdom , remember: creaming butter and sugar until light and fluffy isn’t just a step; it’s pivotal.
This aeration gives your cake a beautiful lift! and let’s talk about success guarantees — most of them hinge on following these foundational techniques.
If you stick to them, you’re basically rolling in cake magic.
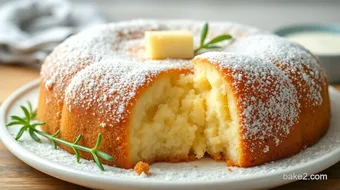
Perfect Presentation
Now, let's chat about making your cake look as beautiful as it tastes! plating techniques can take a simple dessert and elevate it to show-stopping status.
You know those pictures you see online where the cake looks so pretty, you can’t even? it’s all about garnish ideas and creativity.
Think about serving suggestions , like a sprinkle of powdered sugar right before presenting it. or maybe add some fresh fruit on the side for visual appeal and freshness.
It’s the small details that make a big difference.
Oh, and don’t forget about cake layering techniques ! if you happen to bake this in two layers, try placing fresh berries or even a drizzle of sweet sauce between them.
Honestly, it’s all about stunning visual appeal .
Storage and Make-Ahead
Let’s be honest, we all want to enjoy our cake for several days — if it lasts that long! when it comes to storage guidelines , wrap your cake in plastic wrap and keep it in an airtight container.
Trust me, this will help preserve that delectable moistness.
When thinking about make-ahead options, you can actually bake the cake a day or two in advance. just ensure it cools completely first.
If you’re strapped for time, you could also whip up your homemade frosting recipes ahead of time. just keep it in the fridge until you’re ready to frost!
And, for reheating instructions , if you do happen to have leftovers, microwave a slice for just a few seconds. It’ll feel like it's fresh out of the oven!
Creative Variations
Now comes the fun part — getting creative with our cake! there are so many possible flavor enhancements for cakes .
Want to spice it up? consider vanilla cake variations by adding a touch of lemon or almond extract. the world is your oyster!
If you need dietary adaptations , swap out regular flour for gluten-free cake recipes . there are fantastic blends that work just as well.
Honestly, it’s amazing how versatile cakes can be based on your whims or needs!
Don't you love how bakers can infuse the seasons into their recipes? think about adding pumpkin spices in the fall or zesting up the base with peppermint for a winter treat.
Seasonal twists can elevate your baking game!
Complete Nutrition Guide
Okay, let’s get real about the good stuff — nutrition! with this yummy slow-baked classic vanilla cake , we’re looking at a breakdown that is surprisingly decent.
With the estimated nutrition per serving, we’re at around 350 calories , which isn’t too bad when you think about it!
Health Benefits
Baking at home means we can control our ingredients. using whole milk adds a bit of creaminess, and the sugar can be adjusted.
Plus, this cake lends itself beautifully to being a treat , paired with healthier options like fresh fruits on the side.
It’s all about balance, right?
Portion Guidance
For portion control, this recipe yield is about 8-10 servings. So, slice modestly unless you want to tempt the leftovers! Sharing is caring, after all.
Expert FAQ Solutions
Let's answer some of the most common concerns that come up while baking. A lot of beginners ask, “ How to bake cake in slow oven? ” Simply, follow this recipe’s preheating instructions closely — temps matter!
If your cake turns out too dense, don’t panic! it could be that you overmixed the batter. remember those baking tips for beginners : less is more.
Just mix until combined for that fluffy texture we’re aiming for.
And for those pesky troubleshooting guides about cake sinking, keep track of how you’re measuring ingredients. A little too much flour or not enough baking powder can lead to a floppy cake!
Conclusion
So there you have it! with the right techniques and a sprinkle of creativity, your baking journey can be just as delightful as your end result.
Don’t be discouraged; every cake is a chance to learn something new. whether you’re whipping up a cake for afternoon tea desserts or birthdays, approach it with joy, and enjoy every slice of life !
Slow-Baked Classic Vanilla Cake Card
⚖️ Ingredients:
- 2 cups (240g) all-purpose flour
- 1 ½ cups (300g) granulated sugar
- ½ cup (115g) unsalted butter, softened
- 1 cup (240ml) whole milk, at room temperature
- 3 large eggs, at room temperature
- 2 teaspoons vanilla extract
- 1 tablespoon baking powder
- ½ teaspoon salt
- 1 cup (230g) unsalted butter, softened (for frosting, optional)
- 4 cups (480g) powdered sugar (for frosting, optional)
- 2 teaspoons vanilla extract (for frosting, optional)
- 2-4 tablespoons heavy cream or milk (for frosting, optional)
🥄 Instructions:
- Step 1: Preheat the oven to 325°F (163°C) for a slow bake.
- Step 2: Prepare your cake pans by greasing and lightly flouring them; set aside.
- Step 3: In a bowl, whisk together flour, baking powder, and salt. Set aside.
- Step 4: In a large mixing bowl, beat the softened butter and granulated sugar until light and fluffy.
- Step 5: Add eggs, one at a time, beating well after each addition. Mix in the vanilla extract.
- Step 6: Gradually add the dry ingredients and milk to the butter mixture, alternating them until just combined.
- Step 7: Divide the batter evenly between the prepared cake pans.
- Step 8: Place the cake pans in the preheated oven and bake for 1 hour and 15 minutes or until a toothpick inserted comes out clean.
- Step 9: Once done, remove from the oven and let cool in the pans for about 10 minutes before transferring to wire racks to cool completely.
- Step 10: Once cooled, spread frosting on top of one cake layer, place the second layer on top, and frost the top and sides as desired.
Previous Recipe: Brown Butter Bakery: 5 Amazing Bliss Bars to Delight Your Day!
Next Recipe: How Many Calories are in Loaded Twice Baked Potatoes: Ultimate Comfort Food!