Unbaked Pie Crust with Guard Against Spoilage
Ever wonder how long unbaked pie crust goes bad? Discover essential storage tips to prevent spoilage and keep your crust fresh for delicious pies.

- Have You Ever Wondered Why Some Pies Just Hit Differently?
- The Ultimate Guide to Mastering Unbaked Pie Crust
- Why You'll Love This Version
- Health and Nutrition Highlights
- Recipe at a Glance
- Essential Components Guide
- Kitchen Equipment Essentials
- Foolproof Cooking Steps for Unbaked Pie Crust with Guard Against Spoilage
- Professional Secrets
- Perfect Presentation
- Storage and Make-Ahead
- Creative Variations
- Complete Nutrition Guide
- Expert FAQ Solutions
- Recipe Card
Have You Ever Wondered Why Some Pies Just Hit Differently?
You know that moment when you take a bite of a perfectly baked pie and wonder how on earth the crust could be so flaky and delicious? what’s their secret? well, i'm here to tell you that the journey to a killer pie crust starts long before the filling goes in.
Let’s talk about the star of the show—the unbaked pie crust. this recipe is not only simple, but it takes about 15 minutes to prep.
It's an easy-level task that even the most kitchen-phobic among us can conquer. plus, i'm here to share tips that will keep it fresh for when you need it next.
The Ultimate Guide to Mastering Unbaked Pie Crust
Pies have been a comfort food hero in our anglo-saxon heritage for centuries, with humble pies being baked for both sweet and savory fillings.
The earliest versions date back to the romans, who made pies that weren’t quite sweet, but rather, filled with meat or fish.
Fast forward a few centuries, and you’ll find that pies have evolved significantly and have become a beloved part of every household's dessert table.
What makes this unbaked pie crust special? for starters, it’s the base of so many delicious dishes, from fruit pies to creamy quiches.
It’s also incredibly versatile! you can use it for sweet or savory recipes, and you can whip it up ahead of time.
This makes it not just a kitchen staple, but also a lifesaver for busy days or those sudden cravings when you want to whip up a pie.
Let’s get into the nitty-gritty: this foolproof version of unbaked pie crust is designed with tips to prevent spoilage—it really helps when you wonder if unbaked pie crust goes bad! more on that later.
Why You'll Love This Version
I remember the first time i made pie crust. it was a disaster! the dough was either too dry or stuck to the counter like something out of a horror movie.
Over the years though, i’ve fine-tuned my technique, and i can now confidently say that this easy pie crust recipe will save you from those kitchen nightmares.
The use of ice water and chilling the dough is key to getting that perfect flaky texture.
This masterpiece combines all-purpose flour and butter, resulting in a crumbly dough that melts in your mouth. with techniques that are expert-tested, anyone can follow along.
I’ve made it a zillion times, and it always turns out perfect— well, mostly perfect (thanks to some happy accidents).
Plus, with time-saving tips that i’m excited to share, you’ll be a pie-crust prodigy in no time.
Health and Nutrition Highlights
Nutrition isn’t always the first thought that comes to mind when you think of pies. but let's not forget, this recipe is relatively simple with some nutritional benefits.
The unbaked crust has about 150 calories per serving, filled mainly with energy from healthy fats and carbohydrates. while this is classified as comfort food (with all the love that comes with it), you can consider alternatives like using half whole wheat flour for a nutty flavor with a pretty good nutritional boost.
Of course, dietary considerations are always a tiptoe dance— are you gluten-free? you can easily substitute with alternative flours nowadays.
Let’s not complicate things too much, but a few thoughtful adjustments can lead to a delightful pie, and your health will thank you later.
Recipe at a Glance
Let’s break it down:
- Total Preparation Time : 15 minutes
- Skill Level Required : Easy
- Serving Size : One 9-inch pie crust
- Cost Efficiency : Super affordable for the amount of pie joy you’ll spread!
Now that you’re all hyped about making your unbaked pie crust, stay tuned—the next section is all about the ingredients you’ll need.
When it comes to pie crust, we’re talking flour, butter, and a dash of salt, but don’t worry—i’ll guide you through the best tips to bring your crust dreams to life!
Essential Components Guide
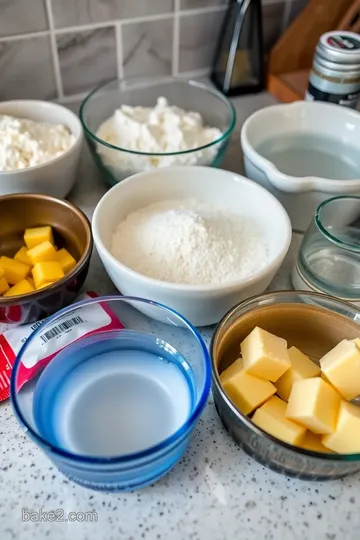
Premium Core Ingredients
When you're whipping up a classic unbaked pie crust , every single component is essential. Let’s break this down so you’re all set for pie perfection!
-
All-purpose flour: 1 ¼ cups (160g) – good ol’ flour is your base. look for flour that feels light and has a fine texture.
I always opt for those labeled “unbleached” for an authentic taste . store it in an airtight container to keep it fresh.
If you’ve had it sitting around for ages, give it a little sniff – if it smells off, it’s time to toss it.
-
Salt: ½ teaspoon – it might seem small, but this little sprinkle is like the hug your pie crust didn’t know it needed.
Always grab kosher salt for its chalky texture. store it in a dry place, because no one likes a clumpy salt.
Fun fact, one time , i accidentally grabbed table salt instead of kosher, and boy, did that ruin the vibe!
-
Granulated sugar: 1 tablespoon (optional) – this is if you’re dreaming of a sweet pie crust, maybe for a apple pie or peach cobbler.
If your sugar has hard bits, just pop it in the microwave for a couple of seconds—the warmth softens those pesky clumps right up!
-
Unsalted butter: ½ cup (1 stick, chilled and cubed) – butter is king! the cold kind is what we're after; shoot for something that has a nice freshness smell.
Keep it in the fridge until you need it to maintain that crisp pie crust . once, in a rush, i melted the butter.
.. and it was a disaster! the crust turned out like cardboard.
-
Ice water: 3 to 5 tablespoons – this is crucial, folks! use a mixture of ice and water; the colder, the better.
I’ve learned to keep a pitcher of water in the fridge, just for baking emergencies. trust me—those emergency crisis moments need cold water, not lukewarm!
Signature Seasoning Blend
To really elevate your unbaked pie crust , sometimes you might add a little something extra. Here’s how to put your signature touch on it:
-
Spices and herbs : try adding a pinch of nutmeg or cinnamon for sweet pies. for savory, consider adding fresh rosemary or thyme into the mix.
It’s amazing what a dash of seasoning can do.
-
Flavor enhancers : A splash of vanilla extract (especially for sweet pies) can turn ordinary into extraordinary.
-
Aromatic additions : Scent is a huge part of flavor. Bake your crust with a bit of citrus zest – lemon or orange can add a nice zing.
Smart Substitutions
We’ve all been there, standing in front of the pantry, wondering what on earth to do if we’re missing an ingredient. Here are some smart swaps:
-
Butter alternatives : Swap out the unsalted butter for coconut oil, or a good dairy-free option like vegan butter. I made a pecan pie once with coconut oil, and wow, it was a hit!
-
Flour alternatives : If you're aiming for a nutty flavor, try half whole wheat flour. Embrace it!
-
Emergency replacements : In a pinch, olive oil can work too—just remember it gives a stronger flavor.
-
Seasonal variations : During the holidays, think about adding pumpkin spice or even crushed dried fruits for a pie crust that feels festive.
Kitchen Equipment Essentials
Let’s make sure your kitchen game is strong! You’ll want the right tools on hand.
-
Must-have tools : A good mixing bowl, pastry cutter, and rolling pin are essential. I can't live without my trusted silicon mat – no more flour all over the counter!
-
Recommended appliances : If you have a food processor, it’s a game changer! Seriously, it saves so much time.
-
Helpful gadgets : A bench scraper is perfect for lifting your dough without messing it up. Honestly, it's a life-saver.
-
Home alternatives : Don’t have a pastry cutter? Your fingertips can work magic too! Just keep your hands cool to avoid warming the butter.
Pro Ingredient Tips
Now that we’ve unpacked the basics, here are some little tidbits I’ve learned along the way:
-
Selection secrets : Pay attention to the best before dates on your flour and butter. I’ve made the mistake of using expired ingredients, and that’s a hard lesson learned.
-
Quality markers : The more buttery the smell, the better your crust will be. For butter, seek out brands without anti-caking agents if you can.
-
Storage solutions : wrap your unbaked pie crust tightly in plastic or foil and pop it in the fridge for up to 2 days.
If you’re freezing, make sure it’s airtight to avoid frost on the surface. no one wants freezer-burnt crust!
-
Money-saving tips : When buying flour, check for bulk options. They often save you a bit of coin over time!
Now that you’ve stocked up on your essential ingredients and tools, you're all set to take the plunge into pie making.
As you're gearing up, think about those flaky pie crust techniques and how to avoid crust shrinkage. soon, you’ll be ready to dive headfirst into those mouthwatering instructions that follow.
Happy baking!
Foolproof Cooking Steps for Unbaked Pie Crust with Guard Against Spoilage
When it comes to baking a pie, the crust is, let’s be honest, that lovely, flakey hug for all the delicious fillings inside.
I always remember my first pie-making adventure. wobbly with nerves, i realized that a solid unbaked pie crust is just as important as what goes in it.
Let’s dive into making an unbaked pie crust that not only holds together beautifully but also stays fresh without puzzling over how long does unbaked pie crust last.
Ready? let’s go!
Essential Preparation Steps
Mise en place : before you even crack into your butter, let’s gather everything: flour, softer ingredients, and those chilled tools.
This prep saves time, and trust me, your future self will thank you.
Prep techniques : for this recipe, we’re going with the classic cutting butter into flour. remember my first attempt where i overworked the dough? yeah, it ended up like a shoe sole.
Keeping the butter cold is key.
Time management : total time? about 15 minutes for prep and even a bit longer if you chill. but it’s well worth the wait.
Also, if you run into a busy schedule, slice in that chilling time ahead; just be aware that an unbaked crust can be stored up to two days in the fridge and even longer in the freezer.
Organization Tips : Keep your kitchen tidy. It’ll boost your mood. Measure your flour and sugar beforehand—because who wants a flour explosion halfway through the process? Trust me, I’ve been there!
Professional Cooking Method
-
Mix dry ingredients : in a medium mixing bowl, combine 1 ¼ cups of all-purpose flour , ½ teaspoon of salt , and 1 tablespoon of sugar (if you're making it sweet).
Whisk away until blended—you’re aiming for harmony here, not chaos!
-
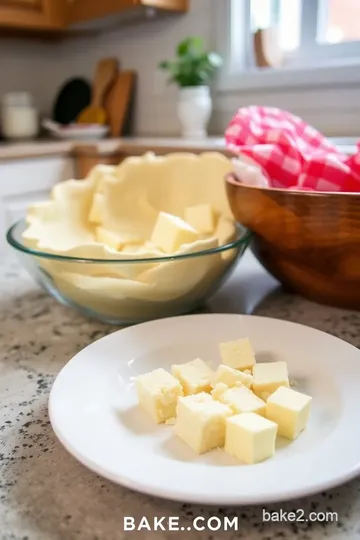
Cut in butter : throw in a chilled, cubed unsalted butter (½ cup, or one stick). using a pastry cutter—or your fingers, if you’re feeling a bit rustic—cut the butter into the flour until it looks like those coarse crumbs.
Keep it cool; remember: overtime, butter can lose that delightful flakiness.
-
Add ice water : now, the kitchen magic. gradually add ice water (3 to 5 tablespoons). you want to mix it in just enough for the dough to come together into a shaggy mass.
Think of it as a communally mixed playground—rough but not too clustered.
-
Form the dough : turn that mixture out onto a lightly floured surface. gently press it into a ball and flatten it into a disc about 1 inch thick.
Then wrap it tightly in plastic wrap.
-
Chill the dough : put the wrapped dough in the fridge for at least 30 minutes (or a couple of days).
A cold crust means preventing shrinkage when you finally bake it. i learned this the hard way!
-
Roll out the dough : once chilled, let it sit for 5-10 minutes to soften slightly. roll it out to a 12-inch diameter and about ¼ inch thick, using flour generously to keep things non-sticky.
-
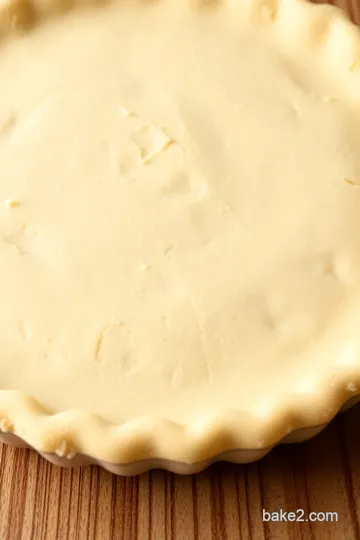
Transfer to pie plate : here's where things get fun! carefully fold the dough in half and place it into a 9-inch pie plate.
Pro tip : take your time. press it gently into the sides, and make sure you trim any excess dough leaving about an inch overhang.
-
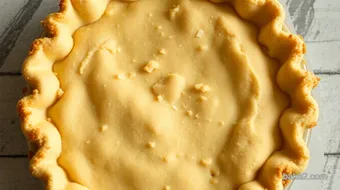
Crimp the Edges : Fold those edges under and crimp them for a touch of style. I often go for the fork method, but whatever tickles your fancy!
-
Chill Again : If you’re not baking the crust right away, give it another chill for about 15-30 minutes. That second chill really locks in the goodness.
-
Use or store : if it’s going back in the oven soon, fill away! otherwise, wrap up tightly and freeze it to prevent spoilage for up to three months.
Remember, unbaked pie crust goes bad but with proper storage tips, you’re good to go!
Expert Techniques
Let’s talk details. for that perfect flaky pie crust: ensure your butter is ice-cold, mix just until moistened, and avoid any over-handling.
I used to get worried the dough was too sticky, but i learned keeping things gentle is the way to go.
Timing Precision : Pay attention to the chilling steps; they’re crucial to success. Chilled butter means crispy layers.
Success Indicators : Your dough should feel a bit tacky but not overly sticky. If it tears while rolling, don’t panic—just press it back together.
Success Strategies
If you run into pesky issues while making your unbaked pie crust, like it breaking apart, simply add a touch more ice water.
On the flip side, if you think your dough is too wet (you’ll know it when it sticks to everything), sprinkle some flour while mixing.
The fridge is your friend for quality assurance—nothing like chilling your crust for the flakiest results. plus, make sure to taste that sweet or savory filling.
It's always delightful to check for balance before you bake!
You've now got what you need for a successful pie crust adventure! Ready to play with interesting fillings? Let’s explore ways to store that unbaked crust and ensure it stays as fresh as the day you made it!
Professional Secrets
When i first started working with pie crusts, i learned quickly that the professional world has some interesting insights. one secret? chilling your pie dough is an absolute game-changer.
It helps keep the butter solid, which means a flakier crust. and trust me, nobody wants a tough, chewy pie crust.
I've tasted my fair share of those, and they aren't pretty.
Ever try adding a dash of vinegar to your dough? it sounds odd, i know, but pros often use it to keep the crust tender.
Just a teaspoon can help. another little nugget of wisdom: always use cold water. like, ice cold. it prevents the butter from melting too early.
Oh, and don’t skimp on the butter . Spend that couple of extra dollars on quality butter. You'll taste the difference, and your pie will sing with flavor.
Perfect Presentation
Now let's get to the fun part - presentation! ever heard of the phrase "you eat with your eyes first"? well, it's true.
Plating can elevate your delicious pie to a whole different level.
Here's a tip: try crimping your pie crust edges for that classic look. it adds a professional touch and doesn’t take much effort.
You can even get fancy and use a fork to make designs on the crust. it’s those small details that can really impress your guests.
Consider adding a garnish like fresh herbs or a sprinkle of powdered sugar, depending on your pie filling. a little creativity here can transform a simple dessert into a work of art.
Not to mention, it’s great for instagram-worthy photos!
Storage and Make-Ahead
Let’s chat about storage because nobody wants an unbaked pie crust that goes bad. if you plan to save your crust, wrap it snugly in plastic wrap.
You can keep it in the fridge for about 2 days, but if you want to extend its life, toss it in the freezer! it can last up to three months when frozen.
Just remember to thaw in the fridge overnight before using it.
And, for those days you want an easy pie night, making your crust ahead of time is life-changing. prep your crust, store it, and when you're ready, just roll it out.
Easy peasy!
Creative Variations
There are a million ways to jazz up your pie crust, and i truly believe it’s where the magic lies.
You can play with flavors too! think about adding herbs for savory pies or zesty lemon zest for sweet ones.
Sometimes, if i’m feeling adventurous, i swap out all-purpose flour for almond flour; it brings a lovely nutty taste!
Dietary needs? No problem! Want a gluten-free crust? Just use a 1:1 gluten-free flour mix instead of regular flour. Plus, how about ditching the butter for coconut oil or vegan butter?
Seasonal twists can also be super fun. in fall, i like to add a pinch of cinnamon for pumpkin pie or swap in whole wheat flour for that earthy taste.
Cheers to delicious experimentation!
Complete Nutrition Guide
Speaking of experimentation, let’s talk numbers! the beauty of making your own unbaked pie crust is knowing exactly what's in it.
With this recipe, here’s a quick nutritional breakdown: you’ve got about 150 calories per serving.
And don’t overlook the health benefits! use whole grain flour for extra fiber, and trust me; your body will thank you later.
Plus, keep an eye on portion sizes—it's easy to munch on a slice here and there without realizing!
Expert FAQ Solutions
I often get asked, “how long does unbaked pie crust last?” well, if stored properly, it can live in the fridge for up to two days or freeze for three months.
But, if you’re ever unsure about freshness, always rely on your senses. if it looks funky or smells off, it’s best to toss it.
And if you find yourself battling with crust shrinkage, don't stress. chilling the dough is your friend. it limits that pesky shrinkage during baking.
Need a quick fix? just patch any holes with extra dough!
Mastering the art of pie crust is within reach, and with these tips, you'll not only impress yourself but also your friends and family.
So dive into the world of unbaked pie crust and explore its potential! whether you're crafting a sweet dessert or a savory quiche, you'll find that these little nuggets of wisdom can help create a delicious masterpiece in your kitchen.
Happy pie-making!
Unbaked Pie Crust with Guard Against Spoilage Card
⚖️ Ingredients:
- 1 ¼ cups all-purpose flour (160g)
- ½ teaspoon salt
- 1 tablespoon granulated sugar (optional for sweet crust)
- ½ cup unsalted butter (1 stick, chilled and cubed)
- 3 to 5 tablespoons ice water
🥄 Instructions:
- Step 1: In a medium mixing bowl, combine the all-purpose flour, salt, and sugar (if using). Whisk together until well blended.
- Step 2: Add the chilled and cubed unsalted butter to the flour mixture. Using a pastry cutter or your fingertips, cut the butter into the dry ingredients until the mixture resembles coarse crumbs.
- Step 3: Gradually add the ice water, one tablespoon at a time, mixing gently with a fork after each addition until the dough holds together but remains crumbly.
- Step 4: Turn the dough out onto a lightly floured surface, press it together to form a ball, and flatten into a disc about 1 inch thick. Wrap in plastic wrap.
- Step 5: Place the wrapped dough in the fridge for at least 30 minutes or up to 2 days to firm up and prevent shrinkage.
- Step 6: Once chilled, take the dough out and let it sit at room temperature for 5-10 minutes. On a floured surface, roll it out to about 12 inches in diameter.
- Step 7: Carefully transfer the rolled dough to a 9-inch pie plate by folding it in half and then unfolding it over the plate. Trim any excess dough.
- Step 8: Tuck the edges of the dough under itself and crimp with your fingers or a fork for decoration.
- Step 9: If not using the crust immediately, refrigerate it again for 15-30 minutes to firm up.
- Step 10: If making a baked pie, bake the filled pie according to your recipe. If not using immediately, wrap tightly and freeze for up to three months to prevent spoilage.
Previous Recipe: Baked Doritos: 7 Comforting Casserole Recipes to Savor
Next Recipe: Unbaked Cookie and Cream Cake Pop Recipe: 7 Sweet Tips for Success