Fluffy Whipped Cream: Your Secret to Decadent Desserts
Ever wondered how to whip heavy cream for that perfect, sweet treat? This easy, delicious recipe gives you tips and tricks for a light and fluffy finish!

Have you ever had a day that just screamed for a little sweetness? you know, one of those times when a simple dessert can turn your mood around? i remember one rainy afternoon when i was feeling a bit down.
I grabbed some heavy whipping cream from the fridge and decided, “let’s whip up some homemade whipped cream!” just a few minutes later, with a fluffy cloud of sweet cream in front of me, i realized how easy it is to whip heavy cream for quick, sweet treat .
Honestly, it became my go-to trick for turning any basic dessert into something delightful.
Whipped cream has been around for centuries, dating back to the early days of european cuisine, and let me tell you, it still has a huge place in our hearts today.
Whether you’re dolloping it on top of an everyday sundae or fancying up a holiday pie, this quick and easy dessert topping is always a winner.
And the best part? it takes about five minutes to make and only needs three simple ingredients – that’s as easy as it gets!
Recipe Overview
Whipped cream, with its light and fluffy texture , brings a heavenly touch to desserts. from its origins in the refined kitchens of europe to modern kitchens across america, it’s become a staple for casual and special occasions alike.
You’ll find it on birthday cakes, fruit salads, and, let’s not forget hot chocolate – oh my gosh, who doesn’t love that?
The beauty of this sweet treat is its easy preparation . you’ll spend about 5 minutes prepping, and guess what? there’s no cooking involved! just whip it up, and you’re in business.
When it comes to cost, you really can’t beat it; a carton of heavy cream is inexpensive, and it makes enough whipped cream to serve about 8-10 people .
So, if you’re entertaining or just treating yourself, this recipe won’t break the bank!
Key Benefits
Now, let’s talk about the healthier side of whipped cream. while it’s definitely a sweet indulgence, using heavy whipping cream means you’re getting some nice fat content without all those crazy additives found in store-bought alternatives.
If you whip it from scratch, you know exactly what you’re eating – only sugar and possibly some flavoring.
Plus, who doesn't love a dessert that looks fabulous without all the fuss? whipped cream is the perfect way to impress guests at a brunch or special occasion.
Piling it high on cakes or using it as a topping for fresh fruit can make even a simple dish feel like a celebration.
Moreover, think of all the flavor variations you can create! whether you’re after classic vanilla whipped cream , or feeling adventurous with a little cocoa or seasonal spices, the sky's the limit! these delicious enhancements can elevate your dish and make it a memorable treat.
Whipped cream is versatile, too, pairing beautifully with an array of desserts. trust me; it’s the ultimate dessert accoutrement you didn’t know you needed! not only is it great for cakes and pies, but it also works wonders for those last-minute dessert garnishes or adds a luxurious touch to your morning coffee.
As we move into the kitchen wizardry of whipping up your very own cream, keep in mind these tips for the best results.
The first step? let’s dive into what you'll need to create this delightful fluffy whipped cream !
Ingredients Section
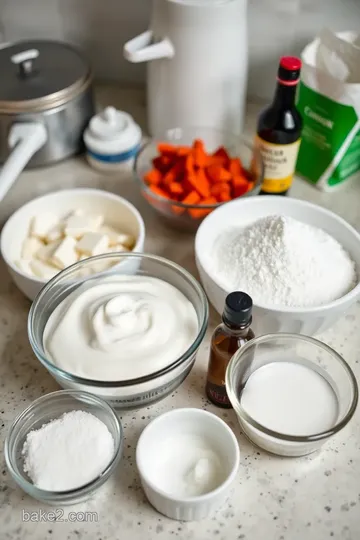
Here’s what you’re gonna need to whip up this quick, sweet treat: 1 cup of heavy cream , 2 tablespoons powdered sugar , and 1 teaspoon of pure vanilla extract .
And trust me, you’ll want to grab a mixing bowl and either an electric mixer or a good old whisk – get ready to whip it real good!
So, let’s gather our ingredients and get to making some light and fluffy dessert toppings that will make you feel like a culinary superstar!
Essential Ingredients Guide
Alright, friends! let’s chat about the essential ingredients you need to whip up some delicious desserts. whether you’re putting together a quick dessert recipe or making that signature cake, knowing your ingredients is key.
Premium Core Components
First up, let’s talk about those premium core components . you really want to make sure you're using quality stuff, right? for that magical homemade whipped cream , grab yourself 1 cup (240 ml) of heavy cream .
Sounds simple, but trust me, it’s all about what you choose.
Quality indicators ? well, fresh heavy cream should smell pleasant and have no lumps. give it a good shake while at the store.
If it sloshes around like a wave, you’re good to go!
Now, as for storage guidelines , keep that cream in your fridge and use it within 5-7 days after opening.
Oh, and don’t forget the freshness tips: check the sell-by date and avoid anything that looks funky or smells off.
Signature Seasoning Blend
Now, let’s sprinkle in some flavor! you’d be surprised how a bit of signature seasoning blend can make all the difference.
Think about 1 teaspoon (5 ml) of pure vanilla extract . it’ll give your whipped cream that wow factor, like a soft hug of flavor.
Flavor enhancers and aromatics can include a dash of almond extract or even some cocoa powder for a chocolate twist—because who doesn’t love whipped cream with cocoa ? and hey, regional variations mean you might want to blend in some spices like nutmeg or cinnamon for that cozy fall vibe.
Smart Substitutions
Life happens, and sometimes you need to throw in some smart substitutions . no powdered sugar? no problem! granulated sugar works, just give it longer to dissolve.
And if you find yourself with no heavy cream in the fridge, mix 70% milk with 30% butter for a lighter alternative.
It won’t be quite the same, but it'll do in a pinch!
Kitchen Equipment Essentials
Don’t forget about the must-have tools ! for whipping that cream to fluffy perfection, a mixing bowl and electric mixer are essential.
You can also wield a whisk like a pro if you’re feeling old-school. just know that it’ll take a little more elbow grease!
And when the party’s over, you need solid storage solutions . keep any leftovers in a sealed container in the fridge for up to 2 hours.
Pro tip: it’s best enjoyed fresh since it might lose its vibe after hanging out too long.
When you're ready to dive into the magic of whipping up that light and fluffy dessert topping, remember to cool your equipment—it makes a world of difference in achieving that dreamy texture.
So whether you’re here to whip heavy cream for quick, sweet treats or learn some easy kitchen hacks for desserts, you're set to create a masterpiece! Who knew quick dessert garnishes could be this fun?
Get ready to elevate your desserts, because coming up next, i’m going to show you how to put all this knowledge into action with a super easy whipped cream recipe.
Let’s dive in and make those delicious dessert dreams come true!
Professional Cooking Method
Let’s dive into the world of professional cooking methods ! if you’ve ever watched a cooking show, you’ve probably heard the phrase "mise en place.
" honestly, it’s a fancy way of saying, “get your stuff together before you start cooking.” but really, it’s key to smooth sailing in the kitchen.
Essential Preparation Steps
Mise en Place
First up, mise en place means you should gather and prep all your ingredients before you hit that stove. chop your veggies, measure out your spices, and line up your pans.
This not only saves time but keeps your space clean and organized.
Time Management Tips
Now, let’s talk timing. you want to be the captain of your own cooking ship, steering through those waves of ingredients without losing focus.
Set timers! whether it’s for boiling or baking, timing precision is crucial. you don’t want to burn that beautiful roast because you lost track of time binging your favorite show.
Organization Strategies
Keep things tidy. Want to avoid chaos? Organize your workspace. Put utensils in easy reach and ingredients close by. A clean kitchen makes cooking way more enjoyable.
Safety Considerations
Safety first, folks! always use a cutting board and keep those knives sharp. keeping everything organized can help prevent accidents.
Think of it this way: a tidy workspace will keep your spirits high while cooking. plus, who wants to clean up a mess later?
Step-by-Step Process
Alright, let’s get into the nitty-gritty!
- Prepare Ingredients : Get your veggies diced and your proteins ready.
- Heat Your Pan : Always preheat. If you’re sautéing, your pan should be hot enough to hear that sizzle when you add ingredients (about 350° F ).
- Cook in Stages : Start with the ingredients that take longer to cook first, like your meats or root veggies.
- Temperature Control : Keep an eye on those temps! If you’re roasting, generally, aim for 400° F . For sautéing, medium-high works best.
- Watch the Time : Every dish has its specific time. For example, chicken needs about 25- 30 minutes in the oven.
Expert Techniques
When you’ve got the basics down, fancy it up with some expert techniques.
Professional Methods
Ever tried deglazing a pan? after searing meat, add a splash of broth or wine and stir up those lovely bits stuck to the bottom.
It creates a rich sauce that’s downright tasty.
Critical Steps Explained
Don’t rush! Let meats rest after cooking. This could be around 10 minutes . It helps keep them juicy.
Quality Checkpoints
Always taste as you go! It might seem simple, but tasting your dish at key points will guide your seasoning.
Troubleshooting Tips
If things don’t go as planned (and they often don’t!), don’t sweat it. undercooked chicken? pop it back in for another 5- 10 minutes .
Overly salty sauce? add a bit of sugar to balance the flavor.
Success Strategies
Now, let’s cover the common mishaps and how to navigate them.
Common Mistakes to Avoid
Don’t overcrowd your pan! If you toss in too much at once, you’ll steam instead of sear. Aim for space—each piece deserves attention.
Quality Assurance Tips
Check doneness with a thermometer. For chicken, look for 165° F . Always err on the side of caution when it comes to food safety.
Perfect Results Guide
Practice makes perfect! Try a simple recipe like Whip Heavy Cream for Quick, Sweet Treat and soon, you’ll whip up masterpieces.
Make-Ahead Options
You can prep a lot ahead of time. Marinade meats a day in advance, or chop your veggies and store them in the fridge. Makes life sooo much easier!
Now that you’re set to impress in the kitchen, let’s transition to some additional information. there’s always more to learn, whether it's about techniques, new recipes, or enhancing your sweet creations like homemade whipped cream or flavored variations.
The beauty of cooking is that it’s a journey. enjoy every twist and turn!
Additional Recipe Information: Whip Heavy Cream for Quick, Sweet Treat
Pro Tips & Secrets
Alright, friends! let’s dive into some pro tips that’ll make you the whipped cream wizard! first up, the chill factor .
Always use a chilled mixing bowl and beaters—this helps your heavy whipping cream whip up beautifully. i mean, who doesn’t love a good fluffy cloud of cream, right?
Another little hack? don’t just slap some sugar in there and call it a day! mix in that powdered sugar gently with the heavy cream first, then whip it to soft peaks.
This allows for even sweetness without those annoying gritty bits. and speaking of sweetness, feel free to taste as you go! a dash more of sugar or a splash of vanilla can make all the difference.
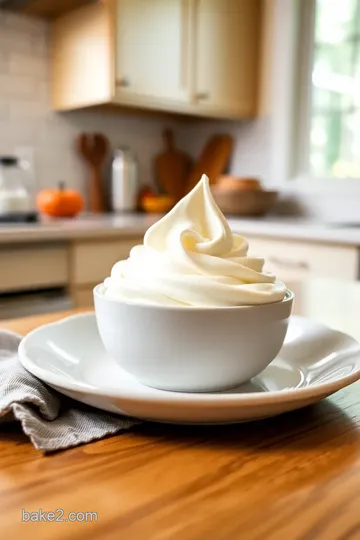
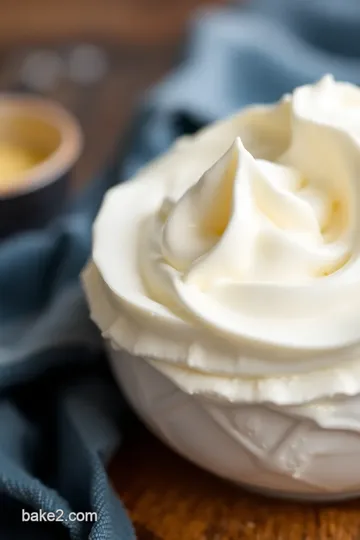
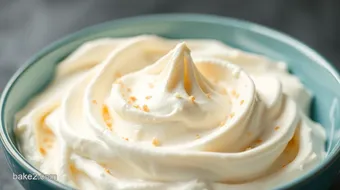
Just keep an eye on it; no need to over-whip. once you see stiff peaks, stop. you want that light and fluffy dessert , not butter!
Perfect Presentation
Now, on to presentation! because let’s be honest—eating with your eyes first is a real thing. for plating techniques , i like to use a piping bag with a star tip.
It gives that pro look and is super easy! just swirl some whipped cream over your dessert, and boom, you’re fancy!
Garnish ideas? oh man, endless possibilities! fresh berries are classic, or even a drizzle of chocolate sauce can elevate things.
For those instagrammable moments, consider mixing a bit of colorful fruit with your cream. a romantic pink from strawberries or a vibrant splash of blue from blueberries makes it pop!
Storage & Make-Ahead
Let’s talk storage. if you can’t finish it all (though, how?), you can keep your homemade whipped cream in the fridge for up to 2 hours .
Just cover it and try not to beat the cream again when you pull it out. if you need to store it longer, consider making whipped cream stabilization a priority.
An easy way? just add a tablespoon of cornstarch before whipping. it keeps that dreaminess intact for about a day or two!
Reheating? Not needed. Just enjoy your cream fresh! But if you must, be careful; it’s all about keeping it smooth, not melty.
Creative Variations
Now, here’s where the fun really begins! feeling adventurous? try a chocolate whipped cream by mixing in cocoa powder. i once made this for a party, and let me tell you, it was the star of the night.
Got some seasonal flavors in mind? cinnamon or nutmeg can really spice things up, especially in the fall.
And hey, for my dairy-free friends, you can totally swap out that heavy cream for coconut cream ! Gives a festive tropical vibe, perfect for holiday desserts.
Complete Nutrition Guide
You know the drill—let’s break down the numbers. each serving of our fluffy whipped cream packs about 50 calories . low on those carbs too, coming in at a mere 1 gram .
Just remember, it’s about balance. so, if you drizzle it over fresh fruits or layer it on cakes, you’re adding a fun texture without losing sight of your healthy goals.
Expert FAQ Solutions
Okay, before you dash off to whip some cream, let’s tackle some common questions. one hiccup i often hear is about getting that cream to whip properly.
If you feel it’s not coming together, just give it more time. the key is persistence—keep that mixer going!
Another hot tip? you can use flavored extracts like almond or mint instead of vanilla for that extra twist. and about those diet modifications? swap in your favorite dairy-free option and voila! you still get the delightful experience of your favorite desserts.
Wrapping It Up
So there you have it, folks! whether you're adding that whipped cream for cakes or just dolloping it on fresh berries, it’s your new best friend in the kitchen.
With all these tips and tricks, you’re set to whip heavy cream for quick, sweet treat in no time.
Now go out there, make those easy dessert toppings , and wow your friends and family! remember, cooking is about having fun.
So whip it up, taste it, and enjoy every bite. you got this!
Fluffy Whipped Cream: Your Secret to Decadent Desserts Card
⚖️ Ingredients:
- 1 cup heavy cream (240 ml)
- 2 tablespoons powdered sugar (25 g)
- 1 teaspoon pure vanilla extract (5 ml)
🥄 Instructions:
- Step 1: Place the mixing bowl and beaters in the refrigerator for about 10-15 minutes to chill.
- Step 2: Add the heavy cream, powdered sugar, and vanilla extract to the chilled bowl.
- Step 3: Use an electric mixer on medium-high speed or a whisk to begin whipping the cream.
- Step 4: Whip until soft peaks form (the cream should hold a peak when the beaters are lifted).
- Step 5: Increase the mixer speed to high; whip until stiff peaks form (cream should stand tall and not collapse).
- Step 6: Taste the whipped cream and adjust sweetness if desired by adding more sugar.
- Step 7: Use immediately or store in the refrigerator for up to 2 hours, covered.
Previous Recipe: How to Bake Milk-Free Cupcakes: Joyful Treats for Every Celebration!
Next Recipe: How to Make Melted Marshmallow Rice Krispies Treats Delight: The Ultimate Sweetness